
The holiday season is officially upon us, and if there is one character that embodies the spirit of festive fun, it is the Grinch. Whether you are hosting a Whoville-themed party or just snuggling up for a movie marathon, these Grinch Crinkle Cookies are the ultimate treat. I’m Sophie, and I have spent the last few weeks perfecting this recipe in my kitchen. After testing this specific batch over 9 times, I can confidently say this is the most foolproof version you will find. We are using a clever cake mix hack that ensures a soft, pillowy texture every single time. These cookies aren’t just a dessert; they are a conversation starter that brings a little bit of Dr. Seuss magic to your dessert table.
Why You’ll Love This Recipe
You are going to absolutely adore these cookies because they strike the perfect balance between effort and impact. First, the cake mix base means you don’t have to worry about measuring out flour, leavening agents, or salt—it’s all balanced for you. Second, the vibrant green color against the stark white powdered sugar creates a stunning visual contrast that pops on any holiday platter. Finally, it is a fantastic recipe for kids to help with. Rolling the dough balls in “snow” (powdered sugar) and placing the “growing heart” sprinkle is a core holiday memory in the making. If you love festive bakes, you should also check out our Stuffed Red Velvet Cookies for another colorful holiday option.
What Is A Grinch Crinkle Cookie?
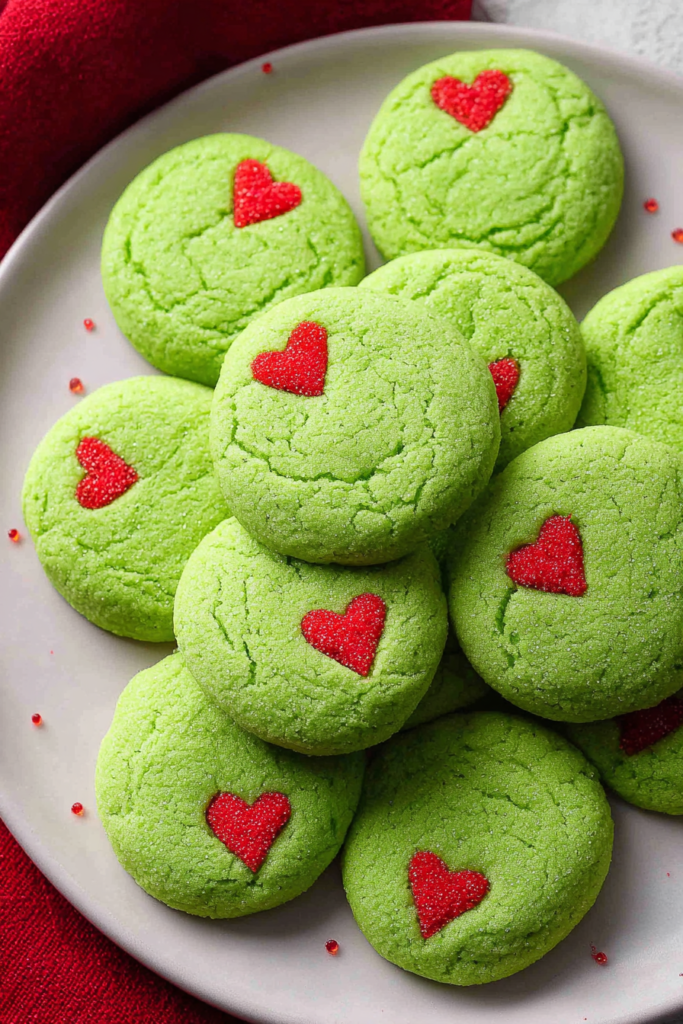
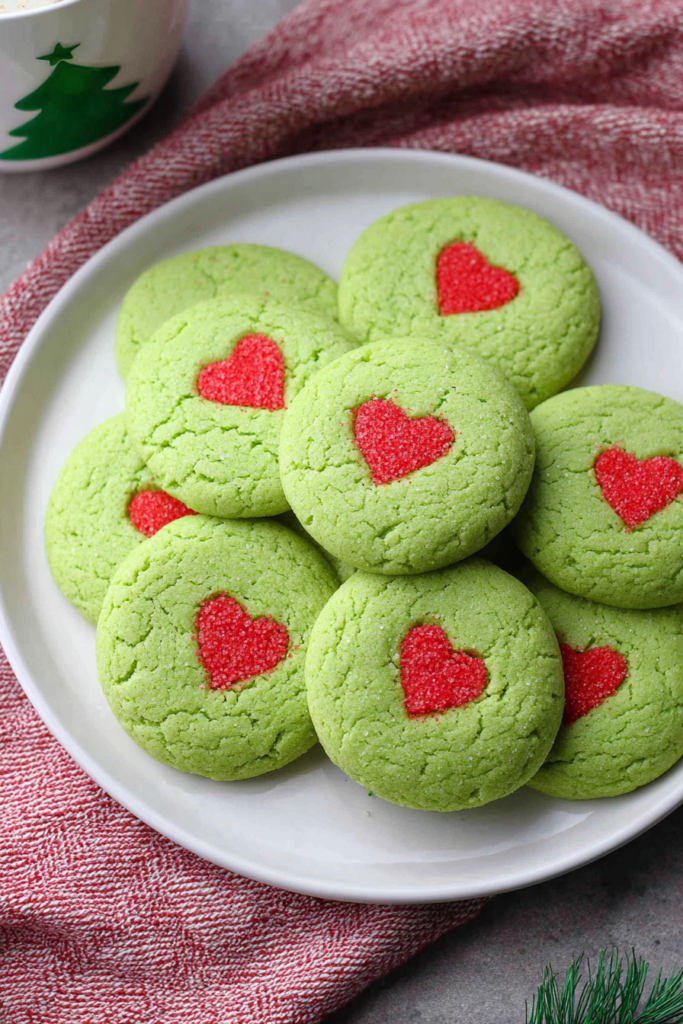
A Grinch Crinkle Cookie is a festive riff on the classic chocolate crinkle cookie. Traditionally, crinkle cookies are fudge-like cookies rolled in powdered sugar; as they bake, the dough expands and cracks, creating a beautiful “crinkled” or “snow-capped” mountain effect. For this version, we swap the cocoa for a bright green hue to represent the Grinch himself. The defining feature is the single red heart sprinkle placed on the cookie, symbolizing the moment the Grinch’s heart grew three sizes. It’s a whimsical, sweet, and slightly nostalgic treat that captures the essence of Christmas redemption in every bite.
Ingredients Overview
To get that perfect “Grinchy” look and taste, we use a few specific ingredients that make all the difference:
- Vanilla Cake Mix: This acts as our dry base. It provides a consistent crumb and a sweet, nostalgic flavor that pairs perfectly with the sugar coating.
- Large Eggs: Essential for binding. Since we are using cake mix, the eggs provide the structure needed to turn a cake batter into a sturdy cookie dough.
- Vegetable Oil: This is the secret to a moist, chewy cookie. Unlike butter, which can make cookies crisp, oil keeps them soft for days.
- Green Gel Food Coloring: This is non-negotiable! Gel coloring is highly concentrated, meaning you get that neon “Grinch” green without adding excess liquid that would ruin the dough’s consistency.
- The Sugar Duo: We use both granulated and powdered sugar. Rolling in granulated sugar first prevents the powdered sugar from melting into the dough, keeping the “crinkle” bright white.
- Red Heart Sprinkles: These are the finishing touch. They represent the heart of the story.
If you enjoy the combination of salty and sweet, you might also like our Peanut Butter Nutella Cookie Recipe.
Ingredient Substitutions & Tips
While this recipe is designed for simplicity, there are ways to customize it. If you cannot find vanilla cake mix, a White Cake Mix or even a Lemon Cake Mix works beautifully—the latter adds a nice citrus zing that cuts through the sweetness. For the oil, you can substitute melted coconut oil for a subtle tropical flavor, though it may make the cookies slightly firmer. If you are looking for a dairy-free option, most standard boxed cake mixes are surprisingly dairy-free, but always check the label. If you want a more decadent experience, try adding a half cup of white chocolate chips to the dough for an extra creamy bite, similar to our White Chocolate Stuffed Cookies.
Step-by-Step Instructions
- Prepare the Dough: Start by emptying your vanilla cake mix into a large mixing bowl. Add the two large eggs and the vegetable oil. Use a sturdy spatula to mix until no dry streaks remain.
- Color the Magic: Add 1/4 teaspoon of green gel food coloring. Fold it into the dough until the color is uniform. You want a vibrant, slightly neon green.
- The Chill Factor: This is the most important step! Cover the bowl with plastic wrap and let it sit in the refrigerator for at least 30 minutes. This firms up the fats and makes the dough much easier to handle.
- Prep the Station: Preheat your oven to 350°F (175°C). Line two large baking sheets with parchment paper or silicone mats. Set out two small bowls: one with granulated sugar and one with powdered sugar.
- Roll and Coat: Using a 1-inch cookie scoop, portion out the dough. Roll it into a smooth ball between your palms. Roll the ball in the granulated sugar first, then generously in the powdered sugar.
- Bake: Place the balls on the baking sheet about 2 inches apart. Bake for exactly 12 minutes. The edges should look set, but the centers will still look a little soft.
- The Final Touch: As soon as you pull the cookies out of the oven, gently press a red heart sprinkle into the upper right corner of each cookie while they are still warm and soft.
- Cooling: Allow them to sit on the hot pan for 5 minutes before transferring to a wire rack to cool completely.
Expert Baking Tips
After 9 rounds of testing, here are my top “pro” secrets:
- The Double-Sugar Method: Many people skip the granulated sugar, but don’t! The granulated sugar absorbs the moisture from the dough so the powdered sugar stays white and doesn’t turn yellow or disappear during baking.
- Gel vs. Liquid: Never use liquid food coloring for these. It will make the dough too sticky and thin, and you won’t get that iconic crinkle.
- Don’t Overbake: These cookies will look slightly underdone when you pull them out. That is okay! They will firm up as they cool, leaving you with a soft, brownie-like texture.
The Ultimate Grinch Movie Night
To truly elevate these cookies, I recommend serving them during a “Grinch Movie Night.” We like to set up a hot cocoa bar featuring “Grinch Cocoa” (white hot chocolate with a drop of green food coloring) and a side of these crinkle cookies. You can even serve them alongside a platter of green grapes and strawberries (the “Grinch’s fruit”). It’s a wonderful way to bring the family together during the busy holiday season. These cookies also make excellent gifts; simply stack them in a clear cellophane bag tied with a red ribbon for a festive “Whoville” treat.
Serving Suggestions
Serve these cookies on a white or red platter to make the green color pop. They pair exceptionally well with a cold glass of milk or a peppermint latte. If you are bringing them to a cookie exchange, print out a small “Grinch” quote to place next to the plate—it always gets a smile! For a fancy touch, you can even serve them alongside a scoop of vanilla bean ice cream for a “Crinkle Cookie Sundae.”
Storage & Make-Ahead Tips
These cookies stay fresh and soft in an airtight container at room temperature for up to 5 days. If you want to make them ahead of time, you can freeze the unbaked dough balls (after rolling in both sugars) on a tray, then transfer to a bag. When you’re ready to bake, just add 2 minutes to the baking time. Already baked cookies can be frozen for up to 3 months—just be careful not to knock off the heart sprinkles!
FAQs
Q: My cookies didn’t crinkle. What happened?
A: Usually, this means the dough was too warm or the oven wasn’t preheated enough. Make sure to chill the dough for the full 30 minutes and check your oven temperature with a thermometer.
Q: Can I use a different flavored cake mix?
A: Absolutely! Chocolate cake mix works for “Dark Grinch” cookies, but the green color won’t show up. Stick to light-colored mixes like vanilla, white, or yellow for the best visual results.
Q: Where can I find the red heart sprinkles?
A: Most craft stores or large supermarkets carry them in the holiday baking aisle. If you can’t find them, a small red M&M or a dot of red icing also works in a pinch.
Q: Can I make these gluten-free?
A: Yes! Simply swap the standard cake mix for a gluten-free vanilla cake mix. The ratios for eggs and oil remain the same.
Final Thoughts
These Grinch Crinkle Cookies are more than just a sweet treat—they are a holiday tradition waiting to happen. With their vibrant color, soft texture, and that iconic little red heart, they perfectly capture the joy of the season. Whether you are an experienced baker or a beginner, this cake mix hack ensures success every time. Happy baking, and may your heart (and your cookie platter) be full this Christmas!
PrintGrinch Crinkle Cookies Recipe
Grinch crinkle cookies are soft, pillowy holiday cookies made with a vanilla cake mix base, rolled in powdered sugar, and finished with a signature red heart sprinkle. This easy, kid-friendly recipe delivers vibrant green color, perfect crinkles, and a festive Grinch-inspired look every time.
- Prep Time: 15 minutes
- Cook Time: 12 minutes
- Total Time: 57 minutes
- Yield: 24 cookies
- Category: Desserts
- Cuisine: American
Ingredients
Vanilla cake mix – 1 box (standard size)
Large eggs – 2
Vegetable oil – ⅓ cup
Green gel food coloring – ¼ teaspoon (or as needed)
**For Rolling**
Granulated sugar – ¼ cup
Powdered sugar – ¾ cup
**Decoration**
Red heart sprinkles
Instructions
**Prepare the Dough**
Add cake mix, eggs, and vegetable oil to a large bowl. Mix until a thick dough forms with no dry spots.
**Color the Dough**
Add green gel food coloring and mix until evenly colored and vibrant.
**Chill**
Cover and refrigerate the dough for at least 30 minutes to firm it up for rolling.
**Prepare for Baking**
Preheat oven to 350°F. Line baking sheets with parchment paper. Set out bowls of granulated sugar and powdered sugar.
**Roll and Coat**
Scoop 1-inch portions of dough. Roll into balls, coat first in granulated sugar, then generously in powdered sugar.
**Bake**
Place cookies 2 inches apart and bake for 12 minutes until edges are set and tops are crinkled.
**Add the Heart**
Immediately press a red heart sprinkle into each warm cookie.
**Cool**
Let cookies cool on the baking sheet for 5 minutes before transferring to a wire rack.
Notes
• Always roll in granulated sugar before powdered sugar for bright white crinkles.
• Use gel food coloring only; liquid coloring makes dough too soft.
• Do not overbake—cookies will firm up as they cool.
• White or lemon cake mix can be used as a substitute.
• Dough balls can be frozen and baked later with 2 extra minutes added.


