
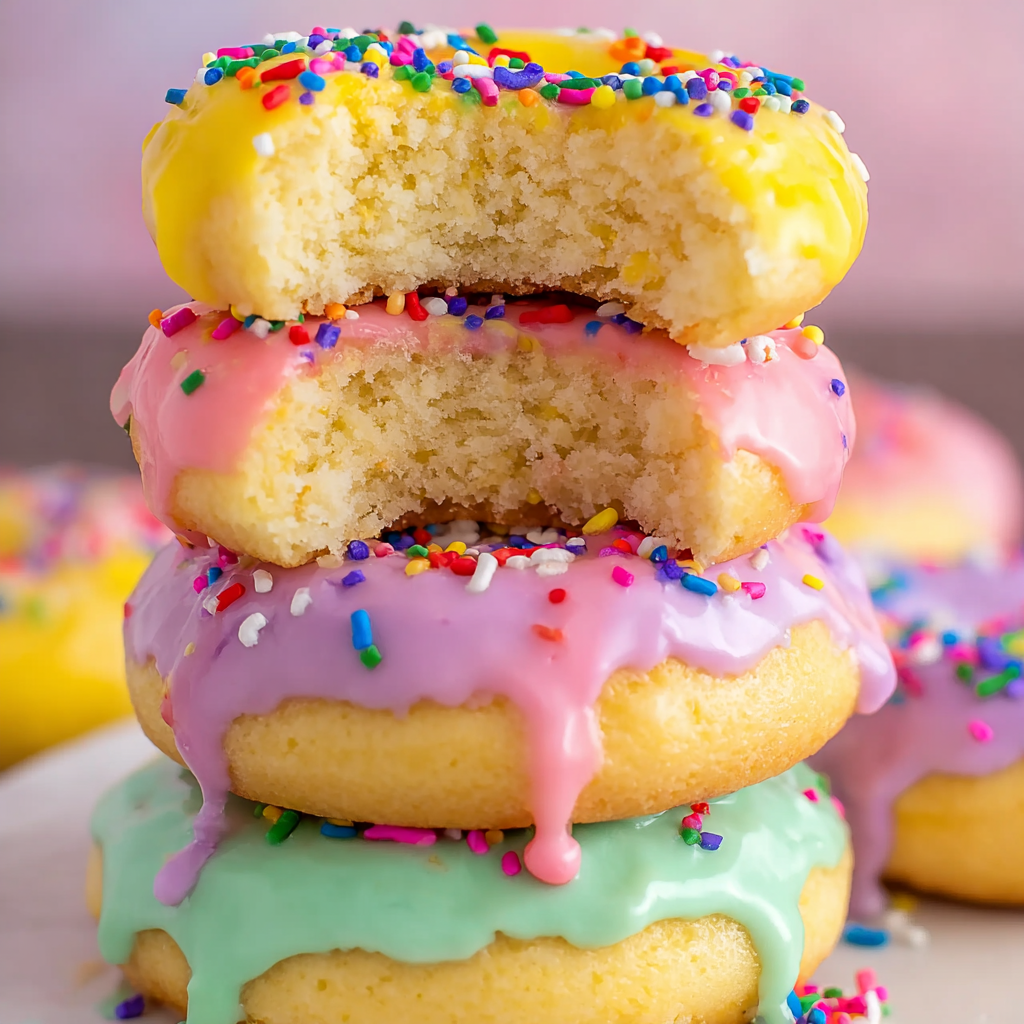
When the first hints of spring air begin to circulate, my kitchen inevitably begins to smell like a traditional Italian bakery. There is something deeply nostalgic and soul-warming about Italian Easter Cookies, also known as Anginetti or Uncinetti. These aren’t your standard crispy sugar cookies; they are remarkably soft, almost cake-like in texture, and carry a sophisticated hint of almond and vanilla. Topped with a vibrant, high-shine pastel glaze and a generous dusting of rainbow sprinkles, they represent the joy and renewal of the season. Whether you grew up with a Nonna who hand-twisted these every April or you’re looking to start a new family tradition, this foolproof recipe delivers that authentic, melt-in-your-mouth experience that has made these cookies a staple of Mediterranean celebration tables for generations.
Why You’ll Love This Recipe
You will absolutely fall in love with these cookies because they strike the perfect balance between simplicity and elegance. First, the texture is unparalleled—soft, pillowy, and thick, reminiscent of a dense muffin but in a portable cookie form. Second, unlike many traditional doughs, this recipe requires zero refrigeration time, meaning you can go from mixing bowl to oven in less than twenty minutes. The addition of light corn syrup in the icing ensures a professional, high-gloss finish that stays beautiful even after the glaze sets. Finally, they are incredibly versatile; while we use almond and vanilla here, they serve as a perfect canvas for anise, lemon, or orange flavorings.
What Is An Italian Easter Cookie?
The Italian Easter Cookie is a traditional festive treat found throughout Southern Italy, particularly in regions like Campania and Sicily. Historically, these cookies were often flavored with anise (black licorice flavor), but modern variations frequently utilize almond or lemon extracts to appeal to broader palates. They are characterized by their unique shapes—usually knots or rings—which symbolize infinity or the crown of thorns. Unlike the American “sugar cookie,” the Italian version is less sweet in the base, relying on the sugary glaze for its hit of sweetness. This makes them a favored accompaniment to a strong cup of espresso or a glass of dessert wine during Easter brunch.
Ingredients Overview
To achieve the perfect “Anginetti” texture, the quality and temperature of your ingredients are paramount.
For the Cookie Base:
- Unsalted Butter: Ensure it is at room temperature to allow for proper aeration during the creaming process.
- Granulated Sugar: Provides just enough sweetness without making the dough heavy.
- Eggs: Using room-temperature eggs ensures the emulsion doesn’t break when added to the butter.
- Extracts: A combination of vanilla and almond creates a complex, “bakery-style” aroma.
- All-Purpose Flour: This provides the structure. Sifting it ensures a light, airy crumb.
- Baking Powder: The primary leavening agent that gives these cookies their signature “puff.”
- Whole Milk: A splash of milk adds moisture, contributing to that sought-after doughy interior.
For the Icing:
- Powdered Sugar: The base of our smooth glaze.
- Light Corn Syrup: This is the “secret” ingredient for a professional shine and a soft bite that doesn’t shatter.
- Gel Food Coloring: Gel is superior to liquid coloring as it provides vibrant pastel hues without thinning out the icing consistency.
Ingredient Substitutions & Tips
If you find yourself missing an ingredient, there are several ways to adapt this recipe without losing its essence. For those who aren’t fans of almond, Anise Extract is the most traditional substitution and provides a nostalgic, licorice-like flavor. If you need a dairy-free option, you can substitute the butter with a high-quality vegan butter stick and use oat milk in place of whole milk. While all-purpose flour is standard, a 1:1 gluten-free baking flour (containing xanthan gum) works surprisingly well here due to the soft nature of the cookie. For the glaze, if you don’t have corn syrup, you can omit it, but be aware the finish will be matte rather than glossy.
Step-by-Step Instructions
Creating these cookies is a tactile and rewarding process. Follow these steps for the best results:
1. Preparation and Creaming:
Start by preheating your oven to 350°F. In a large mixing bowl, beat the room-temperature butter and granulated sugar together. Use a medium-high speed for about 3-4 minutes until the mixture is pale and fluffy. This step is crucial for incorporating air.
2. Incorporating Liquids:
Add your eggs one at a time, ensuring each is fully incorporated before adding the next. Pour in the vanilla and almond extracts. Don’t be alarmed if the mixture looks slightly curdled or separated at this stage; the addition of flour will bring it all together.
3. The Dry Mix:
In a separate bowl, sift together your flour, baking powder, and salt. Sifting is non-negotiable here if you want that “pillowy” texture.
4. Alternating Addition:
With your mixer on low, add half of the milk, then half of the flour. Repeat with the remaining milk and flour. Mix only until the white streaks of flour disappear. Overmixing will develop gluten and make the cookies tough.
5. Shaping the Dough:
The dough will be slightly sticky. Lightly flour your hands and your work surface. Use a 1.5-tablespoon scoop to portion the dough. Roll each portion into a 6-inch log. For a “knot,” simply tie the log gently. For a “donut,” join the ends together.
6. Baking:
Place the cookies on a parchment-lined sheet. Bake for exactly 9 minutes. The tops will look pale, and the bottoms should be just barely golden. Transfer to a wire rack immediately.
7. Glazing:
Once completely cool, whisk your icing ingredients. The consistency should be like thick glue. Dip the tops, let the excess drip, and immediately top with sprinkles before the glaze sets.
Expert Baking Tips
The most common mistake with Italian Easter cookies is overbaking. Because these cookies are pale, many bakers wait for the tops to brown—by then, the cookie is overdone and dry. Trust the 9-minute mark! Another tip involves the shaping process: do not overwork the dough with your hands. The warmth from your palms can melt the butter in the dough, leading to a flatter cookie. Use a light touch when rolling your logs. Finally, when coloring your glaze, use a toothpick to add gel coloring. A little goes a long way, and for Easter, you want soft, “springtime” pastels rather than neon colors.
The Cultural Significance of Italian Easter Baking
In Italy, the period leading up to Pasqua (Easter) is a marathon of baking. These cookies are more than just a dessert; they represent the end of Lenten sacrifice. Historically, the circular shape of the Anginetti symbolized the unity of the family and the cycle of life. In many households, the Sunday before Easter is dedicated to a “cookie-making day,” where multiple generations gather to roll, twist, and glaze hundreds of these treats. They are traditionally gifted to neighbors and friends in colorful tins, acting as a sweet gesture of community and shared celebration.
Serving Suggestions
These cookies are best served on a large platter where their varied pastel colors can truly shine. They are the ultimate “dipping” cookie—try serving them alongside a steaming cup of cappuccino or a glass of cold milk. For an adult twist, they pair beautifully with a sweet Vin Santo or a chilled Moscato. Because they aren’t overly sweet, they also make a great addition to an Easter brunch spread alongside savory items like quiche or glazed ham.
Storage & Make-Ahead Tips
To maintain that signature softness, store the cookies in an airtight container at room temperature. They will stay fresh for 4–5 days. If you are making them ahead of time, I recommend baking the cookies and storing them un-glazed. You can freeze the naked cookies for up to a month. When ready to serve, thaw them at room temperature and apply the fresh glaze. Once glazed, do not stack them until the icing has completely hardened (usually about 2 hours).
FAQs
Why are my Italian Easter cookies dry?
Dryness is almost always caused by adding too much flour during the shaping process or overbaking. Use the minimum amount of flour needed to handle the dough, and pull them out of the oven while they still look pale.
Can I use liquid food coloring instead of gel?
You can, but liquid coloring adds extra moisture, which can make your glaze too runny. If using liquid, you may need to add an extra tablespoon or two of powdered sugar to compensate.
Do I have to use corn syrup in the icing?
No, it’s optional. However, corn syrup prevents the icing from becoming brittle and gives it a beautiful, professional sheen that mimics a high-end bakery look.
What is the best way to get the “knot” shape?
Think of it like tying a loose shoelace. Don’t pull the dough tight, or it won’t have room to expand and puff in the oven. A loose “overhand knot” is perfect.
Baking a batch of these Soft Italian Easter Cookies is a surefire way to bring a little bit of Mediterranean tradition into your home. Their tender crumb and sweet, almond-scented glaze make them an instant favorite for kids and adults alike. Don’t worry about making every knot perfect—the charm of these cookies lies in their rustic, homemade appearance. Once you see those bright sprinkles against the pastel icing, you’ll know that spring has officially arrived in your kitchen!
PrintSoft Italian Easter Cookies Recipe

These Italian Easter cookies are soft and almost dough-y. They melt in your mouth and are sooooo delicious. Almost like a sugar cookie, but soft and pillowy and thick. These were gone in no time in my house.
Ingredients
6 tablespoons unsalted butter, room temperature
1/2 cup granulated sugar
2 large eggs, room temperature
2 teaspoons vanilla extract
1 teaspoon almond extract
2 tablespoons whole milk
2 cups all-purpose flour
2 teaspoons baking powder
1 teaspoon salt
3 cups powdered sugar (Icing)
2–4 tablespoons whole milk (Icing)
2 tablespoons light corn syrup (Icing)
1 teaspoon almond extract (Icing)
gel food coloring, in purple, pink, blue and yellow
rainbow sprinkles
Instructions
1. Preheat oven to 350°F.
2. In a mixing bowl, beat together butter and sugar until creamed.
3. Add eggs one at a time, beating to combine between each.
4. Beat in vanilla and almond extracts. Mixture will be pale yellow and slightly separated.
5. In a separate bowl, sift together flour, baking powder, and salt.
6. Add half of the milk to the butter/sugar mixture, then half of the flour mixture, the remaining milk, and then the remaining flour. Mix just until combined, scraping the bowl as needed.
7. Use a 1 ½ tablespoon cookie scoop to form scoops of dough. Place each scoop of dough on a lightly floured surface and roll into a 6-7” log. Twist the log into a knot for half of the cookies. For the other half of the cookies, form donut shapes by joining the two ends of the log together.
8. Place cookies on a baking sheet lined with parchment paper.
9. Bake for about 9 minutes or until the bottoms of the cookies are just slightly golden brown.
10. Transfer cookies to a cooling rack to cool.
11. Meanwhile, whisk together all of the icing ingredients to form a smooth glaze. Divide the glaze between four bowls and add a tiny drop of gel food coloring to each bowl.
12. Dip a cooled cookie into the glaze; hold it above the bowl for a few seconds to allow the excess glaze to drip off. Place on a sheet of parchment paper and sprinkle with nonpareils. Leave untouched until glaze sets.
Notes
Cookies will keep in an airtight container, on the countertop, for 4-5 days. Freeze for up to 1 month.
Try not to overwork the dough. It is nice and thick and does not need to be refrigerated.
Don’t add a lot of extra flour while forming the shapes – it will make the cookies tough.
I used Americolor gel food coloring in: Lilac, Fuschia, Sky Blue, and Lemon Yellow.


