
There is something profoundly nostalgic about a classic lemon meringue pie. It’s the centerpiece of summer potlucks and the crowning glory of Sunday dinners. But let’s be honest: traditional pie can be a bit of a hassle to serve. Between the fragile crust and the potential for a messy “weeping” meringue, it isn’t exactly the most portable dessert. Enter the Lemon Meringue Pie Bar.
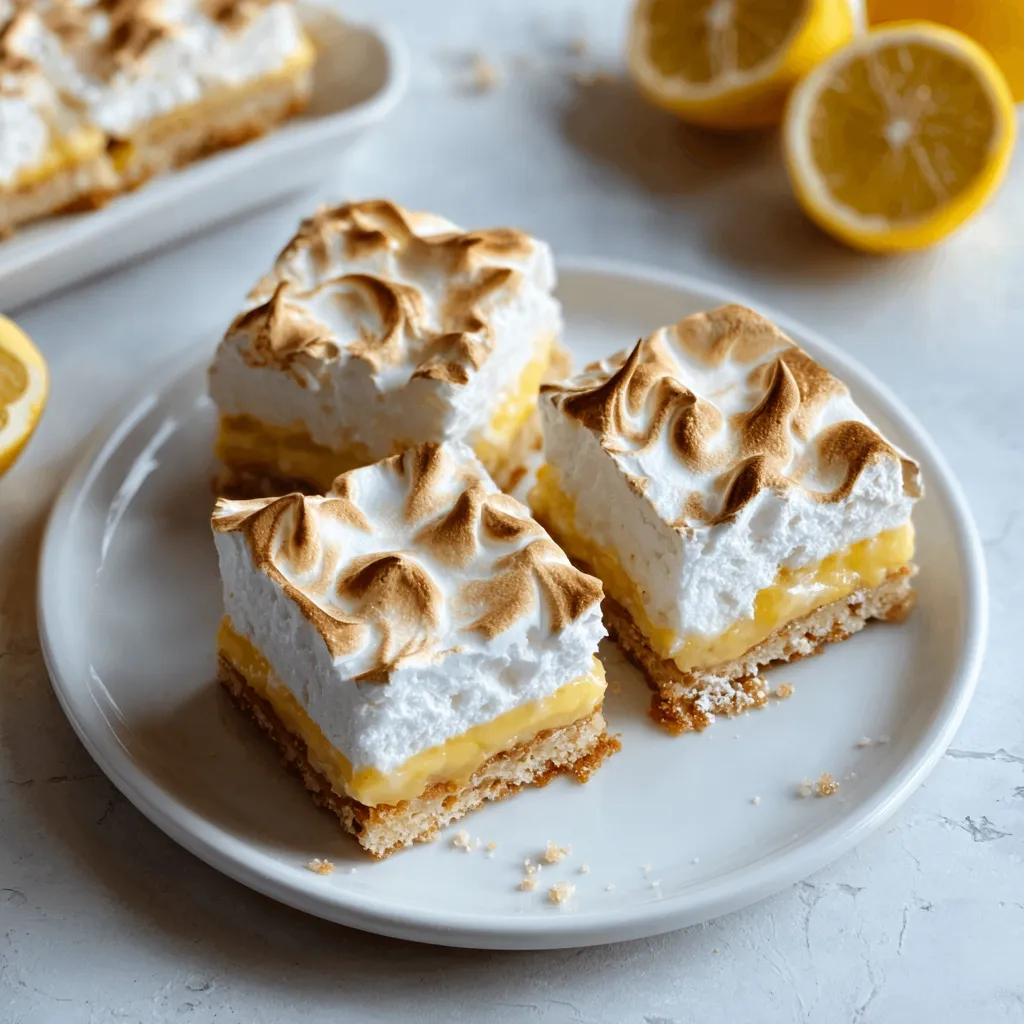
These bars take everything you love about the original—the buttery, crumbly crust, the sharp and tangy citrus curd, and the cloud-like, toasted topping—and pack it into a sturdy, hand-held square. Whether you are hosting a garden party, looking for a bright addition to a bake sale, or simply craving the sunshine-in-a-bite flavor of fresh lemons, this recipe delivers professional-level results with a fraction of the stress.
Why You’ll Love This Recipe
You’re going to fall in love with these Lemon Meringue Pie Bars for several reasons. First, the balance of textures is unmatched. You have the crunch of the shortbread, the silkiness of the lemon curd, and the airy lightness of the meringue. Second, they are inherently portable. Unlike a pie that requires a plate and fork, these bars can be picked up and enjoyed anywhere.
Furthermore, this recipe is a fantastic way to practice your pastry skills. It’s a “gateway” recipe that teaches you the basics of shortbread, custard-making, and meringue stabilization without the high stakes of a full pie. Most importantly, the flavor is explosive. By using fresh lemon juice and zest, you achieve a level of brightness that store-bought desserts simply cannot replicate.
What Is a Lemon Meringue Pie Bar?
Essentially, a Lemon Meringue Pie Bar is a deconstructed and reconstructed version of the classic 19th-century American dessert. Traditional lemon meringue pie consists of a pastry crust, a lemon custard filling made from egg yolks, sugar, and lemon, and a meringue topping made from whipped egg whites and sugar.
By turning it into a “bar,” we swap the traditional flaky pie crust for a more robust shortbread base. This shortbread is pressed into a square pan, providing a stable foundation that holds up the weight of the curd and meringue. The result is a dessert that retains the sophisticated flavor profile of a formal pie but offers the convenience and approachability of a cookie or brownie. It’s the best of both worlds—elegance meets efficiency.
Ingredients Overview
To achieve the best results, every ingredient in this recipe plays a vital role.
- All-Purpose Flour & Powdered Sugar: These form the base of our shortbread. Using powdered sugar instead of granulated sugar in the crust yields a finer, more melt-in-your-mouth texture.
- Unsalted Butter: This provides the richness and fat necessary to bind the crust. Ensure it is softened but not melted to get that perfectly crumbly consistency.
- Granulated Sugar & Cornstarch: These are the backbone of the lemon curd. The cornstarch acts as a thickening agent, ensuring the bars are sliceable and don’t “ooze” when cut.
- Egg Yolks & Egg Whites: We separate the eggs to use the yolks for richness and color in the curd, while the whites are whipped into the airy meringue.
- Fresh Lemon Juice & Zest: Do not use the bottled stuff! Fresh juice provides the acidity and floral notes essential for a high-quality bar. The zest contains the essential oils that pack the most citrus punch.
- Cream of Tartar: This is the secret weapon for a stable meringue. It’s an acid that helps the egg white proteins bond together, preventing the meringue from collapsing or “weeping” moisture onto the filling.
Ingredient Substitutions & Tips
If you find yourself missing an ingredient, don’t panic! You can substitute the all-purpose flour for a 1-to-1 gluten-free baking blend with great success. If you don’t have cream of tartar, a half-teaspoon of lemon juice or white vinegar can help stabilize your egg whites in a pinch.
For those who want an even deeper citrus flavor, try using Meyer Lemons. They are sweeter and more aromatic than standard Eureka lemons. If you want to get creative, you can even swap half the lemon juice for lime juice to create a “Citrus Medley” bar. One tip: always zest your lemons before you juice them. It is nearly impossible to zest a deflated, squeezed lemon half!
Step-by-Step Instructions
1. The Shortbread Base
Start by preheating your oven to 350°F (175°C). In a medium mixing bowl, combine the flour, powdered sugar, and softened butter. Use a pastry cutter or your clean fingertips to work the butter into the dry ingredients until the mixture looks like coarse crumbs. Press this mixture firmly and evenly into the bottom of a greased 8×8-inch baking dish. Bake for 15 minutes. You want the edges to be just barely turning a pale golden brown.
2. Crafting the Lemon Curd
While the crust is in the oven, it’s time to make the filling. In a medium saucepan, whisk together the granulated sugar, cornstarch, and water. Set this over medium heat and stir constantly. You will notice the mixture turn from a cloudy white to a translucent, thick gel. Once it has thickened, remove it from the heat.
Temper your beaten egg yolks by adding a small spoonful of the hot sugar mixture into the yolks and whisking quickly. This prevents the eggs from scrambling. Then, slowly pour the tempered yolks back into the saucepan along with the lemon juice and zest. Return to the heat and cook for 2 more minutes, stirring vigorously. The result should be a bright, glossy, and thick lemon custard.
3. Assembling and Finishing
Pour that luscious lemon filling directly over the hot crust. Return the pan to the oven for 10 minutes. This “pre-bakes” the filling so it sets properly. While that’s happening, beat your egg whites and cream of tartar in a spotlessly clean bowl until soft peaks form. Gradually add sugar if desired and continue beating until the peaks are stiff and glossy.
Spread the meringue over the hot lemon filling, making sure to spread it all the way to the edges of the pan—this “seals” the meringue and prevents it from shrinking. Bake for another 10-15 minutes until the peaks are a beautiful toasted brown.
Expert Baking Tips
To ensure your Lemon Meringue Pie Bars are a success every time, follow these expert tips. First, temperature matters. Use room-temperature egg whites for the meringue; they will whip up much faster and reach a higher volume than cold whites.
Second, avoid humidity. Meringue is essentially a sugar sponge, and it will absorb moisture from the air. If it’s a very rainy day, your meringue might become “weepy” or sticky. Finally, cleanliness is key. When whipping egg whites, even a tiny speck of fat or egg yolk in the bowl will prevent the whites from stiffening. Use a glass or stainless steel bowl wiped with a bit of lemon juice to ensure it is completely grease-free.
How to Achieve the Perfect Meringue
The meringue is often the most intimidating part of this recipe, but it doesn’t have to be. The key is “The Seal.” When you spread the whipped egg whites over the lemon filling, ensure the meringue touches the sides of the baking dish all the way around. This anchors the meringue so it doesn’t pull away from the edges as it cools.
Additionally, don’t over-beat your whites. You are looking for “stiff peaks,” which means when you lift the whisk, the foam stands straight up without drooping. If the mixture starts to look grainy or dry, you’ve gone too far. If this happens, you can sometimes “fix” it by adding one more fresh egg white and whisking briefly until it becomes glossy again.
Serving Suggestions
Once the bars have cooled completely (this is crucial for clean slices!), you can cut them into 16 squares. For an extra touch of elegance, garnish each bar with a tiny sprig of fresh mint or a very thin half-slice of lemon. These bars pair beautifully with a cold glass of iced tea or a crisp glass of Prosecco. If you’re feeling indulgent, serve them alongside a dollop of extra whipped cream or a few fresh raspberries to cut through the tartness.
Storage & Make-Ahead Tips
Lemon Meringue Pie Bars are best enjoyed the day they are made, as the meringue is at its peak texture. However, you can store leftovers in the refrigerator for up to two days. Do not cover them tightly with plastic wrap, as this will cause the meringue to liquefy and become sticky; instead, use a deep container that doesn’t touch the top of the bars. These do not freeze well, as the meringue texture will change significantly upon thawing.
FAQs
1. Why did my meringue pull away from the edges?
This usually happens if the meringue wasn’t “sealed” to the crust or the sides of the pan. Make sure the egg whites touch the edges of the baking dish to anchor them in place.
2. How do I prevent “weeping” (beads of moisture on the meringue)?
Weeping is often caused by putting the meringue on a cold filling. By spreading the meringue over the lemon curd while it is still hot from the oven, you effectively cook the bottom of the meringue, creating a stable bond.
3. Can I use a torch instead of the oven for the meringue?
Absolutely! If you prefer a more dramatic, charred look, you can skip the final 10-minute bake and use a kitchen blowtorch to brown the peaks of the meringue.
4. Can I make these bars gluten-free?
Yes. Simply substitute the 1 cup of all-purpose flour in the crust for a high-quality 1-to-1 gluten-free flour blend. The lemon filling and meringue are naturally gluten-free.
5. My lemon filling didn’t set. What happened?
This usually means the cornstarch wasn’t cooked long enough to reach its full thickening potential. Ensure the mixture is bubbling and translucent before adding the egg yolks.
Lemon Meringue Pie Bars are a triumphant celebration of citrus. They offer a sophisticated, multi-layered experience that is surprisingly simple to achieve at home. By following the steps of tempering your eggs and properly sealing your meringue, you’ll create a dessert that looks like it came from a high-end bakery. Bright, tart, and perfectly sweet, these bars are guaranteed to be the star of your next gathering. Happy baking!
PrintLemon Meringue Pie Bars

A delicious and portable version of the classic Lemon Meringue Pie. These bars feature a crisp shortbread base, a tart lemon curd center, and a sky-high toasted meringue top. Perfect for potlucks and spring celebrations.
- Prep Time: 20 minutes
- Cook Time: 40 minutes
- Total Time: 60 minutes
- Yield: 16 bars
- Cuisine: American
Ingredients
All-purpose flour – 1 cup
Powdered sugar – 1/4 cup
Unsalted butter, softened – 1/2 cup
Granulated sugar – 3/4 cup
Cornstarch – 1/4 cup
Water – 1 cup
Large egg yolks, beaten – 3
Fresh lemon juice – 1/2 cup
Lemon zest – 1 tablespoon
Large egg whites – 3
Cream of tartar – 1/4 teaspoon
Instructions
Preheat oven to 350°F (175°C) and grease an 8×8-inch baking dish.
In a medium bowl, mix flour, powdered sugar, and softened butter until crumbly.
Press the mixture firmly into the bottom of the prepared dish.
Bake for 15 minutes or until the edges are very lightly golden.
In a saucepan, combine granulated sugar, cornstarch, and water.
Cook over medium heat, stirring constantly, until the mixture thickens and becomes translucent.
Slowly stir in beaten egg yolks, lemon juice, and lemon zest.
Cook for an additional 2 minutes, whisking constantly to ensure the yolks don’t scramble.
Pour the lemon filling over the warm crust and bake for 10 minutes.
While the filling bakes, beat egg whites and cream of tartar in a clean bowl until soft peaks form.
Gradually add a few tablespoons of sugar (optional) and beat until stiff, glossy peaks form.
Spread the meringue over the hot lemon filling, sealing the edges to the sides of the pan.
Bake for 10-15 minutes until the meringue is golden brown.
Allow to cool completely at room temperature before chilling and slicing.
Notes
• Ensure your egg whites are at room temperature for maximum volume in the meringue.
• Use a clean metal or glass bowl for beating whites; plastic bowls often retain grease that prevents fluffing.
• Zest the lemons before juicing them for easier handling.
• Dip your knife in hot water and wipe clean between slices for perfect, clean cuts.


