
There is something truly whimsical about a recipe that does the heavy lifting for you. If you’ve ever made a “Magic Cake,” you know the drill: you mix up one simple batter, pop it in the oven, and through the science of density and heat, it transforms into distinct, beautiful layers.

This Magic Lemon Pie (often called an Old-Fashioned Lemon Sponge Pie) is exactly that. It’s a vintage heirloom recipe that has graced Sunday dinner tables for generations. With a bright, puckering citrus punch and a texture that straddles the line between a silky custard and a light-as-air chiffon cake, it is the ultimate “wow” dessert for lemon lovers.
Whether you’re looking for a refreshing summer treat or a bright spot in the middle of winter, this pie delivers. Best of all? It uses basic pantry staples like eggs, flour, and sugar. No fancy equipment or hard-to-find ingredients required!
Why You’ll Love This Magic Lemon Pie
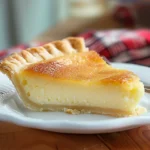
- Two Textures in One: You get a gooey, decadent lemon curd-like custard on the bottom and a fluffy, golden sponge cake on top.
- Simple Ingredients: If you have lemons and eggs, you’re halfway there.
- Perfect Balance: It’s tart enough to be refreshing but sweet enough to satisfy that dessert craving.
- Pinterest-Worthy Slices: When you cut into this pie, the clear separation of layers looks professional and impressive.
- Vintage Charm: This is one of those “Grandma’s kitchen” recipes that never goes out of style.
Ingredient Notes for the Perfect Set
To get that “magic” separation, the quality and temperature of your ingredients matter. Here is what you need to know:
- The Eggs (The Secret Ingredient): You will need 3 large eggs. The most important step in this entire recipe is separating the yolks from the whites. The whites provide the lift for the sponge layer, while the yolks create the creamy custard base. Pro tip: Room temperature egg whites whip up much better than cold ones!
- Lemon Juice: Please, if you can, use fresh lemons! You’ll need about 2 to 3 large lemons to get 2/3 cup of juice. The flavor of fresh citrus is incomparable to the bottled stuff, which can sometimes have a bitter aftertaste.
- The Milk: Whole milk is recommended for the richest custard. You can use 2%, but avoid skim milk as the custard may not set as firmly.
- The Crust: You can absolutely use a store-bought refrigerated crust to save time. However, if you have a favorite buttery homemade pastry recipe, this is the time to use it. Just make sure it’s a deep-dish 9-inch plate!
Step-by-Step Instructions
1. Prepare the Foundation
Start by preheating your oven to 350°F (175°C). Roll out your pie crust and fit it into a 9-inch pie plate. I highly recommend placing the pie plate on a baking sheet. Not only does this make it easier to transfer to the oven, but it catches any potential spills. Crimp the edges to make it look pretty!
2. The Fluffy Egg Whites
In a clean, dry large mixer bowl, beat your 3 egg whites. You want to reach “stiff peaks”—this means when you lift the beaters, the points of the whites stand straight up without drooping. Be careful not to over-beat them until they look dry or grainy. Set these aside.
3. The Lemon Base
In another bowl, beat the egg yolks with the lemon juice and milk. Once incorporated, slowly add the sugar, flour, and salt. Beat this until it is completely smooth. It will look quite thin and liquidy—don’t worry, that’s normal!
4. The “Magic” Fold
This is where the magic happens. Gently fold the lemon yolk mixture into the stiff egg whites. Use a spatula and a “cut and turn” motion. You want to get rid of large white lumps, but you don’t want to deflate all the air. The resulting batter will look foamy and light.
5. Bake to Perfection
Pour the batter into your prepared crust. It will likely fill the crust right to the brim. Carefully slide the baking sheet into the oven. Bake for 45 to 50 minutes. You are looking for a beautiful golden brown top and a slight jiggle in the center (it will firm up as it cools).
6. The Long Wait (Cooling)
This is the hardest part! You must let the pie cool completely on a wire rack, then move it to the refrigerator for at least two hours. This chilling time allows the custard layer to fully set so you get those clean, beautiful slices.
Expert Tips for Best Results
- Clean Your Bowl: When whipping egg whites, ensure your bowl and beaters are completely free of grease or yolk. Even a drop of fat will prevent the whites from fluffing up.
- Don’t Rush the Cooling: If you cut the pie while it’s warm, the custard layer will be runny. It’s still delicious, but you’ll lose that distinct “magic” layering.
- Zest it Up: If you want an extra punch of lemon, add a tablespoon of fresh lemon zest to the yolk mixture.
- The Baking Sheet Trick: Always bake custard pies on the lower middle rack to ensure the bottom crust gets cooked through without burning the top.
Variations and Substitutions
- Gluten-Free: You can swap the 1/3 cup of all-purpose flour for a 1:1 gluten-free flour blend. Since it’s a small amount, it won’t affect the structure too much.
- Meyer Lemons: For a sweeter, more floral flavor, use Meyer lemons. You may want to reduce the sugar by 2 tablespoons if using these.
- Lime Version: You can turn this into a “Magic Lime Pie” by substituting the lemon juice with fresh lime juice. It’s equally refreshing!
Storage and Freezing
- To Store: Because this pie contains milk and eggs, it must be stored in the refrigerator. Cover it loosely with plastic wrap or foil. It will stay fresh for up to 3–4 days.
- To Freeze: I do not recommend freezing this pie. The delicate sponge layer can become soggy, and the custard layer may weep or become grainy upon thawing.
FAQ
Why did my pie not separate into layers?
This usually happens if the egg whites weren’t whipped to stiff peaks or if they were folded in too vigorously. The air bubbles in the whites are what cause the “sponge” to float to the top!
Can I use a graham cracker crust?
While traditional Magic Lemon Pie uses a pastry crust, a graham cracker crust works too! Just be aware that the liquid batter might soften the crumbs more than a flour crust.
Is the custard layer supposed to be soft?
Yes! It should be a soft, creamy custard, similar to the consistency of a lemon curd or a very soft pudding. It shouldn’t be rubbery like a flan.
A Bright and Cheery Conclusion
This Magic Lemon Pie is a testament to the fact that you don’t need a pantry full of specialized ingredients to make something spectacular. It’s the perfect ending to a heavy meal, providing a light, citrusy “palate cleanser” feel. Serve it with a dollop of homemade whipped cream and a few berries for a dessert that looks just as good as it tastes.
Give this vintage classic a try this weekend—your family will love watching the “magic” unfold!
PrintLemon Pie
An old-fashioned ‘magic’ dessert where one batter separates into a luscious lemon custard layer and a delicate sponge cake top.
- Prep Time: 20
- Cook Time: 50
- Total Time: 70
- Yield: 8 servings
- Method: Baking
- Cuisine: American
Ingredients
1 pie crust (homemade or store bought)
3 large eggs (separated yolks and whites)
2/3 cup lemon juice (fresh preferred)
1 cup whole milk
1 1/2 cups granulated sugar
1/3 cup all-purpose flour
1/4 tsp salt
Instructions
1. Preheat oven to 350 degrees. Roll your dough out and place into a 9 inch pie plate. Place pie plate on top of a baking sheet. Crimp edges. If using a pre-made crust, thaw before using.
2. Beat egg whites in a large mixer bowl until stiff peaks form but not dry, set aside.
3. Beat egg yolks, add the lemon juice and milk and beat until well incorporated. Add sugar, flour and salt; beat until smooth.
4. Fold lemon mixture into egg whites, making sure that there are no lumps of egg white left in batter or white streaks.
5. Pour into pastry-lined pie plate sitting on top of a baking sheet. Bake until golden brown, 45 to 50 minutes.
6. Cool the pie down completely and refrigerate for a couple hours to let the filling set. Serve with sweetened whipped cream if desired.
Notes
Ensure your egg whites are at room temperature for maximum volume.
Do not over-fold the batter; a few tiny white wisps are better than a deflated sponge.
Fresh lemon juice provides the best ‘zing’ compared to bottled.


