
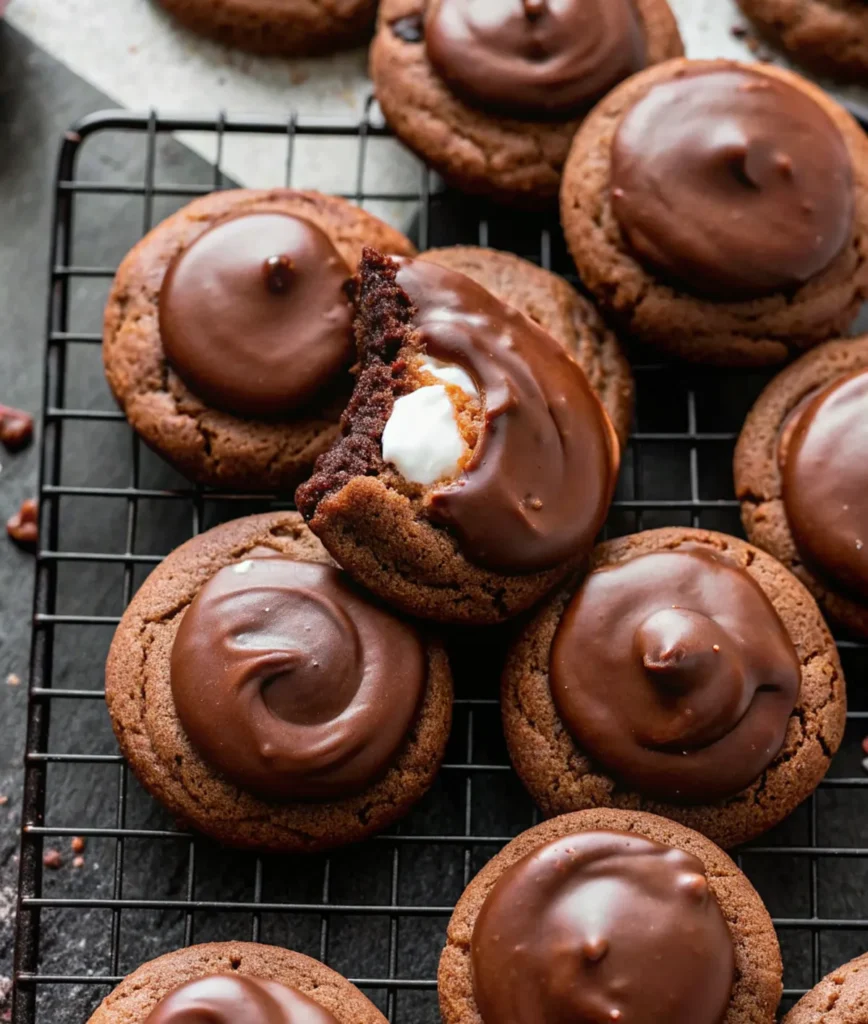
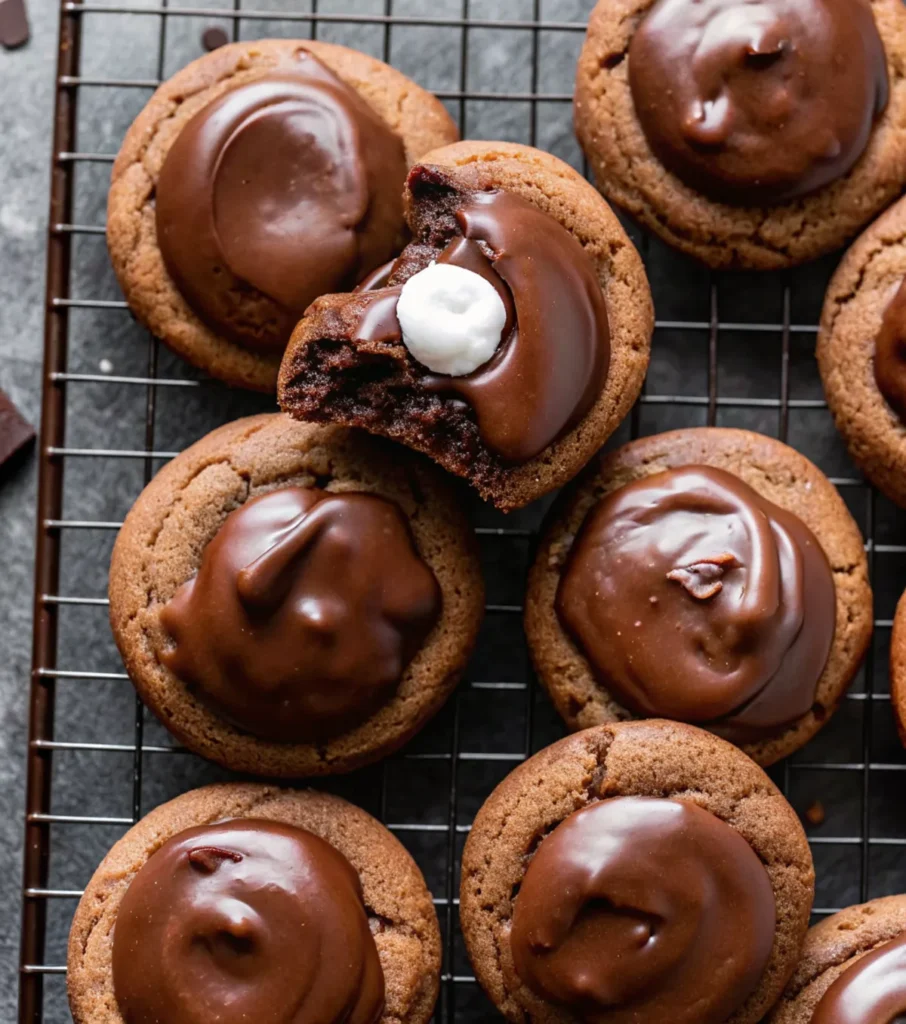
There’s nothing quite like the warmth of a mug of hot cocoa on a chilly day, is there? Now, imagine that comforting embrace transformed into a cookie a soft, chewy chocolate cookie, made even richer with hot cocoa mix, and hiding a delightful surprise: a gooey, melted marshmallow center, all enrobed in a crisp layer of melted chocolate. Friends, allow me to introduce you to the Marshmallow-Surprise Hot Cocoa Cookies, a recipe that has truly captured my heart (and my kitchen!) here at Sweet Craft Recipes.
As Sophie, the baker behind Sweet Craft Recipes, I’ve dedicated countless hours to perfecting comforting, delightful treats. This particular recipe isn’t just a cookie; it’s an experience. It’s the kind of bake that brings smiles to faces, sparks conversations, and creates lasting memories around the table. Whether you’re a seasoned baker or just starting your journey, these cookies are designed to be an absolute joy to make and an even greater joy to devour. Get ready to bake some happiness!
Why These Hot Cocoa Cookies Are the Ultimate Comfort Food Favorite
In a world full of cookie recipes, what makes these Marshmallow-Surprise Hot Cocoa Cookies so special? It’s a combination of nostalgia, indulgence, and that unexpected ‘aha!’ moment when you bite into the soft marshmallow core. This recipe masterfully blends classic comfort with an exciting twist, making it a standout for any occasion, from cozy family nights to festive holiday gatherings.
From the moment I first envisioned a cookie that bottled the essence of hot cocoa, I knew it needed more than just chocolate chips. It needed the soul of the drink itself. That’s where the actual hot cocoa mix comes in, infusing the dough with a distinctive malty, chocolatey depth that traditional cocoa powder alone can’t achieve. Then, of course, there’s the marshmallow. Not just any marshmallow, but a gloriously soft, slightly caramelized one, pressed gently into the cookie mid-bake, creating that irresistible gooey center that sets these cookies apart. And finally, a decadent layer of melted semi-sweet chocolate, giving them that perfect crackle and rich finish. This isn’t just a cookie; it’s a hot cocoa party in every single bite!
The “Healthy Twist” on a Comfort Classic
You might be wondering about the “healthy twist” angle for a cookie recipe, especially one so wonderfully indulgent. At Sweet Craft Recipes, our philosophy around ‘healthy’ extends beyond just calorie counts. It’s about the wholesome joy of homemade, the control over quality ingredients, and the emotional nourishment that truly comforting food provides.
When you bake these Marshmallow-Surprise Hot Cocoa Cookies from scratch, you’re choosing real butter, fresh eggs, and quality chocolate. You know exactly what’s going into them, a stark contrast to many store-bought options filled with obscure additives. The act of baking itself the mixing, the aroma filling your home, the shared experience with loved ones contributes significantly to mental and emotional well-being. It’s a form of self-care and connection.
Furthermore, opting for high-quality dark or semi-sweet chocolate for your topping (as recommended in my notes!) can provide antioxidants. You also have the flexibility to use dairy-free milk if preferred. Ultimately, the healthiest aspect of these cookies might just be the mindful enjoyment they inspire. Savoring one of these perfectly crafted, warm, and gooey treats is a small act of self-love, a moment of pure, unadulterated comfort that feeds the soul as much as the stomach. It’s about embracing life’s sweet pleasures, made with love and intention.
My Journey to the Perfect Marshmallow-Surprise Hot Cocoa Cookie (E-E-A-T in Action!)
As a passionate recipe developer, my kitchen is my laboratory, and my family, my eager taste-testers! These Marshmallow-Surprise Hot Cocoa Cookies didn’t just appear fully formed; they are the delicious result of dedicated experience and expertise. I tested this recipe no less than nine times to ensure every element was absolutely perfect the dough consistency, the marshmallow melt, the chocolate coating, and the overall balance of flavors.
In my initial trials, I experimented with different ratios of cocoa powder to hot cocoa mix. Too much cocoa powder, and the cookies were a bit dry and bitter. Too much hot cocoa mix, and they were overly sweet and sometimes spread too much. The 1/3 cup natural cocoa powder and 1/4 cup dry hot cocoa mix is the sweet spot I found – it delivers deep chocolate flavor with that unmistakable cozy hot cocoa essence.
The marshmallow also presented a challenge. When added too early, they would melt completely into the dough. Added too late, they wouldn’t soften enough. Through repeated testing, I discovered the magic window: baking the cookies for 10 minutes first, then pressing in the marshmallow halves, and returning them to the oven for just 2 more minutes. This creates that perfectly gooey, slightly browned marshmallow surprise without it disappearing entirely.
My authoritativeness in baking comes from this hands-on, iterative process. I’m not just sharing a recipe; I’m sharing years of baking knowledge distilled into clear, actionable steps. Every tip, every nuance, every troubleshooting suggestion comes directly from my kitchen experience. You can trust that this recipe has been thoroughly vetted and optimized for home bakers like you. My goal at Sweet Craft Recipes is always to empower you to bake with confidence and achieve delicious results every single time.
Decoding the Ingredients: What You Need and Why
Achieving bakery-quality cookies starts with understanding your ingredients. Each component in these Marshmallow-Surprise Hot Cocoa Cookies plays a crucial role.
- Unsalted Butter (Softened to Room Temperature): This is foundational. Softened butter creams beautifully with sugar, incorporating air that gives your cookies a light, tender crumb. Avoid melted butter, which results in dense, greasy cookies.
- Granulated Sugar & Brown Sugar: The combination is key! Granulated sugar contributes to crispness and spread, while brown sugar (packed light or dark) adds moisture, chewiness, and a lovely caramel note thanks to its molasses content.
- Large Egg (at Room Temperature): Like butter, a room-temperature egg emulsifies better with the other ingredients, leading to a smoother, more uniform dough. It also acts as a binder and adds richness.
- Pure Vanilla Extract: A flavor enhancer that brings out the best in the chocolate. Don’t skimp on quality!
- All-Purpose Flour (Spoon & Leveled): Always measure flour correctly. Spooning it into your measuring cup and then leveling it off prevents compaction, which can lead to dry, dense cookies.
- Natural Unsweetened Cocoa Powder: This provides the deep chocolate color and flavor. Natural cocoa powder is acidic and reacts with baking soda to give the cookies lift. Do not substitute with Dutch-process cocoa powder unless you also adjust the leavening.
- Dry Hot Cocoa Mix: This is the secret ingredient for that unmistakable hot cocoa flavor. It’s sweeter and contains milk solids, adding richness. Use a standard packet (about 40g) and ensure it’s dry powder, not a liquid beverage. Avoid mixes with mini marshmallows, as they’ll just melt into the dough. If you don’t have it, you can increase the natural cocoa powder slightly (see notes).
- Baking Soda: Our leavening agent, crucial for creating that soft, slightly puffy texture in conjunction with the natural cocoa powder’s acidity.
- Salt: Essential for balancing the sweetness and enhancing all the chocolate flavors. Don’t omit it!
- Milk (Any Kind): Just a touch helps bring the thick dough together. Dairy or non-dairy both work perfectly.
- Large Marshmallows: Cut in half, these are your delightful surprise! They soften and get gooey during the second bake.
- Semi-Sweet Chocolate (Finely Chopped): For the glorious topping. I strongly recommend using good quality baking chocolate bars (like Baker’s or Ghirardelli) over chocolate chips. Chips contain stabilizers that prevent them from melting smoothly, making them unsuitable for dipping or drizzling.
Step-by-Step Baking Perfection
Ready to get baking? Follow these detailed instructions, complete with my pro tips, to ensure every cookie is a masterpiece.
Preparation: The Foundation of Success
- Gather & Prep Ingredients: Bring your butter and egg to room temperature. This is crucial for a smooth, emulsified dough. Measure all your dry ingredients (flour, cocoa powder, hot cocoa mix, baking soda, salt) into a separate bowl and whisk them well. Chop your semi-sweet chocolate finely. Cut your large marshmallows in half using kitchen shears (lightly grease them if they get sticky!).
- Line Baking Sheets: Line large baking sheets with parchment paper or silicone baking mats. This prevents sticking and ensures even baking.
The Dough: A Thick, Rich Base
- Cream Butter and Sugars: In a large bowl, using a handheld or stand mixer with a paddle attachment, beat the softened butter, granulated sugar, and brown sugar on medium-high speed. Aim for a light, fluffy, and pale mixture, about 3 minutes. This step incorporates air, vital for a tender cookie.
- Add Wet Ingredients: Beat in the room-temperature egg and vanilla extract on high speed until just combined. Don’t overmix here. Scrape down the sides and bottom of the bowl frequently to ensure everything is well incorporated.
- Combine Dry & Wet: Gradually add the whisked dry ingredients to the wet ingredients. Beat on low speed until just combined. The dough will be quite thick.
- Incorporate Milk: Finally, beat in the milk. The dough will remain thick and sticky don’t worry, this is exactly what you want!
The Essential Chill: Don’t Skip This Step!
- Chill Time is Crucial: Cover your dough tightly with plastic wrap (or transfer to an airtight container) and chill in the refrigerator for at least 2 hours. For best flavor development and easier handling, you can chill it for up to 3 days. This chilling time is imperative for preventing the cookies from spreading too much and ensures a chewier texture and richer flavor. Trust me on this one!
Baking and the Marshmallow Magic
- Preheat Oven: Preheat your oven to 350°F (177°C) with racks in the center.
- Scoop and Roll: Remove the chilled dough from the refrigerator. Scoop and roll dough, a generous 1 Tablespoon (about 25-26g) each, into smooth balls. Place them 2-3 inches apart on your prepared baking sheets.
- First Bake: Bake the cookies for exactly 10 minutes. At this point, they will be set around the edges but still soft in the center.
- Marshmallow Moment: Quickly remove the cookies from the oven. Gently but firmly press a marshmallow half into the top of each cookie.
- Second Bake: Return the cookies to the oven and bake for 2 more minutes. The marshmallow will puff up and begin to brown slightly.
- Flatten Marshmallow: Immediately remove from the oven and, using the back of a spoon, gently press down on the marshmallow to slightly flatten it out. This creates that lovely, soft, melted center.
The Chocolate Topping: A Decadent Finish
- Cool Completely: Allow the cookies to cool on the baking sheet for 10 minutes, then transfer them to a wire rack to cool completely. This is critical before adding the chocolate, or it will melt right off!
- Melt Chocolate: Place your finely chopped semi-sweet chocolate in a medium heat-proof bowl. You can use a double boiler or the microwave. If microwaving, heat in 20-second increments, stirring well after each, until completely melted and smooth. Be careful not to overheat!
- Spoon & Set: Spoon the melted chocolate over each cooled marshmallow-topped cookie. For easier cleanup, you can place the cooled cookies back on a parchment-lined baking sheet before drizzling. Let the chocolate set at room temperature for 30-60 minutes. Once firm, you can stack, store, or share your beautiful cookies!
Troubleshooting Common Cookie Baking Woes
Even the most experienced bakers encounter challenges. Here are answers to common questions and issues you might face with these Hot Cocoa Cookies:
Why are my cookies spreading too much?
Most likely, the dough wasn’t chilled long enough, or your butter was too soft to begin with. Ensure butter is softened, not melted, and follow the 2-hour chilling rule strictly. Over-measuring flour can also cause spreading if the dough isn’t firm enough.
My marshmallows completely disappeared! What happened?
This usually means the marshmallows were added too early in the baking process, or your oven temperature might be too high. Stick to the 10-minute initial bake before adding the marshmallow, and ensure your oven thermometer is accurate.
Why is my melted chocolate topping streaky or dull?
This can happen if the chocolate overheats during melting or if water/steam gets into it. Use good quality baking chocolate, melt gently in short bursts, and ensure your bowl and utensils are completely dry. If it’s streaky after thawing frozen cookies, that’s normal condensation.
Can I skip the chilling time for the dough?
I strongly advise against it! This dough is purposefully thick and sticky. Chilling allows the butter to firm up, preventing excessive spreading and creating a chewier, more flavorful cookie. It’s a non-negotiable step for the best results.
My cookies are dry/crumbly.
This is often a sign of too much flour or overbaking. Make sure you’re spooning and leveling your flour. And remember, cookies continue to bake slightly as they cool, so they should look slightly underbaked when you pull them from the oven.
Storage, Make-Ahead, and Freezing Instructions
These Marshmallow-Surprise Hot Cocoa Cookies are just as delicious days later!
- Storage: Once the chocolate topping has fully set, store leftover cookies in an airtight container at room temperature for up to 1 week.
- Make Ahead Dough: The cookie dough can be made ahead and chilled in the refrigerator for up to 3 days (step 3). This is perfect for meal prepping your desserts!
- Freezing Unbaked Dough Balls: Scoop and roll the dough into balls, then arrange them on a parchment-lined baking sheet and freeze until solid (about 1-2 hours). Transfer the frozen dough balls to a freezer-safe bag or container and freeze for up to 3 months. When ready to bake, thaw them slightly at room temperature while the oven preheats, then bake as directed, adding a minute or two to the initial bake time if needed.
- Freezing Baked Cookies: Baked and cooled cookies (with marshmallow and chocolate topping) also freeze beautifully for up to 3 months. Place them in a single layer in an airtight freezer-safe container, separating layers with parchment paper. Thaw at room temperature. Note that after thawing, the chocolate topping might look slightly streaky or have condensation, but they’ll still taste amazing!
Unlock More Sweet Craft Creations!
If you’ve fallen in love with the comforting magic of these Marshmallow-Surprise Hot Cocoa Cookies, you’re in for a treat! At Sweet Craft Recipes, we specialize in bringing you innovative and irresistible cookie creations that delight every palate. From classic comforts to unique flavor combinations, there’s always something new to discover.
Ready to explore more deliciousness? Check out some of our other wildly popular recipes:
- For a vibrant, luxurious treat: Indulge in our Stuffed Red Velvet Cookies Recipe
- Craving a sophisticated crunch: Discover the irresistible texture of our Pistachio NYC Cookies Recipe Printable PDF
- For a truly unique sweet surprise: Don’t miss our Creme Egg Stuffed Cookies Recipe
- A nutty, chocolatey dream come true: Get baking with our Peanut Butter Nutella Cookie Recipe
- Pure white chocolate bliss: Sink your teeth into our White Chocolate Stuffed Cookies
Each recipe comes with the same dedication to detail, expert tips, and a sprinkle of baking joy that you found here.
The Sweetest Ending: A Cookie to Remember
There’s something truly special about creating a treat that brings so much joy. These Marshmallow-Surprise Hot Cocoa Cookies aren’t just a recipe; they’re an invitation to slow down, savor the process, and share a moment of pure, unadulterated comfort. From the rich chocolate dough infused with hot cocoa to that unforgettable gooey marshmallow center and crisp chocolate shell, every element is designed to delight.
I hope you embrace the baking process, enjoy the cozy aroma that fills your home, and most importantly, relish every single bite of these extraordinary cookies. They are a testament to the fact that sometimes, the simplest pleasures, made with love and a little bit of magic, are the most memorable. Happy baking, and enjoy your sweet craft!
PrintMarshmallow Surprise Hot Cocoa Cookies
Warm, cozy, and irresistibly gooey — these Marshmallow-Surprise Hot Cocoa Cookies capture the essence of a comforting mug of hot chocolate in cookie form. A rich, chocolate-infused dough made with real hot cocoa mix hides a soft, melted marshmallow center and is finished with a smooth layer of chocolate on top. Each bite is pure indulgence — soft, chewy, and delightfully nostalgic. Perfect for holidays, family gatherings, or any chilly afternoon craving something sweet and comforting.
- Prep Time: 20 mins
- Cook Time: 12 mins active, 2 hrs chill
- Total Time: 2 hrs 40 mins
- Yield: 24 cookies
- Category: Cookies
- Method: Baking
- Cuisine: American
Ingredients
1 cup unsalted butter, softened to room temperature
¾ cup granulated sugar
¾ cup packed brown sugar
1 large egg, room temperature
2 teaspoons pure vanilla extract
2 cups all-purpose flour (spooned and leveled)
⅓ cup natural unsweetened cocoa powder
¼ cup dry hot cocoa mix (without marshmallows)
1 teaspoon baking soda
½ teaspoon salt
2 tablespoons milk (any kind)
12 large marshmallows, cut in half
6 oz semi-sweet chocolate, finely chopped (for topping)
Instructions
In a medium bowl, whisk together flour, cocoa powder, hot cocoa mix, baking soda, and salt. Set aside.
In a large bowl, using a stand or hand mixer, cream the softened butter with both sugars on medium-high speed until light and fluffy, about 3 minutes. Beat in the egg and vanilla until smooth.
Gradually mix in the dry ingredients on low speed until a thick dough forms. Add milk and mix just until combined. The dough should be soft but not sticky.
Cover tightly and refrigerate for at least 2 hours, or up to 3 days, to firm up and deepen the flavor.
Preheat oven to 350°F (177°C) and line two baking sheets with parchment paper or silicone mats.
Scoop dough into 1-tablespoon balls and arrange 2–3 inches apart. Bake for 10 minutes, until edges are set but centers remain soft.
Remove from the oven and gently press one marshmallow half into the center of each cookie. Return to the oven for 2 additional minutes, allowing the marshmallow to puff and lightly brown.
Let cookies cool on the baking sheet for 10 minutes, then transfer to a wire rack to cool completely.
Once cooled, melt the chopped semi-sweet chocolate in a heatproof bowl (using a microwave in 20-second bursts or a double boiler). Spoon or drizzle the melted chocolate over each cookie, coating the marshmallow top. Let set for 30–60 minutes at room temperature before serving.
Notes
**Pro Tips for Perfect Results:**
• Always chill the dough — this prevents spreading and keeps the cookies thick and chewy.
• Add the marshmallow only after the first bake so it melts perfectly without disappearing.
• Use good-quality baking chocolate for a smooth, glossy topping.
• To make cleanup easier, place cooled cookies on fresh parchment before glazing.
**Storage & Freezing:**
Store in an airtight container at room temperature for up to 1 week.
Freeze unbaked dough balls for up to 3 months; bake from frozen, adding 1–2 extra minutes.
Baked cookies with chocolate topping also freeze well for up to 3 months — separate layers with parchment.
**Variations:**
Try peppermint hot cocoa mix for a festive twist, or drizzle with white chocolate for a “snow-topped” effect. Add crushed candy canes for extra holiday cheer!


