
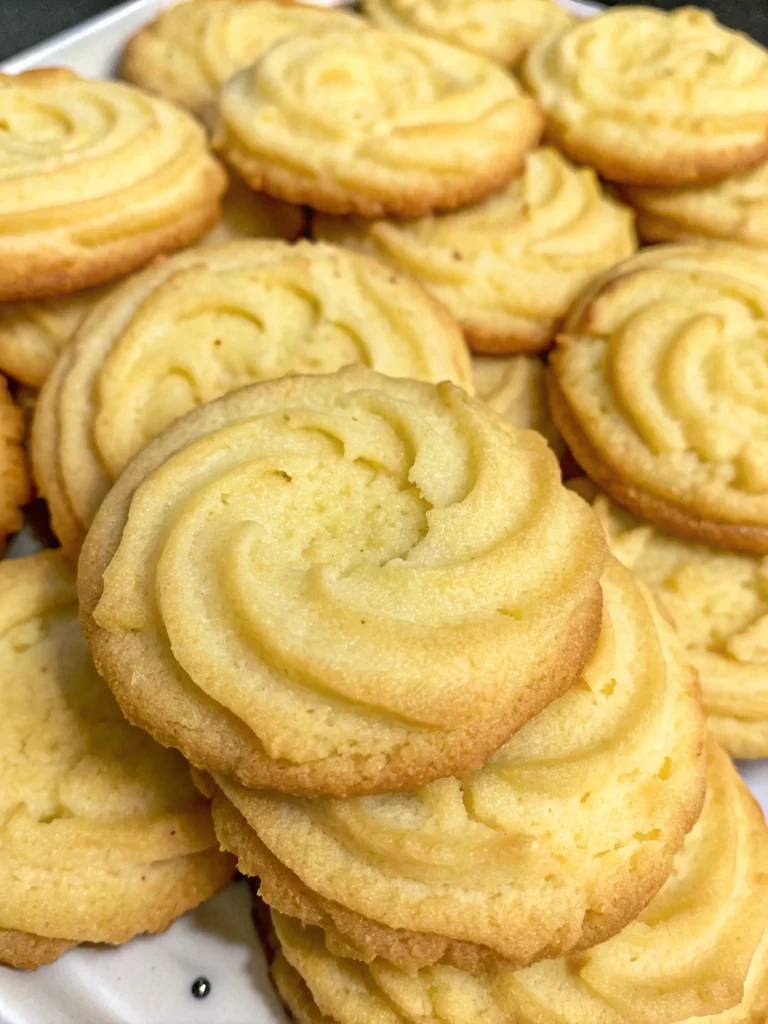
There’s a certain magic in a perfectly baked butter cookie. That moment it dissolves on your tongue, leaving behind a rich, creamy sweetness – it’s pure comfort. As a home cook who believes in the power of simple, honest ingredients, I’ve dedicated countless hours to perfecting classic recipes. And let me tell you, these butter cookies are a testament to that dedication.
I’m Sophie, and these aren’t just any butter cookies; this is a recipe I’ve personally tested, tweaked, and fallen in love with over nine times (and counting!). Every crumb, every swirl, every buttery note has been refined to ensure you get the most exquisite, melt-in-your-mouth experience possible right from your own kitchen. Whether you’re a seasoned baker or just starting your culinary journey, these easy butter cookies are designed for success.
Forget the days of dry, crumbly, or overly dense cookies. My method guarantees a delicate texture, an irresistible buttery richness, and a cookie that’s beautiful enough for any special occasion but simple enough for an everyday treat. They’re a true comfort-food favorite that brings warmth and joy, transforming simple ingredients into something extraordinary. Ready to bake some bliss? Let’s dive in!
Why These Homemade Butter Cookies Are an Absolute Must-Make
In a world full of complex desserts, the simple elegance of a classic butter cookie recipe often gets overlooked. But these aren’t just any classic cookies; they’re designed to be the best you’ve ever made, offering distinct advantages that set them apart:
- Unrivaled Melt-in-Your-Mouth Texture: Thanks to the precise balance of cake flour and cornstarch, these cookies boast an incredibly delicate crumb that practically melts the moment it touches your tongue. They’re never tough or dry, always tender and ethereal.
- Rich, Authentic Buttery Flavor: Using high-quality unsalted butter is key here. This recipe truly lets the pure, sweet flavor of butter shine through, creating a depth of taste that store-bought cookies simply can’t match. It’s a taste of pure nostalgia and simple indulgence.
- Easily Customizable & Versatile: While delightful on their own, these delicate butter cookies are a fantastic canvas for various customizations. Dip them in chocolate, add a sprinkle of sea salt, or incorporate citrus zest for a twist. They’re also perfect for gifting, cookie exchanges, or simply elevating your afternoon tea.
- Tested for Success (by Sophie!): As I mentioned, I’ve personally baked and perfected this recipe over nine times. This means I’ve anticipated common pitfalls and woven in expert tips to guide you every step of the way, ensuring your baking journey is smooth and rewarding. You can trust that these instructions are clear, concise, and proven to work.
- A Healthier Homemade Alternative: While butter cookies are an indulgence, making them at home gives you full control over the ingredients. You know exactly what goes into them – no strange additives, preservatives, or excessive amounts of highly processed sugars often found in store-bought varieties. It’s a wholesome approach to a sweet treat, allowing for mindful enjoyment.
These homemade butter cookies aren’t just a dessert; they’re an experience. They’re about creating moments of joy, sharing something delicious with loved ones, and rediscovering the simple pleasures of baking from scratch.
Essential Ingredients for Perfect Butter Cookies
The beauty of this butter cookie recipe lies in its simplicity. High-quality ingredients are paramount for achieving that signature melt-in-your-mouth texture and rich flavor. Let’s break down each component and its role:
- Cake Flour (125g): This is a secret weapon for tenderness! Cake flour has a lower protein content than all-purpose flour, which results in a softer, more delicate crumb. If you absolutely can’t find cake flour, you can substitute with all-purpose flour, but be aware the cookies might be slightly chewier.
- Cornstarch (15g): Works hand-in-hand with cake flour to enhance tenderness and create that delicate, almost powdery texture we crave in classic butter cookies. It also helps prevent the cookies from spreading too much.
- Unsalted Butter (110g, softened): The star of the show! Unsalted butter allows you to control the salt content in your recipe. It needs to be softened – not melted – for proper creaming with the sugar. This means it should give slightly when pressed but still hold its shape. Cold butter won’t cream properly, and melted butter will lead to greasy, spreading cookies.
- Caster Sugar (60g): Also known as superfine sugar, caster sugar dissolves more easily and incorporates better into the butter, contributing to a smoother dough and a fine-textured cookie. Granulated sugar can be used, but your cookies might have a slightly coarser texture.
- Vanilla Extract (1 Tsp): A classic flavor enhancer that complements the butter perfectly, adding warmth and depth. Use pure vanilla extract for the best flavor.
- Heavy Cream (1 Tbsp): This tiny addition adds richness and helps create a more pliable dough, making it easier to pipe and contributing to the delicate texture.
- Salt (1/4 tsp): Don’t skip the salt! It balances the sweetness and enhances all the other flavors, bringing out the true essence of the butter.
Always measure your ingredients accurately, especially flour, preferably using a kitchen scale for the most consistent results. This precision is one of the keys to success when baking delicate butter cookies.
Step-by-Step Guide: Crafting Your Own Melt-in-Your-Mouth Butter Cookies
Creating these irresistible cookies is a joyful process. Follow these detailed steps for guaranteed success!
1. Prepare Your Baking Station
- Preheat the oven: Set your oven to 170°C (340°F).
- Line baking trays: Prepare two large baking trays by lining them with parchment paper. This prevents sticking and makes cleanup a breeze. To keep the parchment from sliding, pipe a small dot of cookie dough in each corner of the tray before placing the paper on top – it acts like a sticky anchor!
2. Cream the Butter, Sugar, and Salt
- In a spacious mixing bowl, combine the softened unsalted butter, caster sugar, and salt.
- Using a handheld electric beater (or a stand mixer with a paddle attachment), beat on medium speed until the mixture becomes wonderfully pale and creamy. This typically takes 2-3 minutes. Make sure to pause and scrape down the sides of the bowl with a spatula periodically to ensure everything is evenly combined. This step is crucial for incorporating air and creating a light texture.
3. Incorporate the Wet Ingredients
- Add the vanilla extract and the heavy cream to the creamed butter mixture.
- Beat again briefly, just until these liquids are fully incorporated and the mixture is smooth and cohesive. Avoid overmixing at this stage.
4. Gently Fold in the Dry Ingredients
- Sift the cake flour and cornstarch directly over your butter mixture in the bowl. Sifting prevents lumps and helps distribute the ingredients evenly.
- Using a rubber spatula, carefully fold the dry ingredients into the wet mixture. Mix only until the flour streaks have just disappeared and a soft, cohesive cookie dough forms. The golden rule here is to avoid overmixing! Overmixing develops gluten, which can lead to tough cookies, and we’re aiming for delicate perfection.
5. Prepare for Piping
- Transfer about half of your freshly made cookie dough into a piping bag. I recommend fitting your bag with a 13mm star nozzle tip for those classic, elegant swirls. (Of course, you’re the artist! Feel free to choose any size or shape nozzle that speaks to your creative vision. The size of the nozzle will determine the final look and overall size of your baked treats.)
- Don’t overfill the piping bag! This is an important tip to maintain control and precision. Dividing the dough in half ensures easier handling and more consistent results as you pipe.
6. Pipe Your Beautiful Butter Cookies
- With your parchment paper securely in place (remember that little dot of dough trick!), begin piping your cookies.
- Pipe 1-2 inch round swirl cookies onto the prepared baking sheets, leaving a good 1-inch space between each cookie to allow for slight spreading. Focus on even pressure for consistent shapes.
7. Bake to Golden Perfection
- Repeat the piping process with the remaining cookie batter on the second tray.
- Carefully place your baking trays into the preheated oven.
- Bake for 15-18 minutes. Keep a close eye on them! You’re looking for the edges to turn a beautiful, light golden brown color. The centers might still look a little pale, but they will firm up as they cool. This slight underbaking is the secret to a delightfully soft and chewy interior while maintaining that crisp outer edge.
- Don’t over bake! This is paramount for maintaining their delicate texture.
8. Cool and Enjoy!
- Once baked, remove the trays from the oven.
- Let the butter cookies cool on the baking sheet for about 5 minutes. This allows them to set and firm up without breaking.
- After 5 minutes, carefully transfer the cookies to a wire rack to cool completely. Cooling completely helps them achieve their final delicate structure.
- Now, it’s time to enjoy your homemade masterpieces! Pair them with a cup of tea or coffee, share them with family, or simply savor one (or two!) yourself.
Expert Tips for Achieving Butter Cookie Perfection
I’ve baked these cookies so many times that I’ve gathered a treasure trove of tips to help you achieve the most exquisite results. These insights will elevate your homemade butter cookies from good to absolutely phenomenal!
The Art of Softened Butter
- Temperature is Key: Your unsalted butter must be truly softened, not melted. It should be pliable enough to leave an indentation when pressed, but still cool to the touch. If it’s too warm or greasy, your cookies will spread excessively. If it’s too cold, it won’t cream properly, resulting in a dense dough. Take it out of the fridge at least 30-60 minutes before you start.
Mastering the Mix
- Creaming is Crucial: The initial creaming of butter, sugar, and salt isn’t just mixing; it’s aerating. Beat until the mixture is truly pale and fluffy. This traps air, contributing to the cookie’s light texture.
- Gentle Folding for Dry Ingredients: Once you add the sifted flour and cornstarch, switch to a spatula and fold gently. Overmixing develops gluten, which leads to tough, chewy cookies – the opposite of what we want for delicate butter cookies. Stop as soon as no dry streaks of flour remain.
Piping vs. Rolling: Your Choice!
- Piping Precision: Using a 13mm star nozzle gives those beautiful, classic swirl patterns. To ensure a smooth piping experience, don’t overfill your piping bag. Divide the dough into halves or even thirds for better control and less strain on your hands. If the dough feels too stiff, let it sit at room temperature for a few minutes to soften slightly.
- No Piping Bag? No Problem! As highlighted in the recipe notes, you can absolutely make these without a piping bag. Simply divide the dough into small, roughly 1-inch balls. Place them on the baking sheet and gently flatten each one with the back of a fork, creating a charming ridged pattern. This is an easier method for beginners or when you’re short on time.
The Parchment Paper Trick
- Secure Your Surface: That little dollop of dough in the corners of your baking sheet before laying the parchment paper? It’s a game-changer! It stops the paper from sliding around while you pipe, allowing for cleaner, more consistent shapes.
Don’t Overbake – It’s a Delicate Balance!
- Golden Edges, Not Golden Centers: The magic of a melt-in-your-mouth cookie often means a slightly underbaked center. Look for the edges to turn a light golden brown. The cookies will continue to cook slightly from residual heat on the baking sheet. Removing them at this stage ensures they remain soft and tender, firming up as they cool. Overbaking is the quickest way to dry, hard cookies.
Chill for Control (Optional but Recommended in Warm Climates)
- If your kitchen is particularly warm or if your dough feels too soft after mixing, consider chilling the dough for 15-20 minutes before piping. This helps the butter firm up slightly, which can prevent excessive spreading and help your piped shapes hold better.
Following these tips will not only help you troubleshoot potential issues but will also elevate your easy butter cookies to bakery-quality standards.
Troubleshooting Common Butter Cookie Challenges
Even with a perfectly tested recipe, baking can sometimes throw a curveball. Here are solutions to common issues you might encounter while making homemade butter cookies:
- My Cookies Spread Too Much!
- Butter Too Soft/Melted: Ensure your butter is softened but still cool to the touch. If it’s too warm, it melts too quickly in the oven.
- Dough Too Warm: If your kitchen is hot, chill the dough for 15-20 minutes before piping.
- Over-Beating: Excessively creaming butter and sugar can incorporate too much air, leading to collapse.
- Not Enough Flour/Too Much Liquid: Ensure accurate measurements, especially of flour. If dough seems overly wet, a tiny bit more flour (1-2 tsp) can sometimes help, but be cautious not to make them tough.
- Greasy Baking Sheet: Always use parchment paper!
- My Cookies Are Too Hard/Dry!
- Overbaked: This is the most common culprit. Keep a close eye on them and remove them when the edges are just golden, even if the centers seem pale.
- Overmixed Dough: Overmixing the flour develops gluten, making cookies tough. Fold gently until just combined.
- Too Much Flour: Accurate measuring (preferably by weight) is crucial. Too much flour will absorb too much moisture.
- My Dough Is Too Stiff to Pipe!
- Cold Dough: The dough might be too cold. Let it sit at room temperature for 10-15 minutes to soften slightly.
- Too Much Flour: Double-check your measurements. You might need to add a tiny touch more heavy cream (1/2 tsp at a time) to reach a pipeable consistency, but be careful not to make it too wet.
- My Cookies Don’t Look Like Swirls (Piped Cookies)!
- Dough Consistency: If the dough is too stiff or too soft, it won’t hold its shape well.
- Piping Technique: Practice makes perfect! Ensure consistent pressure as you pipe.
- Nozzle Choice: A star tip (like 13mm) is best for defined swirls.
By understanding these common issues and their fixes, you’ll be well-equipped to tackle any baking challenge and ensure your melt-in-your-mouth butter cookies turn out perfect every time.
Delicious Variations & Customizations for Your Butter Cookies
While these classic butter cookies are divine on their own, they also serve as a perfect canvas for creativity. Here are some ideas to add your own personal twist:
- Citrus Zest: For a bright, zesty flavor, add 1-2 teaspoons of finely grated lemon, orange, or lime zest to the butter and sugar mixture.
- Almond Extract: Swap half of the vanilla extract for almond extract for a delightful nutty aroma.
- Cardamom or Cinnamon: Add ½ teaspoon of ground cardamom or cinnamon with the dry ingredients for a warm, spiced note.
- Mini Chocolate Chips: Fold in ½ cup of mini chocolate chips (or finely chopped chocolate) with the dry ingredients for a chocolatey surprise.
- Dipped & Drizzled: Once cooled, dip half of each cookie in melted dark, milk, or white chocolate. You can then sprinkle with sea salt, finely chopped nuts, or festive sprinkles.
- Jam Thumbprints: Instead of piping, roll the dough into balls, make an indentation with your thumb, and fill with a dollop of your favorite jam (raspberry, apricot, or strawberry are excellent choices) before baking.
- Glazed Perfection: Whisk together powdered sugar with a splash of milk or lemon juice to create a simple glaze. Drizzle over cooled cookies.
For even more cookie inspiration and ways to get creative in the kitchen, check out some of my other popular cookie recipes:
- Craving something decadent? Try these incredible Stuffed Red Velvet Cookies.
- For a truly unique experience, don’t miss the Pistachio NYC Cookies.
- And if you love a surprise center, my Creme Egg Stuffed Cookies are a seasonal favorite!
- For a classic flavor combo, these Peanut Butter Nutella Cookies are a must-try.
- Another stuffed cookie favorite: White Chocolate Stuffed Cookies.
These variations ensure that your easy butter cookies can adapt to any craving or occasion, making them a truly versatile recipe in your baking repertoire.
Serving Suggestions & Perfect Pairings
These homemade butter cookies are wonderfully versatile, fitting into almost any occasion. Their delicate flavor and texture make them perfect for a wide range of pairings:
- Classic Tea Time Treat: There’s nothing quite like a butter cookie alongside a warm cup of Earl Grey, black tea, or your favorite herbal infusion. The cookie’s sweetness and butteriness complement the robust or aromatic notes of the tea beautifully.
- Coffee Companion: For coffee lovers, these cookies are a match made in heaven. The slight bitterness of coffee (or a creamy latte) perfectly balances the rich sweetness of the cookie.
- After-Dinner Delight: A light, sweet ending to any meal. Serve them with fresh berries or a scoop of vanilla bean ice cream for an elevated dessert.
- Holiday & Gifting: Their elegant appearance makes them ideal for holiday platters, cookie exchanges, or as a thoughtful homemade gift. Arrange them beautifully in a box lined with parchment paper.
- Kid-Friendly Snack: Simple, delicious, and not overly sweet, these cookies are a hit with children. They’re a much-loved, comforting snack.
- Ice Cream Topping: Crumble a few cooled butter cookies over your favorite ice cream for an extra layer of texture and flavor.
Whether it’s a quiet moment alone or a bustling family gathering, these delicate butter cookies are sure to bring smiles and satisfy sweet cravings.
Storage & Make-Ahead Tips
Ensuring your melt-in-your-mouth butter cookies stay fresh and delicious is simple with these storage and make-ahead tips:
Storing Baked Cookies
- Airtight Container: Once completely cooled, store your butter cookies in an airtight container at room temperature. This will keep them fresh and maintain their delicate crumb for up to a week.
- Avoid Moisture: Make sure the cookies are entirely cool before storing. Any residual warmth will create condensation, making them soft and potentially soggy.
- Layering (Optional): If stacking cookies, you can place a piece of parchment paper between layers to prevent them from sticking or breaking.
Freezing Baked Cookies
- For Longer Freshness: If you have extra cookies or want to bake a large batch in advance, cooled cookies freeze beautifully. Place them in a single layer on a baking sheet and freeze until solid (about 1-2 hours).
- Airtight Freezing: Once frozen, transfer the solid cookies to a freezer-safe airtight container or heavy-duty freezer bag. They will keep well for up to 3 months.
- Thawing: Thaw frozen cookies at room temperature for an hour or two before serving.
Make-Ahead Dough (Freezing Raw Dough)
- Prepare and Freeze: You can prepare the cookie dough as directed, then divide it into portions. If piping, fill your piping bag and pipe desired shapes onto a parchment-lined baking sheet. Freeze these piped shapes until solid.
- Store Frozen Dough: Once solid, transfer the frozen cookie dough shapes to an airtight freezer bag or container. They can be stored for up to 2 months.
- Baking from Frozen: When ready to bake, place the frozen dough shapes on a parchment-lined baking sheet. You might need to add an extra 2-5 minutes to the baking time, depending on the size of your cookies. This is a fantastic way to have fresh, warm cookies on demand!
These tips ensure you can enjoy your easy butter cookies whenever the craving strikes, making them an incredibly convenient and rewarding treat to have on hand.
Frequently Asked Questions About Butter Cookies
You’ve got questions, I’ve got answers! Here’s a quick rundown of common queries about making the best homemade butter cookies.
1. What’s the secret to making delicate, melt-in-your-mouth butter cookies?
The secret lies in using quality ingredients like softened unsalted butter and cake flour, coupled with cornstarch for tenderness. Crucially, avoid overmixing the dough once the flour is added, as this develops gluten and can lead to tough cookies. And whatever you do, don’t overbake! Baking just until the edges are golden brown ensures that delightful soft-chewy interior and delicate crumb that practically dissolves on your tongue.
2. Can I make butter cookies without a piping bag?
Absolutely! If you don’t have a piping bag or prefer a simpler approach, you can easily skip the piping step. Just divide the dough into small, equal sections (about 1-inch balls), roll them out, and then gently press each ball down with a fork to create a classic ridged pattern. This method simplifies the process and yields equally delicious results with less fuss.
3. Why did my butter cookies spread too much in the oven?
Cookie spreading can often be attributed to a few factors: your butter might have been too soft (almost melted) when you started, you might have over-beaten the butter and sugar incorporating too much air, or the dough itself might have been too warm. Ensure your butter is softened but still cool to the touch. If your kitchen is warm, a short chill of the dough (15-20 minutes) before piping can help maintain shape and prevent excessive spreading. Also, make sure to measure your flour accurately by weight.
4. How do I store homemade butter cookies to keep them fresh?
To maintain their freshness and delicate texture, store your completely cooled butter cookies in an airtight container at room temperature. They will typically stay fresh for up to a week. For longer storage, you can freeze the baked cookies in an airtight container for up to 3 months. Thaw them at room temperature before serving for the best texture.
5. What’s the difference between butter cookies and shortbread?
While both are delightfully buttery, traditional shortbread typically contains only butter, sugar, and flour, resulting in a dense, very crumbly, and distinctively melt-in-your-mouth texture. Butter cookies, like this recipe, often include additional ingredients like vanilla extract, heavy cream, or egg yolk. These additions contribute to a slightly softer, more delicate, and often pipeable dough, offering a distinct richness and often a more intricate shape compared to the typically simpler shortbread forms.
Your New Go-To Butter Cookie Recipe
There you have it – the ultimate guide to creating melt-in-your-mouth butter cookies that are sure to become a beloved staple in your home. From the first delicate crumb to the lingering, rich buttery finish, these cookies are a true celebration of simple, wholesome indulgence.
Remember, baking is as much about the journey as it is about the destination. Enjoy the process of creaming, piping, and watching these beauties transform in your oven. With Sophie’s proven method and all the expert tips I’ve shared, you’re not just baking cookies; you’re crafting moments of pure joy and comfort.
So go ahead, preheat your oven, gather your ingredients, and get ready to experience the magic of homemade delicate butter cookies. Your taste buds (and your family!) will thank you. Happy baking!
PrintMelt-in-Your-Mouth Butter Cookies
Delicate crumb and buttery richness make these cookies irresistible! Perfectly tested for home bakers.
- Prep Time: 20
- Cook Time: 15
- Total Time: 35
- Yield: 22 Cookies
- Category: Dessert, Cookie
- Method: Baking
- Cuisine: American
Ingredients
125g Cake Flour
15g Cornstarch
110g Unsalted Butter (Softened)
60g Caster Sugar
1 Tsp Vanilla Extract
1 Tbsp Heavy Cream
1/4 tsp Salt
Instructions
1. Preheat the oven to 170°C (340°F) and line two baking trays with parchment paper.
2. In a large bowl, beat the softened butter, caster sugar, and salt using a handheld beater until pale and creamy. Scrape down the sides of the bowl as needed.
3. Add the vanilla extract and heavy cream, then beat again briefly to combine.
4. Sift the cake flour and cornstarch into your butter mixture. Using a rubber spatula, fold together gently until just combined, forming a soft cookie dough. Be careful not to overmix.
5. Transfer about half of the cookie dough into a piping bag with a 13mm star nozzle tip. (Feel free to choose any size nozzle that suits your cookie size preference, as it will ultimately determine the final look of your baked treats.)
6. To help keep your parchment paper from shifting while you pipe the cookies, pipe a little bit of mixture in each corner of the tray, then place your parchment paper over the top, sticking it in place. Pipe 1-2 inch round swirl cookies onto the prepared sheets.
7. Repeat the process with the remaining cookie batter.
8. Bake for 15-18 minutes, or until the edges turn a beautiful golden brown color.
9. Set aside on the baking tray for 5 minutes before transferring to a wire rack to cool completely.
10. Enjoy!
Notes
You don’t have to pipe these cookies: You can skip the piping step and opt for an easier method by dividing the dough into small sections, rolling them out, and then using a fork to press them down. This simplifies the process and yields similar results.
Piping nozzle size: I suggest opting for a 13mm star nozzle size when piping your cookies; of course, feel free to choose any size that suits your cookie size preference, as it will ultimately determine the final look of your baked treats.
Parchment paper: To prevent the parchment paper from shifting on your baking trays as you pipe your cookies, a helpful tip is to pipe a small amount of batter onto the corners of the tray before placing the parchment paper over it. This simple trick ensures that the paper stays securely in place during the piping process.
Don’t over fill piping bag: I highly recommend not overfilling the piping bag with the cookie dough. It’s best to divide the dough in half before piping to ensure better control and precision in your decorating process. This simple step will make the piping much easier to manage and give you more consistent results.
Don’t over bake: Only bake these cookies until the edges turn a beautiful golden brown colour, ensuring that they are perfectly crisp on the outside while remaining delightfully soft and chewy on the inside.


