
When it comes to creating a dessert that stops people in their tracks, nothing beats the visual appeal of a rainbow. These No-Bake Rainbow Mini Cheesecakes combine the playful whimsy of vibrant colors with the sophisticated, silky texture of a high-end cheesecake. Unlike traditional baked versions that can crack or sink, this no-bake method provides a flawlessly smooth finish every single time. By utilizing a silicone mold and a touch of gelatin for stability, you achieve professional-grade layers that are as pleasing to the palate as they are to the eye. Whether you are prepping for a festive Easter brunch, a child’s birthday party, or simply want to brighten up your weekend baking, these mini treats offer the perfect portion-controlled indulgence. Get ready to master the art of the “no-bake” with this foolproof, step-by-step guide.
Why You’ll Love This Recipe
You will absolutely fall in love with these mini cheesecakes because they bridge the gap between “easy to make” and “stunning to serve.” First, the no-bake technique saves you from the stress of water baths and oven temperatures. Second, the use of shortbread for the crust provides a buttery, melt-in-your-mouth base that complements the tangy cream cheese filling perfectly. Because these are individually portioned in a jumbo muffin pan, they are ideal for entertaining—no messy slicing required! Finally, the rainbow layering is surprisingly therapeutic and allows for total creative freedom. You can customize the colors for any holiday, making this a versatile staple in your recipe box.
What Is a Rainbow Mini Cheesecake?
A No-Bake Rainbow Mini Cheesecake is a modern twist on the classic American cheesecake. Unlike its baked counterpart, which relies on eggs for structure, this version uses a combination of full-fat cream cheese, heavy cream, and unflavored gelatin to create a stable, mousse-like consistency. The “mini” aspect refers to the individual serving size, typically achieved using a silicone muffin mold. The “rainbow” element comes from dividing the base batter and tinting it with concentrated gel food colors. When layered carefully, these colors remain distinct, creating a beautiful striped effect once the cheesecake is unmolded. It is a cold-set dessert that is best served chilled.
Ingredients Overview
To achieve the best results, ingredient quality is paramount.
- Shortbread Cookies: These provide a much richer, more buttery base than standard graham crackers. Brands like Walkers or even store-brand buttery rounds work perfectly.
- Full-Fat Cream Cheese: This is non-negotiable. Low-fat or “spreadable” versions contain too much water and will prevent the cheesecake from setting properly. Ensure it is at room temperature to avoid a lumpy batter.
- Heavy Cream: Also known as heavy whipping cream, this adds the necessary fat and airiness. It must be at room temperature when added to the cream cheese to ensure the gelatin doesn’t seize.
- Unflavored Gelatin: This is the “magic” ingredient. It provides the structural integrity needed to unmold the cheesecakes while maintaining a creamy mouthfeel.
- Vanilla Bean Paste: While extract works, the tiny black flecks of vanilla bean add an artisanal touch to the colorful layers.
- Gel Food Coloring: Gel is superior to liquid coloring because it provides intense pigment without changing the moisture content of the batter.
Ingredient Substitutions & Tips
If you need to pivot based on what’s in your pantry, here are a few expert tips. For the crust, you can substitute shortbread with Golden Oreos or graham crackers; just adjust the melted butter slightly if the crumbs feel too dry. If you cannot find vanilla bean paste, a high-quality pure vanilla extract is an easy 1:1 swap. For those looking for a citrus twist, increase the lemon juice to 1 tablespoon or add a teaspoon of fresh lemon zest. To make this recipe vegetarian, you can replace the gelatin with Agar Agar powder, though the texture will be slightly firmer and less “creamy” than the original.
Step-by-Step Instructions
- Prepare the Base: Start by pulsing your shortbread cookies in a food processor until they resemble fine sand. Combine with melted butter until the mixture looks like wet sand. Press about 2 tablespoons of the mixture into each cavity of a jumbo silicone muffin pan. Use the bottom of a glass to pack it tight.
- Bloom the Gelatin: This is a critical E-E-A-T step. Sprinkle the gelatin over 2 tablespoons of cold water. Let it sit for 5 minutes. This “blooming” process ensures the gelatin dissolves smoothly without graininess.
- Cream the Filling: Beat your room-temperature cream cheese until it is completely smooth. This should take about 3 minutes on medium speed. Scrape the bowl often. Add the sugar, lemon juice, vanilla, and salt, mixing until incorporated.
- The Cream Addition: With the mixer on low, slowly pour in the heavy cream. Continue mixing until the batter is thick and luscious.
- Incorporate Gelatin: Microwave the bloomed gelatin for 10-15 seconds. It should be liquid and warm, but not boiling. Quickly whisk this into your cheesecake batter. The warmth helps it distribute evenly before the cold cream cheese can set it.
- Color and Layer: Divide the batter into four bowls. Add a drop of gel color to each and fold gently. Spoon the first color into the molds, leveling it with a small offset spatula. Repeat with the remaining colors.
- Set and Unmold: Freeze the pan for at least 2 hours. This makes the cheesecakes firm enough to pop out of the silicone mold without damaging the sides. Once popped out, let them thaw in the fridge.
Expert Baking Tips for Success
The most common mistake in no-bake desserts is temperature shock. If your cream cheese is cold and you pour in warm gelatin, the gelatin will instantly turn into “rubbery bits” in your batter. Always ensure your dairy is at a true room temperature. Another tip is to use a silicone mold rather than a metal tin. Silicone is flexible, allowing you to push the frozen cheesecake up from the bottom, which is the only way to get those clean, sharp edges on your layers. If you find the layers are mixing too much, pop the pan in the freezer for 5 minutes between each color layer to “flash set” the top.
Special Section: Achieving the Perfect Rainbow
To get those “Instagram-worthy” vibrant layers, the type of food coloring matters immensely. Liquid drops from the grocery store will dilute your batter and often result in pastel, muddy colors. I highly recommend Americolor or Wilton Gel Pastes. Because they are highly concentrated, you only need a tiny toothpick-tip amount to achieve deep saturation. When layering, start with your darkest color at the bottom (like purple or blue) and work your way up to lighter colors (like yellow or pink). This prevents any potential bleeding from being noticeable and creates a more aesthetically pleasing gradient when the guest bites into the center.
Serving Suggestions
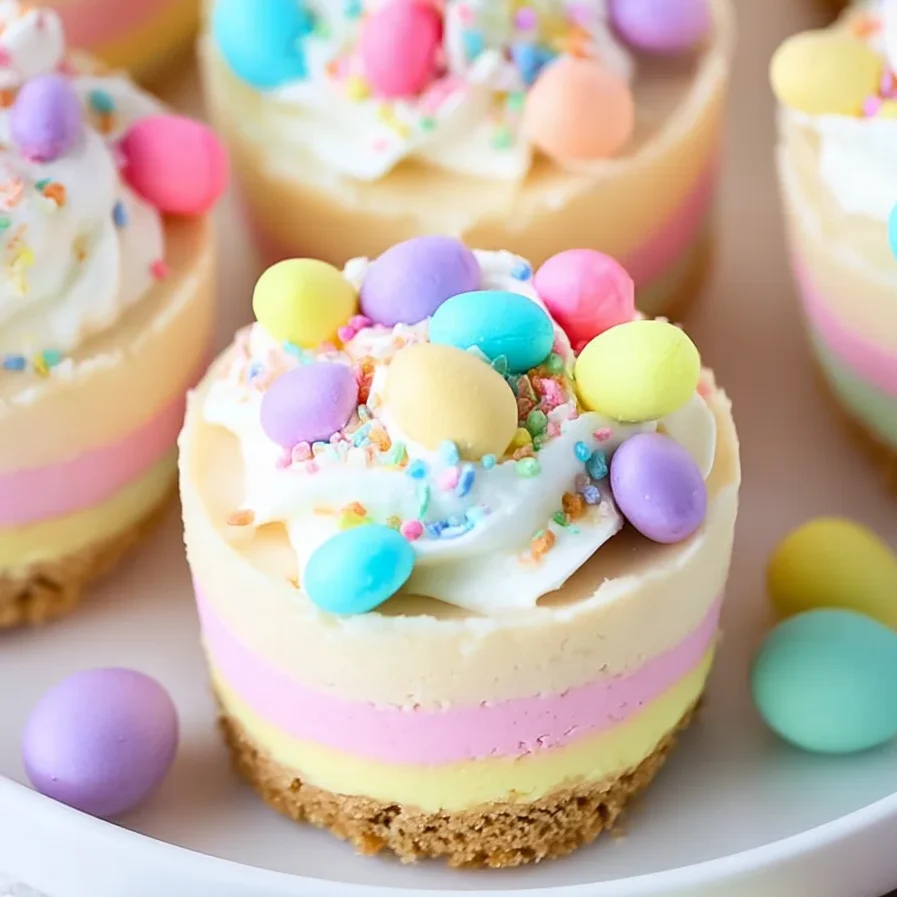
Serve these cheesecakes chilled on a white porcelain platter to make the colors “pop.” Just before serving, top each one with a generous swirl of stabilized whipped cream. For a festive touch, add a few malted milk candy eggs or a dusting of rainbow nonpareils. These pair beautifully with a crisp glass of Moscato or a light Earl Grey tea, which cuts through the richness of the cream cheese.
Storage & Make-Ahead Tips
These are the ultimate make-ahead dessert! You can keep the cheesecakes in their silicone molds, tightly wrapped in plastic, in the freezer for up to two weeks. When you are ready to serve, unmold them while frozen and let them thaw in the refrigerator for at least 4 hours. Once thawed and decorated, they will stay fresh and delicious in an airtight container in the fridge for 4 to 5 days.
FAQs
Q: Can I use a regular metal muffin tin?
A: It is not recommended. Without the flexibility of silicone, it is very difficult to remove the cheesecakes without destroying the layers. If you must use metal, line the cavities with parchment paper strips to help lift them out.
Q: Why is my cheesecake grainy?
A: This usually happens if the gelatin wasn’t fully dissolved in the microwave or if it was added to a cold cheesecake mixture, causing it to clump.
Q: Do I have to freeze them?
A: Yes, freezing is necessary for the unmolding process. However, they should be eaten at refrigerator temperature for the best creamy texture.
Q: Can I use flavored gelatin (Jell-O)?
A: No. Flavored gelatin contains sugar and different setting agents that will change the chemistry and flavor of the recipe. Stick to unflavored gelatin.
Q: Is vanilla bean paste necessary?
A: No, but it adds a premium look and deeper flavor that makes these feel like they came from a high-end bakery.


