
There’s something undeniably magical about a cookie. It’s a hug in edible form, a sweet escape, and for many, a nostalgic trip down memory lane. But what if we told you there’s a cookie that takes that magic to an entirely new level? Enter the Peanut Butter Stuffed Chocolate Cookie: a rich, fudgy chocolate cookie exterior giving way to an unbelievably creamy, gooey, molten peanut butter center. This isn’t just a cookie; it’s an experience, a moment of pure bliss that every peanut butter and chocolate lover dreams of.
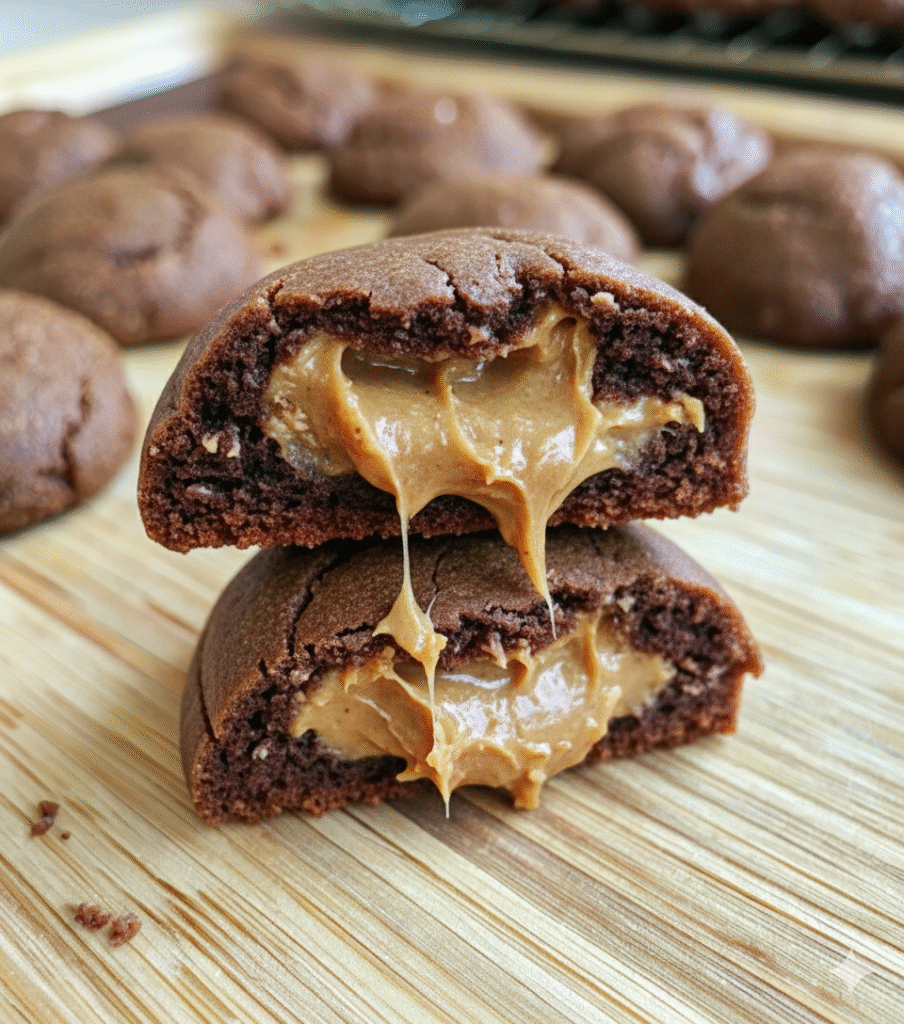
Forget complicated desserts; these cookies deliver big on flavor and “wow” factor with steps that are completely achievable for bakers of all skill levels. With a little patience for chilling (a non-negotiable step for perfection!), you’ll be pulling warm, deeply satisfying cookies from your oven that are guaranteed to become a household favorite. Imagine biting through that soft, chewy chocolate cookie only to discover a warm, flowing river of peanut butter. Pure decadence!
Why These Peanut Butter Stuffed Cookies Are a Must-Try
You might be thinking, “Another cookie recipe?” But these aren’t just any cookies. They are designed to stand out, to be the star of your next potluck, bake sale, or simply your Tuesday night indulgence. Here’s why this recipe deserves a prime spot in your baking repertoire:
- The Ultimate Flavor Fusion: Chocolate and peanut butter are a classic pairing for a reason. This recipe maximizes that synergy, creating a balanced yet intense flavor profile where neither ingredient overpowers the other. The slight bitterness of the dark chocolate cookie perfectly complements the sweet, salty richness of the peanut butter filling.
- Gooey Center Perfection: The secret to these cookies lies in their surprise filling. By freezing the peanut butter dollops, we ensure they remain distinct and melt slowly, creating that signature gooey center you crave without leaking out during baking. It’s a technique that yields professional-level results every time.
- Irresistible Texture: Beyond the gooey center, the cookie itself boasts a delightful texture. Thanks to a careful balance of ingredients, including a touch of cornstarch, these cookies are soft, chewy, and slightly fudgy, never dry or crumbly. The dark chocolate chips add pockets of melty goodness, enhancing the overall experience.
- Impressive Yet Approachable: While they look incredibly impressive, the steps are straightforward. Our detailed instructions break down the process, making it easy to achieve bakery-quality stuffed cookies in your own kitchen. It’s a recipe that builds confidence and delivers consistent deliciousness.
- Perfect for Any Occasion: Whether you need a show-stopping dessert for a party, a comforting treat for a cozy evening, or a thoughtful homemade gift, these peanut butter stuffed cookies fit the bill perfectly. They’re universally loved and always disappear fast!
The Secret to the Perfect Gooey Peanut Butter Filling
The heart of these incredible cookies is, of course, the creamy, irresistible peanut butter filling. This isn’t just a blob of peanut butter shoved into dough; it’s a carefully prepared element designed to deliver maximum flavor and that coveted gooey texture. The key is to sweeten and stabilize the peanut butter just enough so it melts beautifully without completely dissolving into the cookie dough.
Ingredients for the Peanut Butter Filling
You’ll only need three simple ingredients for this magical filling:
- 250g Creamy Peanut Butter: Opt for a good quality, creamy peanut butter. While natural peanut butter can work, its oil separation might make it slightly trickier to work with. A standard creamy peanut butter will give you the best, most consistent results for shaping and texture.
- 60g Powdered Sugar (Sifted): Powdered sugar (also known as confectioners’ sugar or icing sugar) is crucial here. Its fine texture blends seamlessly into the peanut butter, adding sweetness without grittiness. Sifting prevents lumps and ensures a smooth filling.
- 1/2 Tsp Vanilla Extract: A touch of vanilla enhances the overall flavor, adding warmth and depth to the peanut butter. Don’t skip it!
Step-by-Step Filling Prep
- Combine: In a medium bowl, combine the creamy peanut butter, sifted powdered sugar, and vanilla extract.
- Mix Thoroughly: Stir until all ingredients are completely incorporated and the mixture is smooth and uniform. It should be firm enough to scoop.
- Scoop Dollops: Using a small spoon, a mini ice cream scoop, or your hands, scoop out 18 even dollops of the peanut butter mixture. Each dollop should be roughly 1 tablespoon in size. Place these onto a chopping board or baking tray lined with parchment paper. This ensures they don’t stick.
- Freeze, Freeze, Freeze! This is the most crucial step for the filling. Transfer the lined tray with the peanut butter dollops to the freezer. Freeze for at least 1 hour, or even better, overnight. Freezing them solid prevents the peanut butter from melting too quickly during the initial stages of baking, ensuring it stays contained within the cookie dough and creates that beautiful, gooey center. It also makes them much easier to handle and stuff into the cookie dough.
Crafting the Ultimate Chocolate Cookie Dough
A magnificent filling deserves an equally magnificent vessel. Our chocolate cookie dough is rich, deeply flavorful, and perfectly chewy, providing the ideal contrast to the sweet peanut butter center. Each ingredient plays a vital role in achieving that perfect balance of texture, flavor, and structure.
Ingredients for the Chocolate Cookie Dough
- 225g Unsalted Butter (Softened): Softened butter is key for proper creaming with the sugars, creating air pockets that contribute to the cookies’ light texture. Ensure it’s truly softened, not melted.
- 250g Granulated White Sugar: Provides sweetness and helps create a crisp edge.
- 100g Brown Sugar: Adds moisture, chewiness, and a subtle molasses flavor that complements the chocolate beautifully.
- 1 Egg + 1 Egg Yolk: The whole egg provides structure and richness, while the extra egg yolk adds moisture, fat, and contributes to that desirable chewy texture without making the cookies cakey.
- 1 1/2 Tsp Vanilla Extract: Amplifies the chocolate flavor and adds aromatic warmth.
- 375g Plain Flour: The base of our cookie. Measure accurately, preferably by weight, to avoid dry or overly dense cookies.
- 50g Cocoa Powder: This is where the rich chocolate flavor comes from. Using good quality, unsweetened cocoa powder (natural or Dutch-processed) will significantly impact the depth of flavor.
- 2 Tbsp Cornstarch: Our secret ingredient for chewy, tender cookies that resist spreading too much.
- 1 Tsp Baking Powder & 1/4 Tsp Baking Soda: These leavening agents work together to give the cookies a slight lift and tender crumb. Baking soda reacts with the cocoa powder (acidic) for extra lift.
- 1/4 Tsp Salt: Essential for balancing the sweetness and enhancing all the flavors. Don’t skip it!
- 170g Dark Chocolate Chips: Pockets of melty chocolate goodness scattered throughout the dough. Dark chocolate complements the sweetness of the peanut butter particularly well.
Demystifying the Dry Ingredients
The combination of plain flour, cocoa powder, cornstarch, baking powder, baking soda, and salt forms the backbone of our cookie. Sifting these together is not just a suggestion; it’s a small step that makes a big difference. Sifting ensures that all leavening agents and flavorings are evenly distributed, preventing pockets of unmixed ingredients and guaranteeing a consistent texture throughout your batch. The cornstarch, in particular, contributes to a soft, almost melt-in-your-mouth interior while helping the cookies maintain their shape during baking.
Wet Ingredients: The Foundation of Flavor
The creaming of softened butter with both granulated and brown sugars is the foundation of many great cookie recipes. This process, known as creaming, whips air into the mixture, which results in a lighter, more tender cookie. The addition of an extra egg yolk boosts richness and chewiness. This isn’t just about adding ingredients; it’s about building texture and flavor from the ground up.
Bringing it All Together: Mixing the Dough
- Cream Butter and Sugars: In a large mixing bowl, use an electric mixer to cream the softened butter and both granulated and brown sugars until the mixture is light, fluffy, and noticeably paler in color. This usually takes 2-3 minutes. Scrape down the sides of the bowl to ensure everything is evenly mixed.
- Add Wet Ingredients: Beat in the egg, extra egg yolk, and vanilla extract until smooth and well combined.
- Combine Dry Ingredients: In a separate medium bowl, sift and whisk together the flour, cocoa powder, cornstarch, baking powder, baking soda, and salt. This ensures no lumps and even distribution.
- Gradually Combine: Gradually add the dry ingredients to the wet mixture. Use a spatula to gently fold them together until just combined. The golden rule of cookie dough is: do not overmix! Overmixing develops the gluten in the flour, leading to tough, dry cookies. Stop mixing as soon as no streaks of flour are visible.
- Fold in Chocolate Chips: Gently fold the dark chocolate chips into the dough until evenly distributed. Again, be mindful not to overmix.
- Chill the Dough: Cover the cookie dough with plastic wrap and chill it in the refrigerator for at least 30 minutes. This chilling period is vital; it helps the dough firm up, making it easier to handle and preventing the cookies from spreading too much in the oven. It also allows the flavors to meld, resulting in a richer, more complex taste.
Assembling Your Stuffed Masterpieces: The Art of Perfection
This is where the magic truly happens – transforming simple dough and filling into irresistible stuffed cookies. The stuffing process requires a little technique, but once you get the hang of it, it’s incredibly satisfying.
Scooping and Stuffing Techniques
- Portion the Dough: Scoop medium-sized balls of the chilled cookie dough into your hand. A standard cookie scoop (about 2 tablespoons) works perfectly here for even sizing.
- Create a Crater: Gently roll the dough between your palms to create a smooth ball. Then, using your thumb, press a crater (an indentation) into the center of the dough ball. Don’t press too deep, just enough to comfortably cradle the frozen peanut butter filling. The sides should remain relatively thick.
- Insert the Filling: Retrieve one frozen dollop of the peanut butter filling from the freezer. Place it directly into the crater you just made in the cookie dough.
- Seal It Up: Carefully fold the cookie dough over the peanut butter filling, pinching the edges of the dough together to completely seal it. It’s crucial that there are no gaps or cracks where the peanut butter could escape during baking.
- Smooth It Out: Gently roll the stuffed cookie dough ball between your palms again, creating a perfectly smooth, seamless sphere. This ensures the peanut butter is fully encased and will melt beautifully inside.
- Repeat: Continue this process with the remaining dough and frozen peanut butter dollops until all 18 cookies are formed.
The Importance of Chilling: A Non-Negotiable Step
Once your cookies are stuffed and perfectly shaped, they’re not quite ready for the oven. This second chilling period is just as, if not more, important than the first.
- Refrigerate Again: Place the stuffed cookie balls onto a baking tray (lined with parchment paper is always a good idea) and refrigerate them for an additional 30-45 minutes.
- Why the Double Chill? This second chill serves multiple purposes:
- Prevents Spreading: The dough, especially after being handled, can warm up. Chilling firms it up again, making the butter colder and less likely to spread prematurely in a hot oven.
- Ensures Gooey Center: By keeping the dough and the (already frozen) peanut butter filling very cold, you maximize the chance for the cookie dough to set around the filling before the peanut butter gets too hot and leaks out. This is the secret to that perfectly contained, gooey center.
- Develops Flavor: Chilling also allows the flour to fully hydrate and the flavors to deepen, resulting in a more delicious and cohesive cookie.
Resist the urge to skip this step! Your patience will be rewarded with perfectly shaped, perfectly stuffed, and perfectly delicious cookies.
Baking for Golden Perfection
With your cookie balls perfectly chilled, it’s almost time to enjoy the fruits of your labor. Baking these beauties is the final step, and knowing when they’re done is key to achieving that soft, chewy texture with a gooey center.
Oven Prep and Baking Times
- Preheat Your Oven: Preheat your oven to 190°C (375°F). This temperature ensures the cookies bake quickly on the outside, setting the edges while the inside remains soft and gooey. Always preheat your oven fully before putting cookies in to prevent uneven baking and excessive spreading.
- Prepare Trays: Line 2 baking trays with parchment paper. This prevents sticking, promotes even baking, and makes cleanup a breeze.
- Space Evenly: Place the chilled, stuffed cookies onto the lined baking trays, ensuring they are evenly spaced. Give them enough room to spread slightly without touching each other – typically about 2 inches apart.
- Bake: Bake for 10-13 minutes. The exact time will depend on your oven and personal preference. You’re looking for edges that are set and lightly golden, but the centers should still look soft and slightly underbaked. They will continue to cook and set as they cool.
Cooling and Enjoying Your Peanut Butter Stuffed Cookies
- Initial Cooling: Once out of the oven, do not move the cookies immediately! Allow them to cool on the baking trays for 5-10 minutes. During this time, the centers will continue to set, and the cookies will firm up enough to be handled without falling apart.
- Transfer to Wire Rack: After the initial cooling, carefully transfer the cookies to a wire rack to cool completely. This prevents the bottoms from becoming soggy.
- Warm vs. Cooled: While they are absolutely divine at room temperature, for the ultimate gooey peanut butter experience, enjoy them slightly warm! A quick 10-15 second zap in the microwave can revive that molten center.
Expert Tips for Peanut Butter Stuffed Cookie Success
Achieving perfect Peanut Butter Stuffed Cookies every time is within reach with a few expert insights. Here are some pro tips to elevate your baking game:
Ingredient Quality Matters
Use good quality ingredients. For peanut butter, a standard creamy variety works best for the filling’s texture. For cocoa powder, a rich, unsweetened variety will give you the best chocolate flavor. Good quality vanilla extract also makes a noticeable difference.
Don’t Overmix!
This is a golden rule for most cookie recipes. Overmixing the dough develops gluten, which can lead to tough, dry cookies. Mix the dry ingredients into the wet ingredients only until just combined, with no visible streaks of flour remaining.
Chill Time is Crucial
We can’t stress this enough! The chilling steps (for the peanut butter filling and the stuffed cookie dough) are non-negotiable. They prevent spreading, ensure a gooey, contained peanut butter center, and allow flavors to deepen. If your kitchen is warm, or your dough feels too soft, add extra chilling time. Patience truly pays off here.
Even Scoops, Even Bake
Using a cookie scoop for both the peanut butter filling and the cookie dough will ensure all your cookies are roughly the same size. This leads to even baking, meaning no burnt edges or raw centers, and a beautiful, uniform batch of cookies.
Customization Ideas
Feel free to get creative!
- Different Chocolate: Try milk chocolate chips or even white chocolate chips in the dough.
- Nut Butter Variations: Almond butter or cashew butter could be interesting alternatives for the filling, though they might yield a slightly different texture.
- A Sprinkle of Salt: A light sprinkle of flaky sea salt on top of the warm cookies when they come out of the oven enhances the chocolate and peanut butter flavors beautifully.
Frequently Asked Questions About Peanut Butter Stuffed Cookies
Why do my peanut butter stuffed cookies spread too much?
Cookie spreading is a common issue often attributed to insufficient chilling time, especially for stuffed cookies. Ensuring both the peanut butter filling is frozen solid and the stuffed cookie balls are thoroughly chilled is critical. Additionally, using softened butter (not melted), accurately measuring flour (too little can lead to spreading), and not overmixing the dough can help. A too-cool oven can also cause excessive spreading before the cookies set, so ensure your oven is accurately preheated.
Can I use crunchy peanut butter for the filling?
While creamy peanut butter is recommended for a smooth, melty center, you absolutely can use crunchy peanut butter for the filling if you prefer a bit of texture! Just be aware that the texture will be different, and it might be slightly harder to form perfectly smooth dollops. The taste will still be incredible!
How do I store peanut butter stuffed cookies?
Once completely cooled, store your Peanut Butter Stuffed Cookies in an airtight container at room temperature for up to 3-4 days. For longer storage, you can freeze them for up to 2-3 months. Thaw frozen cookies at room temperature or gently warm them in the microwave for a few seconds for that fresh-baked, gooey center experience.
Can I make the cookie dough ahead of time?
Yes! You can prepare the peanut butter filling and freeze the dollops ahead of time (even weeks in advance!). The chocolate cookie dough can be made and chilled in the refrigerator for up to 2-3 days before stuffing and baking. You can also form the stuffed cookie balls and freeze them raw; simply bake them from frozen, adding a couple of extra minutes to the bake time.
What’s the best way to ensure the peanut butter filling stays in the center?
The key is to freeze the peanut butter filling dollops solid before stuffing. This prevents them from melting too quickly during baking. When stuffing, ensure you completely encase the frozen peanut butter with cookie dough, pinching all seams firmly closed. A second chill of the stuffed cookie balls also helps the dough firm up around the filling before hitting the hot oven.
Why is cornstarch used in this cookie recipe?
Cornstarch is a fantastic secret ingredient in cookie recipes! It helps to tenderize the dough, creating a softer, chewier cookie texture, and it also contributes to keeping the cookies thick and preventing excessive spreading. It’s an often overlooked ingredient that makes a noticeable difference in the final cookie texture.
Ready to Bake Your New Favorite Cookies?
There you have it – the ultimate guide to creating Peanut Butter Stuffed Chocolate Cookies that will undoubtedly impress anyone who takes a bite. This recipe isn’t just about baking; it’s about creating moments of pure, unadulterated joy. The combination of rich, fudgy chocolate and creamy, gooey peanut butter is a classic for a reason, and this recipe takes it to its most delicious potential.
So, gather your ingredients, set aside a little time for chilling, and prepare to embark on a delightful baking adventure. We guarantee that the moment you bite into one of these warm, decadent cookies, you’ll agree: every minute spent was entirely worth it. Don’t forget to share your creations with us, and let us know how much you loved them in the comments below! Happy baking!
PrintPeanut Butter Stuffed Chocolate Cookies
Decadent, rich chocolate cookies with a surprise creamy, gooey peanut butter filling that melts in your mouth. A perfect treat for any occasion, these cookies are surprisingly easy to make with our step-by-step guide and expert tips.
- Prep Time: 45
- Cook Time: 13
- Total Time: 150
- Yield: 18 cookies
- Category: Dessert, Cookie
- Method: Baking
- Cuisine: American
Ingredients
250g Creamy Peanut Butter
60g Powdered Sugar (Sifted)
1/2 Tsp Vanilla Extract
225g Unsalted Butter (Softened)
250g Granulated White Sugar
100g Brown Sugar
1 Egg
1 Egg Yolk
1 1/2 Tsp Vanilla Extract
375g Plain Flour
50g Cocoa Powder
2 Tbsp Cornstarch
1 Tsp Baking Powder
1/4 Tsp Baking Soda
1/4 Tsp Salt
170g Dark Chocolate Chips
Instructions
1. Combine all of the peanut butter filling ingredients in a medium bowl
2. Spoon 18 even dollops of the mixture onto a lined chopping board or baking tray
3. Freeze for 1 hour to overnight
4. In a large mixing bowl, cream the butter and both sugars until light and fluffy
5. Add the egg, egg yolk, and vanilla, and beat again until smooth
6. In a separate medium bowl, sift and whisk together the flour, cocoa powder, cornstarch, baking powder, baking soda, and salt
7. Gradually add the dry ingredients to the wet and fold together using a spatula until just combined
8. Fold the dark chocolate chips into the mixture (try not to overmix)
9. Cover the dough with plastic wrap and chill for 30 minutes
10. Scoop medium-sized balls of the cookie dough into your hand and gently roll between your palms to create a smooth ball
11. Using your thumb, press a crater into the center (don’t press too deep)
12. Retrieve one dollop of the peanut butter filling and press it into the crater, then fold the dough over the peanut butter filling so there is no filling showing
13. Roll the cookie dough gently between your palms to create a smooth ball (make sure all the peanut butter filling is covered)
14. Refrigerate the cookie balls for 30-45 minutes
15. Preheat the oven to 190°C and line 2 baking trays with parchment paper
16. Place the cookies onto the lined baking trays, evenly spaced
17. Bake for 10-13 minutes
18. Allow the cookies to cool
19. Enjoy!
Notes
The chilling steps for both the peanut butter filling and the stuffed cookie balls are absolutely crucial for success. Don’t skip them! They ensure the cookies hold their shape and the peanut butter stays perfectly gooey inside.


