Pink Velvet Buttermilk Cake Recipe
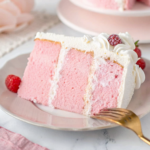
A moist, tender Pink Velvet Buttermilk Cake made with real buttermilk, a velvety crumb, and topped with stabilized whipped cream and fresh raspberries. Perfect for any special occasion, meticulously tested for perfection.
- Prep Time: 10
- Cook Time: 40
- Total Time: 50
- Yield: 8 servings
- Category: Dessert
- Method: Baking
- Cuisine: American
Ingredients
13 oz cake flour
12 oz granulated sugar
1 teaspoon salt
1 tablespoon baking powder
½ teaspoon baking soda
5 oz egg whites room temperature
4 oz vegetable oil
10 oz buttermilk room temperature or slightly warm
6 oz butter unsalted and softened
2 teaspoon vanilla extract
2 drops electric pink food coloring
24 ounces Heavy whipping cream
4 ounces powdered sugar
2 teaspoons powdered gelatin
1 Tablespoon cold water
1 teaspoon vanilla extract (for whipped cream)
1 teaspoon heavy whipping cream (for gelatin)
1 cup fresh raspberries (optional) garnish
Instructions
1. Heat oven to 335º F/168º C — 350º F/177º C. I tend to use lower setting to prevent my cakes from getting too dark on the outside before the inside is done baking.
2. Prepare two three 6″x2″ cake pans with cake goop or another preferred pan spray. Fill your pans about ¾ of the way full of batter.
3. Combine flour, sugar, baking powder, baking soda and salt in the bowl of a stand mixer with the paddle attachment. Mix 10 seconds to combine.
4. Combine ½ cup of the milk and the oil together and set aside.
5. Combine the remaining milk, egg whites, pink food coloring and vanilla together, whisk to break up the eggs and set aside.
6. Add your softened butter to the dry ingredients and mix on low until mixture resembles a coarse sand (about 30 seconds). Add in your milk/oil mixture and let mix until dry ingredients are moistened and then bump up to med (setting 4 on my kitchenaid) and let mix for 2 minutes to develop the cakes structure. If you don’t let your cake mix on this step your cake could collapse.
7. Scrape your bowl and then reduce speed to low. Add in your egg white mixture in three batches, letting the batter mix for 15 seconds between additions.
8. Scrape down the sides again to make sure everything has incorporated then pour into prepared pans.
9. Bake 35-40 minutes until a toothpick inserted into the center comes out cleanly but the cake has not begun to shrink yet from the sides of the pan.
10. IMMEDIATELY TAP PAN FIRMLY on countertop once to release the steam from the cake. This stops the cake from shrinking.
11. Let cakes cool for 10 minutes inside the pan before flipping them out. The cake will shrink a bit and that is normal. Flip onto a cooling rack and let cool fully. I chill my cakes before handling or you can wrap them in plastic wrap and freeze them to trap moisture in the cake. Thaw on the countertop while still wrapped before frosting.
12. Stabilized Whipped Cream
13. Sprinkle your gelatin over the water and let bloom for 5 minutes.
14. Melt gelatin for 5 seconds in the microwave. If not fully melted do another 3 seconds. You can tell gelatin is melted when there are no granules of unmelted gelatin visible.
15. After dissolving your gelatin, add in 1 teaspoon of heavy cream and mix. If your gelatin is too cold, heat again until it’s melted (5 seconds).
16. In a cold mixing bowl, whip your heavy cream to soft peaks
17. Add in your powdered sugar and vanilla and mix until combined
18. Turn your mixer down to low and drizzle in your gelatin and mix until whipped cream forms stiff peaks. Do not over-mix or your whipped cream will turn into butter.
Notes
IMPORTANT: Make sure all your ingredients are at room temp and you’re using a scale to measure. Substituting ingredients may cause this recipe to fail.
Important Things To Note Before You Start
1. Bring all your ingredients to room temperature or even a little warm (eggs, buttermilk, butter, etc) to ensure your batter does not break or curdle.
2. Use a scale to weigh your ingredients (including liquids) unless otherwise instructed (Tablespoons, teaspoons, pinch etc). Metric measurements are available in the recipe card. Scaled ingredients are much more accurate than using cups and help ensure the success of your recipe.
3. Practice Mise en Place (everything in it’s place). Measure out your ingredients ahead of time and have them ready before you start mixing to reduce the chances of accidentally leaving something out.
4. Chill your cakes before frosting and filling. You can cover a frosted and chilled cake in fondant if you wish. This cake is also great for stacking. I always keep my cakes chilled in the refrigerator before delivery for easy transporting.
5. If the recipe calls for specific ingredients like cake flour, replacing it with all purpose flour and cornstarch is not recommended unless specified in the recipe that it’s ok. Substituting ingredients may cause this recipe to fail.