
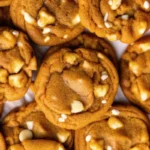
There’s something truly magical about the crisp air of autumn, the rustling leaves, and the warm, inviting scent of pumpkin spice filling your home. As a home cook who has spent countless hours perfecting seasonal treats, I know the joy a perfect cookie can bring. And let me tell you, these Pumpkin White Chocolate Chip Cookies aren’t just good—they’re a fall revelation!

I’ve personally tested this recipe nine times (yes, nine!) to get that ideal balance of soft, chewy texture, intense pumpkin flavor, and gooey white chocolate goodness. They’re a family favorite, perfect for cozy evenings or impressing guests at any gathering. Forget those bland, cakey pumpkin cookies; we’re going for rich, flavorful, and utterly irresistible. This recipe is a healthy-ish twist on a classic, focusing on natural flavors and simple steps to bring you pure comfort in every bite. Ready to bake some magic? Let’s dive in!
The Secret to Perfect Pumpkin Cookies
Achieving the perfect Pumpkin White Chocolate Chip Cookie isn’t just about throwing ingredients together; it’s about understanding the “why” behind each step. The biggest secret? Squeezing out excess moisture from your pumpkin puree. This might sound minor, but it’s a game-changer. Pumpkin puree has a high water content, and too much moisture leads to cakey, spread-out cookies. We want chewy, dense, and flavorful!
My first few attempts at pumpkin cookies were, frankly, a disaster. They were flat, didn’t hold their shape, and the pumpkin flavor was diluted. It was only after a friend, a seasoned baker, shared this simple yet crucial tip that my pumpkin cookie game truly elevated. This step ensures a concentrated pumpkin flavor and a wonderfully chewy texture that melts in your mouth. It’s a small effort that yields monumental results!
Essential Equipment & Ingredients
Before we get to the fun part, let’s make sure you have everything you need. Having the right tools and fresh ingredients is key to baking success. You don’t need fancy gadgets, but a good mixer and quality ingredients make a world of difference.
The Tools You’ll Need:
- Stand Mixer or Hand Mixer: Essential for properly creaming butter and sugar.
- Baking Sheets: Light-colored sheets bake more evenly.
- Parchment Paper or Silicone Baking Mat: Prevents sticking and ensures easy cleanup.
- Rubber Spatula: For scraping down the bowl.
- Measuring Cups & Spoons: Accuracy is vital in baking.
- Ice Cream Scoop (optional, but highly recommended): For perfectly even cookies.
Fresh, Flavorful Ingredients:
- Unsalted Butter: Always use unsalted to control the salt content. Make sure it’s softened, but not melted.
- Light Brown Sugar & Granulated Sugar: The combination gives chewiness and sweetness.
- Pumpkin Puree: Not pumpkin pie filling! We’ll be removing excess moisture.
- Egg Yolk: Adds richness and helps with chewiness.
- All-Purpose Flour: Spooned and leveled for accuracy.
- Cinnamon or Pumpkin Pie Spice: The warm flavors of fall!
- Vanilla Extract: Enhances all the other flavors.
- Baking Soda & Baking Powder: The leavening agents that give lift and spread.
- Salt: Balances sweetness and enhances flavor.
- White Chocolate Chips: The perfect creamy contrast to the pumpkin.
Using high-quality ingredients truly elevates the final product. For instance, I always opt for pure vanilla extract over imitation; the depth of flavor is incomparable. When it comes to pumpkin puree, make sure to check the label—some brands can be quite watery, making that initial squeeze even more important!
Step-by-Step Baking Bliss
Now for the exciting part—bringing these delicious cookies to life! Follow these steps carefully, and you’ll be enjoying warm, spiced cookies in no time. This detailed guide ensures even novice bakers can achieve bakery-quality results.
Step-by-Step Instructions:
- Prep the Pumpkin: This is the game-changer! Grab your pumpkin puree. Wrap it in a few layers of paper towels or a clean tea towel. Squeeze firmly to remove as much excess liquid as possible. You’ll be surprised how much comes out! This is crucial for a chewy, non-cakey cookie.
- Cream the Fats & Sugars: In your mixer, cream the softened unsalted butter, granulated sugar, and light brown sugar together for 2-3 minutes. This should result in a light, fluffy, and well-combined mixture. Don’t forget to scrape down the sides of the bowl to ensure everything is incorporated. This step creates air pockets, which contribute to the cookie’s texture.
- Add Wet Ingredients: Mix in the vanilla extract, the moisture-reduced pumpkin puree, and the egg yolk. Continue mixing until just combined. Overmixing here can lead to tougher cookies.
- Combine Dry Ingredients: In a separate bowl, whisk together the all-purpose flour (remember to spoon and level!), baking soda, baking powder, salt, and cinnamon.
- Gently Combine: Gradually add the dry ingredient mixture to the wet ingredients in the mixer. Mix on low speed until just combined. Stop as soon as you see no more dry streaks of flour.
- Fold in Chocolate Chips: Remove the bowl from the mixer and gently fold in the white chocolate chips with a spatula. Don’t overmix; we want those chips evenly distributed.
- Chill the Dough: Cover the bowl with plastic wrap and chill the cookie dough for a minimum of 30 minutes in the refrigerator. If you’re short on time but want to ensure even cookies, you can pre-scoop the dough into 2-tablespoon balls before chilling. (We’ll talk more about why chilling is so important soon!).
- Preheat & Prep: While your dough chills, preheat your oven to 350°F (175°C). Line a baking sheet with parchment paper or a silicone baking mat.
- Bake: Place the chilled dough balls onto the prepared baking sheet, leaving about 2-3 inches between each cookie as they will spread.
- Bake & Tap: Bake for 9-12 minutes, or until the edges begin to lightly brown. The centers might still look a little soft—that’s okay! Immediately upon removing them from the oven, gently tap the baking sheet on top of the oven or a heat-safe surface. This helps the cookies settle, creating those desirable crinkly tops.
- Cool & Enjoy: Let the cookies cool on the baking tray for 5-10 minutes. They’ll firm up as they cool. Then, transfer them to a wire rack to finish cooling completely. Once cool, it’s time to enjoy your masterpiece!
Why Chilling Dough is Your Best Friend
You might be tempted to skip the chilling step for instant gratification, but resist! Chilling the cookie dough for at least 30 minutes (or even longer, up to 24 hours!) is a crucial step that dramatically impacts the flavor, texture, and overall success of your Pumpkin White Chocolate Chip Cookies.
The Science Behind the Chill:
- Prevents Spreading: Chilled butter melts more slowly in the oven, meaning your cookies spread less and retain a thicker, chewier texture. Unchilled dough often results in flat, crispy cookies.
- Intensifies Flavor: As the dough chills, the flour absorbs more moisture, leading to a more concentrated flavor profile. The spices and pumpkin notes become richer and more pronounced.
- Better Texture: Chilling helps the gluten in the flour relax, resulting in a more tender and less tough cookie. It also gives you that delightful chewiness that everyone loves.
- Easier Handling: Cold dough is much less sticky and easier to scoop and shape, especially when working with a softer dough like this pumpkin recipe.
I once rushed a batch without chilling, thinking “what’s the worst that could happen?” The result was a tray of flat, greasy discs that barely resembled cookies. Learn from my mistakes – the chill time is worth every minute! For more insights into baking science, check out resources like America’s Test Kitchen’s guide on baking principles.
Troubleshooting Common Cookie Woes
Even experienced bakers run into issues sometimes! Here’s a quick guide to common problems you might encounter with your Pumpkin White Chocolate Chip Cookies and how to fix them.
- Cookies are too flat and spread out:
- Cause: Dough wasn’t chilled enough, butter was too soft/melted, or too much liquid in the pumpkin puree.
- Fix: Ensure butter is softened, not melted. Always squeeze excess moisture from pumpkin. Chill dough for at least 30 minutes, or even longer. You can also try chilling the scooped cookie dough balls before baking.
- Cookies are cakey and not chewy:
- Cause: Too much flour, not enough fat, or not enough moisture squeezed from pumpkin puree.
- Fix: Measure flour using the spoon-and-level method. Double-check pumpkin puree moisture. Adding an extra egg yolk (like this recipe does) can also boost chewiness.
- Cookies are tough:
- Cause: Overmixing the dough once flour is added.
- Fix: Mix the dry ingredients into the wet until just combined. Stop as soon as no dry streaks of flour remain.
- Cookies are bland:
- Cause: Old spices, not enough vanilla, or insufficient salt.
- Fix: Use fresh spices. Ensure you’re using pure vanilla extract. Don’t skip the salt – it balances sweetness!
Ingredient Science: The Role of Baking Soda & Powder
In this recipe, we use both baking soda and baking powder. Why? Baking soda (sodium bicarbonate) needs an acid to react with, like the brown sugar and a tiny bit from the pumpkin. It helps with spread and tenderness. Baking powder, on the other hand, is double-acting, meaning it reacts once with liquid and again with heat. This gives our cookies a perfect lift and contributes to that desired soft, yet chewy texture. Understanding these leavening agents is a cornerstone of baking expertise!
Storing Your Delicious Creations
You’ve baked a fantastic batch of Pumpkin White Chocolate Chip Cookies! Now, how do you keep them fresh and delicious? Proper storage is key to enjoying them for days to come, and even meal prepping for future treats.
- At Room Temperature: Once completely cooled, store your cookies in an airtight container at room temperature for 3-5 days. A pro tip: add a half-slice of bread to the container; it helps keep the cookies soft by transferring its moisture.
- Freezing Baked Cookies: These cookies freeze beautifully! Once completely cool, place them in a single layer on a baking sheet and freeze for about an hour until solid. Then, transfer them to a freezer-safe airtight container or zip-top bag. They will last for up to two months. Thaw at room temperature or warm briefly in the microwave for a “freshly baked” experience.
- Freezing Dough: You can also freeze scooped cookie dough balls! Place them on a parchment-lined baking sheet and freeze until solid. Transfer to a freezer bag and bake from frozen, adding an extra 2-4 minutes to the baking time. This is perfect for those spontaneous cookie cravings!
For another delightful treat that stores well, my readers also love this Stuffed Red Velvet Cookies Recipe that freezes wonderfully for later enjoyment.
Beyond White Chocolate – Flavor Variations
While white chocolate chips are a match made in heaven for pumpkin, don’t be afraid to get creative! These Pumpkin White Chocolate Chip Cookies are incredibly versatile, and switching up the mix-ins can offer a whole new experience.
- Classic Chocolate Chips: Swap white chocolate for semi-sweet or dark chocolate chips for a richer, more traditional flavor.
- Cinnamon Chips: For an extra kick of spice, cinnamon chips are an incredible addition, enhancing the warm flavors of fall.
- Toffee Bits: Add a delightful crunch and buttery caramel note with toffee bits.
- Chopped Nuts: Pecans or walnuts offer a lovely texture contrast and nutty flavor. Toast them lightly before adding for an enhanced taste.
- Cream Cheese Frosting Drizzle: For an extra decadent treat, once the cookies are cool, drizzle them with a simple cream cheese glaze (powdered sugar, cream cheese, milk, and vanilla).
- Spice It Up! If you’re a true spice lover, consider adding a pinch of nutmeg, ginger, or cloves to your dough alongside the cinnamon for a more complex pumpkin pie spice blend.
If you’re new to baking with different add-ins, start with a simple swap like semi-sweet chocolate chips. For another family favorite with a unique twist, try this Pistachio NYC Cookies Recipe.
Expert Tips from My Kitchen
As someone who bakes almost daily, I’ve picked up a few tricks over the years that can make your baking experience even smoother and your results even better.
- The Spoon & Swipe Flour Method: This is crucial! Fluff up your flour in its container, then spoon it into your measuring cup. Level off the excess with the back of a knife. Never scoop directly from the bag, as this can compact the flour and lead to a dry, dense cookie. This simple technique ensures you add the right amount of flour every time.
- Ice Cream Scoop for Uniformity: Using an ice cream scoop (I prefer a 2-tablespoon size) ensures all your cookies are the same size. This means they’ll bake evenly and look beautiful on your cooling rack.
- The “Cookie Tap” for Crinkles: Don’t skip the pan tap! As soon as the cookies come out of the oven, give the baking sheet a firm tap on a heat-safe surface. This deflates them slightly, creating those lovely crinkled tops and a chewier center.
- Seasonal Context: These cookies are perfect for fall, but pumpkin puree is available year-round! They make a fantastic treat for Halloween parties, Thanksgiving dessert tables, or even a cozy Christmas afternoon. My grandmother taught me that the best recipes are those that bring comfort, no matter the season.
Frequently Asked Questions (FAQ)
Here are answers to some common questions about cookies, pumpkin, and even celebrity favorites!
Q: What is Michelle Obama’s favorite cookie?
A: While Michelle Obama has expressed a love for healthy eating, she’s also known to enjoy a good cookie! Reports indicate her favorite might be a classic Peanut Butter Cookie. Perhaps she’d enjoy a healthy twist on pumpkin cookies too!
Q: What is Taylor Swift’s favorite type of cookie?
A: Taylor Swift is famously known for her love of baking, especially for her friends and fans. Her ultimate favorite cookie is said to be Chai Sugar Cookies with a cinnamon-egg nog glaze. While ours are pumpkin, both recipes capture the cozy essence of fall!
Q: What are the 2 ingredient pumpkin spice cookies?
A: The viral 2-ingredient pumpkin spice cookies typically involve mixing a can of pumpkin puree with a box of spice cake mix. While incredibly easy, our recipe offers a more robust, homemade flavor and a chewier texture by controlling the ingredients. If you’re looking for quick and easy, they’re a fun option, but for true depth of flavor, homemade is always best!
Q: What are common white chocolate cookie mistakes?
A: Some common mistakes when making white chocolate cookies include using low-quality white chocolate (which can melt strangely or taste overly sweet), overbaking (leading to dry cookies), and not chilling the dough (resulting in excessive spreading). Our recipe addresses these by emphasizing quality ingredients, precise timing, and crucial chilling.
My Final Thoughts: A Cookie Love Story
There’s something incredibly satisfying about pulling a tray of warm, fragrant Pumpkin White Chocolate Chip Cookies from the oven. For me, it’s not just about the taste—it’s about the memories created, the cozy moments shared, and the simple joy of baking something delicious from scratch. This recipe, honed over countless batches in my own kitchen, is more than just a list of ingredients; it’s a testament to the comforting power of homemade food.
Whether you’re making these for a family gathering, a quiet evening at home, or simply to fill your house with the irresistible aroma of fall, I promise you won’t be disappointed. They’re sweet, spicy, chewy, and bursting with all the best flavors of the season. So go ahead, preheat your oven, get those ingredients ready, and treat yourself (and your loved ones!) to a batch of these unforgettable cookies. Happy baking, everyone! If you’re looking for more delicious cookie adventures, you might also love this Creme Egg Stuffed Cookies Recipe—a year-round favorite!
PrintEasy & Delicious Pumpkin White Chocolate Chip Cookies: The Ultimate Fall Comfort Treat!
Bursting with pumpkin flavor and white chocolate chips, these Pumpkin White Chocolate Chip Cookies are an easy and delicious fall dessert.
- Prep Time: 13M
- Cook Time: 15M
- Total Time: 58M
- Yield: 22 cookies
- Category: Dessert
- Method: Baking
- Cuisine: American
- Diet: Vegetarian
Ingredients
½ cup unsalted butter (1 stick), softened
½ cup packed light brown sugar
½ cup granulated sugar
6 tbsp pumpkin puree (¼ cup plus 2 tbsp), excess liquid squeezed out
1 egg yolk
1.5 cups all-purpose flour (180 g), spooned and leveled
½ tsp cinnamon or pumpkin pie spice
1 tsp vanilla extract
½ tsp baking soda
½ tsp baking powder
½ tsp salt (decrease to ¼ tsp if using salted butter)
1 cup white chocolate chips
Instructions
1. Prepare Pumpkin Puree: Using paper towels or a clean tea towel, wrap the pumpkin puree in a few layers and squeeze out as much excess liquid as possible. This is crucial for texture!
2. Cream Butter & Sugars: In a large bowl with an electric mixer, cream together the softened butter, granulated sugar, and light brown sugar for 2-3 minutes until fully combined and fluffy, scraping down the sides of the bowl as necessary.
3. Add Wet Ingredients: Mix in the vanilla extract, the prepped pumpkin puree, and the egg yolk until just combined.
4. Combine Dry Ingredients: In a separate medium bowl, whisk together the all-purpose flour, baking soda, baking powder, salt, and cinnamon or pumpkin pie spice.
5. Mix Dough: Gradually add the dry ingredients to the wet ingredients, mixing on low speed until just combined. Be careful not to overmix.
6. Fold in Chocolate Chips: Gently fold in the white chocolate chips with a spatula until evenly distributed.
7. Chill Dough: Cover the cookie dough with plastic wrap and chill in the refrigerator for at least 30 minutes. For even baking, you can pre-scoop the dough into 2-tablespoon balls before chilling.
8. Preheat Oven: While the dough chills, preheat your oven to 350°F (175°C). Line a baking sheet with parchment paper or a silicone baking mat.
9. Scoop & Bake: Place the chilled dough balls onto the prepared baking sheet, keeping them 2-3 inches apart as they will spread.
10. Bake & Tap: Bake for 9-12 minutes, or until the edges begin to lightly brown and the centers are still slightly soft. Remove from oven and immediately tap the pan on top of the oven or a heat-safe surface a few times to help the cookies settle and create crinkly tops.
11. Cool: Let the cookies cool on the baking tray for 5-10 minutes to firm up. Then, transfer them to a wire rack to finish cooling completely. Enjoy!
Notes
Flour Measurement: Always use the spoon and swipe method for measuring flour. Fluff the flour, then spoon it into the measuring cup and level with a knife.
Even Cookies: An ice cream scoop helps create uniformly sized cookies, ensuring even baking.
Mix-ins: Feel free to use your favorite chocolate chips, chopped chocolate bars, M&Ms, or cinnamon chips instead of white chocolate.
Chilling is Key: Don’t skip the chilling step! It’s essential for cookie texture and to prevent excessive spreading.
Pan Tap: Firmly tapping the pan on the oven once they’re done helps them settle and gives the cookies a slight crinkle top.
Yield & Storage: This recipe makes 18-22 cookies and can be easily doubled. Store in an airtight container at room temperature for 3-5 days, or freeze for up to two months.


