Raspberry Almond Snowball Cookies
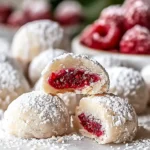
Delightful raspberry almond snowball cookies recipe Easy to make meltinyourmouth treats Perfect for holidays or any occasion
- Prep Time: 25 minutes
- Cook Time: 12 minutes
- Total Time: 37 minutes
- Yield: 24 cookies
- Category: Dessert
- Cuisine: American
Ingredients
Cookie Dough
- ½ teaspoon salt – Enhances flavors
- 2 cups (248g) all-purpose flour – Creates tender structure
- ¾ cup (76g) sliced almonds – Finely ground to add nutty richness
- 1 cup (226g) unsalted butter, softened – Creates rich, tender texture
- ½ cup (60g) powdered sugar – Sweetens dough and creates tender crumb
- ½ teaspoon almond extract – Enhances almond flavor
Filling and Coating
- 6 tablespoons (115g) seedless raspberry jam – Provides fruity center
- 1½ cups (170g) powdered sugar – For double coating
Instructions
In a mixing bowl, whisk together the all-purpose flour and salt until evenly distributed. Set this bowl aside. Add the sliced almonds to a food processor and pulse repeatedly until they’re finely ground into tiny bits resembling coarse meal. Set the ground almonds aside separately.
Step 2 – Cream Butter and SugarIn the bowl of an electric stand mixer fitted with the paddle attachment (or using a hand mixer with a large bowl), cream together the softened butter and ½ cup powdered sugar on medium speed until combined and smooth, about 2-3 minutes. Mix in the almond extract until incorporated.
Step 3 – Build the DoughWith the mixer on low speed, slowly add the flour mixture and mix just until combined. Add the ground almonds and mix on low, using a spatula to fold and gather any almonds from the bottom of the bowl to ensure even distribution. The dough should be soft and workable but not sticky. If it feels sticky, add 1-2 tablespoons more flour. If it feels dry and crumbly, add 1 tablespoon milk and mix until combined.
Step 4 – Form Cookie BottomsScoop out ½ tablespoon of dough. Roll it between your palms to shape it into a smooth ball. Using your finger or thumb, make a fairly deep indentation in the center—large enough to hold ½ teaspoon of jam. Add exactly ½ teaspoon of raspberry jam into the indentation.
Step 5 – Create Cookie Tops and SealScoop out another ½ tablespoon of cookie dough and shape it into a ball. Make an indentation in this piece as well. Gently place this indented dough ball over the jam-filled bottom piece, positioning the indentation over the jam. This creates one round ball with jam in the center. Gently press and smooth the edges where the two pieces meet, bringing some of the dough down on the sides to completely seal the ball. Check for any cracks and pinch them closed—even small cracks can allow jam to seep out during baking.
Step 6 – Chill ThoroughlyTransfer each formed cookie ball to a plate, leaving space between them so they chill evenly. Continue forming all cookies with the remaining dough. Once all cookies are shaped, transfer the plates to the refrigerator and chill for 1 hour 30 minutes. This extended chilling is essential—it firms the butter and helps the cookies hold their shape during baking.
Step 7 – Bake Until SetDuring the last 15 minutes of chilling, preheat your oven to 375°F. Line baking sheets with parchment paper. Transfer chilled cookies to the prepared baking sheets, spacing them 2 inches apart. Keep remaining dough balls chilled until ready to bake. Bake for 11-13 minutes until the cookies are set but not browned. Be careful not to overbake or the cookies can crack and jam may seep out.
Step 8 – First Powdered Sugar CoatingRemove cookies from the oven and let them cool on the baking sheet for several minutes until they’re warm but can be handled. Pour the 1½ cups powdered sugar into a small mixing bowl. Carefully roll the warm cookies in the powdered sugar to give them a light coating. The warmth helps the sugar adhere.
Step 9 – Cool and Second Coating
Transfer the lightly coated cookies to a wire cooling rack and let them cool completely, about 30 minutes. Once completely cool, roll the cookies once more in the powdered sugar to give them a thick, snowy coating that creates the signature snowball appearance.
Notes
Grind Almonds Finely: Coarsely ground almonds create grainy texture, while finely ground almonds integrate smoothly and provide delicate nutty flavor throughout.
Perfect Dough Consistency: This is the most critical factor for success. The dough must be soft enough to seal without cracking but not so sticky that it’s difficult to handle. Adjust with flour or milk as needed.
Seal Thoroughly: Check each cookie ball for cracks after sealing and pinch any closed. Even tiny cracks allow jam to leak during baking, creating messy cookies.
Don’t Skip the Chill: The 1.5-hour chill time seems long but is essential. Warm dough spreads too much during baking, causing the cookies to flatten and potentially crack open.
Watch Baking Time: These cookies should look barely done when you remove them from the oven. They’ll continue cooking slightly from residual heat. Overbaking causes cracking and jam leakage.
Double Coating Method: The warm coating creates the base layer, while the second coating after cooling creates the thick, beautiful snowball exterior that makes these cookies stunning.