
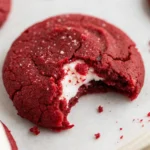
Picture this: A soft, chewy, crimson-hued cookie, infused with a whisper of cocoa and vanilla, giving way to a creamy, tangy cheesecake swirl that melts in your mouth. This isn’t just a dream; it’s my Red Velvet Cheesecake Cookie recipe, and it’s about to become your new favorite comfort-food obsession. As Sophie, the passionate baker behind SweetCraft Recipes, I’ve poured my heart and countless hours (over 9 tests, to be precise!) into perfecting this recipe, ensuring every bite is pure bliss.
These aren’t your average cookies. They’re a celebration of flavor and texture, marrying the decadent charm of classic red velvet cake with the irresistible tang of creamy cheesecake, all nestled into a portable, perfectly baked package. Whether you’re planning a festive holiday gathering, a cozy family evening, or simply craving something extraordinary, these cookies are designed to impress and delight. Get ready to bake a batch that tastes like pure joy, straight from my kitchen to yours!
Why Sophie’s Red Velvet Cheesecake Cookies Stand Out
In a world full of cookies, what makes these so special? It boils down to a few key elements, meticulously refined through my extensive testing:
- The Perfect Balance: We’ve achieved that quintessential red velvet flavor – a delicate balance of vanilla and cocoa with a hint of tang, perfectly complemented by the creamy, slightly tart cheesecake filling. It’s a symphony for your taste buds.
- Irresistible Texture: Forget dry, crumbly cookies. My recipe yields a cookie that is wonderfully soft and chewy in the center, with just the right amount of crispness around the edges. The cheesecake swirl adds an extra layer of velvety smoothness.
- Visual Appeal: The vibrant red of the cookie against the stark white of the cheesecake is simply stunning, making these cookies a showstopper on any dessert table, especially during the holidays.
- Tested for Success: As I mentioned, this recipe has been through the SweetCraft Recipes gauntlet, tested more than 9 times with various ingredient ratios and techniques. This means you’re getting a tried-and-true method that guarantees success, even if you’re a novice baker. I’ve ironed out all the kinks so you don’t have to!
These cookies truly embody the essence of comfort food with a sophisticated twist, bringing a familiar warmth while offering an exciting flavor experience.
Gather Your Ingredients
Before we dive into the delightful baking process, let’s ensure you have all your ingredients ready. Quality ingredients are the foundation of exceptional cookies!
For the Creamy Cheesecake Filling:
- 6 ounces cream cheese, at room temperature: This is non-negotiable for a smooth, lump-free filling.
- 1/2 cup powdered sugar: Adds sweetness and helps thicken the filling.
- 2 tablespoons flour: A small but mighty ingredient, this helps stabilize the cheesecake filling so it doesn’t melt out during baking.
- 1/2 teaspoon vanilla extract: Enhances the creamy flavor.
For the Vibrant Red Velvet Cookies:
- 1/2 cup unsalted butter, at room temperature: Softened butter creams beautifully, incorporating air for a tender cookie.
- 1/2 cup light brown sugar: Adds moisture and a hint of caramel flavor, contributing to chewiness.
- 1/2 cup granulated sugar: Provides sweetness and helps with spreading and crispness.
- 1 large egg + 1 large egg yolk, at room temperature: The extra yolk adds richness and chewiness.
- 2 teaspoons vanilla extract: Essential for that classic red velvet aroma and taste.
- 1 teaspoon red gel food coloring: Gel is superior to liquid for achieving a deep, vibrant red without thinning the dough too much.
- 1/3 cup Dutch processed cocoa powder: Gives that characteristic deep chocolate undertone without being overly bitter. Dutch processing makes it less acidic, enhancing the color.
- 1 3/4 cup all-purpose flour: The structural backbone of our cookies.
- 1 teaspoon baking powder: For lift and a tender crumb.
- 1/4 teaspoon baking soda: Reacts with the natural acidity in cocoa (even Dutch) to provide additional lift and tenderness, as well as enhancing the red color.
- 1/2 teaspoon salt: Balances the sweetness and enhances all the flavors.
- 1/2 cup granulated sugar, optional for rolling: Adds a lovely sparkle and a slight crunch to the exterior.
Sophie’s Ingredient Tip: Always use room temperature ingredients for both the cheesecake filling and cookie dough. This ensures everything combines smoothly, creating a uniform texture and preventing lumps. Set your butter, cream cheese, and eggs out at least an hour before you plan to bake.
Step-by-Step Instructions: Bake Your Best Red Velvet Cheesecake Cookies!
Now for the fun part! Follow these detailed steps for cookie perfection.
1. Prepare the Cheesecake Filling
In a medium bowl, combine the softened cream cheese, 1/2 cup powdered sugar, 2 tablespoons flour, and 1/2 teaspoon vanilla extract. Beat with an electric mixer on medium speed until the mixture is completely smooth, creamy, and free of any lumps. Cover the bowl and refrigerate the filling for at least 30 minutes while you prepare the cookie dough. This step is crucial to ensure the filling is firm enough to work with.
2. Cream Wet Ingredients for Cookies
In a large stand mixer bowl, fitted with the paddle attachment, cream together the softened unsalted butter, 1/2 cup light brown sugar, and 1/2 cup granulated sugar. Beat on medium speed for 2-3 minutes, until the mixture is light, fluffy, and pale in color. Make sure to scrape down the sides and bottom of the bowl periodically to ensure even mixing.
3. Add Eggs and Flavor
Add the large egg and the extra egg yolk to the creamed mixture, one at a time, beating well after each addition until fully incorporated. Once the eggs are mixed in, stir in the 2 teaspoons of vanilla extract and the 1 teaspoon of red gel food coloring. Continue mixing until the dough achieves a beautiful, uniform vibrant red hue.
4. Combine Dry Ingredients
In a separate medium bowl, whisk together the 1/3 cup Dutch processed cocoa powder, 1 3/4 cup all-purpose flour, 1 teaspoon baking powder, 1/4 teaspoon baking soda, and 1/2 teaspoon salt. Whisk vigorously for about 30 seconds to ensure all ingredients are evenly distributed.
5. Incorporate Dry into Wet
With the stand mixer on low speed, gradually add the dry ingredient mixture to the wet ingredients in the bowl. Mix just until combined. Be very careful not to overmix the dough, as overmixing can lead to tough cookies. A few small streaks of flour are perfectly acceptable.
6. Form and Fill the Cookies
Scoop out approximately 2 tablespoons of cookie dough for each cookie. Gently flatten each portion of dough in the palm of your hand. Take about 1 teaspoon of the chilled cheesecake filling and place it directly in the center of the flattened cookie dough. Carefully wrap the cookie dough around the filling, pinching the seams together to completely enclose the cheesecake. Roll the dough into a smooth ball. If you’re using the optional 1/2 cup granulated sugar for rolling, gently roll each cookie ball in the sugar to coat it evenly.
7. Chill the Cookie Dough
Place the formed cookie dough balls onto a baking sheet lined with parchment paper. Ensure they are spaced apart. Cover the baking sheet with plastic wrap and refrigerate for at least 30 minutes, or preferably 1-2 hours. This chilling step is absolutely vital for preventing the cookies from spreading too much during baking and allows the flavors to deepen.
8. Bake the Cookies
Preheat your oven to 350°F (175°C). Line two large baking sheets with parchment paper. Arrange the chilled cookie dough balls on the prepared baking sheets, leaving about 2 inches between each cookie. Bake for 10-12 minutes, or until the edges are lightly set and golden, but the centers still look slightly soft. Remember, cookies continue to bake for a few minutes after they are removed from the oven.
9. Cool and Enjoy
Once baked, remove the cookie sheets from the oven. Allow the cookies to cool on the baking sheets for 5 minutes before carefully transferring them to a wire rack to cool completely. The cheesecake filling will be very hot right out of the oven, so resist the urge to bite into them immediately! These cookies are delicious slightly warm or completely cooled.
Expert Tips for Red Velvet Cheesecake Cookie Perfection
Through my many rounds of testing, I’ve gathered invaluable insights to help you achieve the absolute best results with these cookies:
- The Power of Room Temperature Ingredients: I can’t stress this enough! Softened butter, cream cheese, and eggs emulsify beautifully, creating a smooth, homogenous dough and filling that bakes evenly. Cold ingredients can lead to lumps and a tougher texture.
- Gel Food Coloring is Your Best Friend: While liquid food coloring will technically work, you’ll need to use a lot more to achieve that signature vibrant red, which can thin out your dough and impact its texture. Gel food coloring provides intense color with minimal volume.
- Don’t Fear the Chill: The chilling step might feel like an extra hurdle, but it’s essential. Cold dough spreads less, resulting in thicker, chewier cookies. It also gives the flavors a chance to meld, intensifying that red velvet goodness.
- Measure Flour Accurately: Too much flour can make cookies dry and dense, while too little can make them spread excessively. I highly recommend using a kitchen scale for precise measurement (1 cup all-purpose flour is typically 120-125 grams). If you don’t have a scale, fluff your flour with a spoon before lightly spooning it into a measuring cup and leveling it off.
- Avoid Overmixing: Once you add the dry ingredients to the wet, mix only until just combined. Overmixing develops the gluten in the flour, leading to tougher cookies.
- Make-Ahead and Storage Solutions:
- Dough: The unbaked cookie dough balls (filled) can be refrigerated for up to 3 days or frozen for up to 3 months. If baking from frozen, add 2-3 minutes to the baking time.
- Baked Cookies: Due to the cream cheese, store baked cookies in an airtight container in the refrigerator for up to 3-4 days. You can also freeze baked cookies for up to 2 months; thaw in the fridge or at room temperature.
- Creative Variations to Try:
- Chocolate Chip Swirl: Add a handful of mini chocolate chips to the cookie dough for extra chocolatey goodness.
- Nutty Crunch: Fold in chopped pecans or walnuts for a delightful textural contrast.
- Citrus Zest: A tiny bit of orange or lemon zest in the cheesecake filling can add a bright, unexpected pop of flavor.
The Allure of Red Velvet
Red velvet, with its striking color and distinctive flavor, has a fascinating history. Originating in the Victorian era, it was initially known as “Velvet Cake” due to its fine, soft crumb. The “red” color historically came from a reaction between acidic buttermilk, vinegar, and cocoa powder (especially non-Dutch processed, high-acid cocoa), which brought out the anthocyanins in the cocoa. During WWII, beets were sometimes used to enhance the color.
Today, thanks to readily available red food coloring, we can achieve that iconic crimson hue consistently. The flavor profile is often described as a mild chocolate with a hint of tang (from traditional buttermilk or, in our case, the interaction of baking soda and cocoa), finished with a touch of vanilla. It’s truly a classic for a reason, and these cookies perfectly capture that rich legacy.
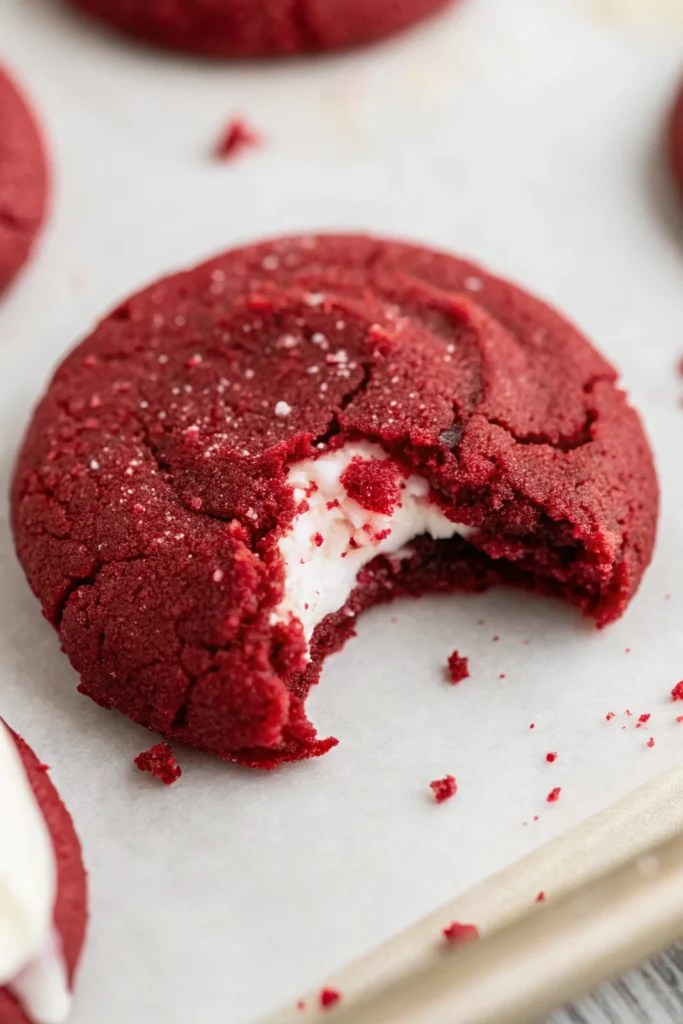
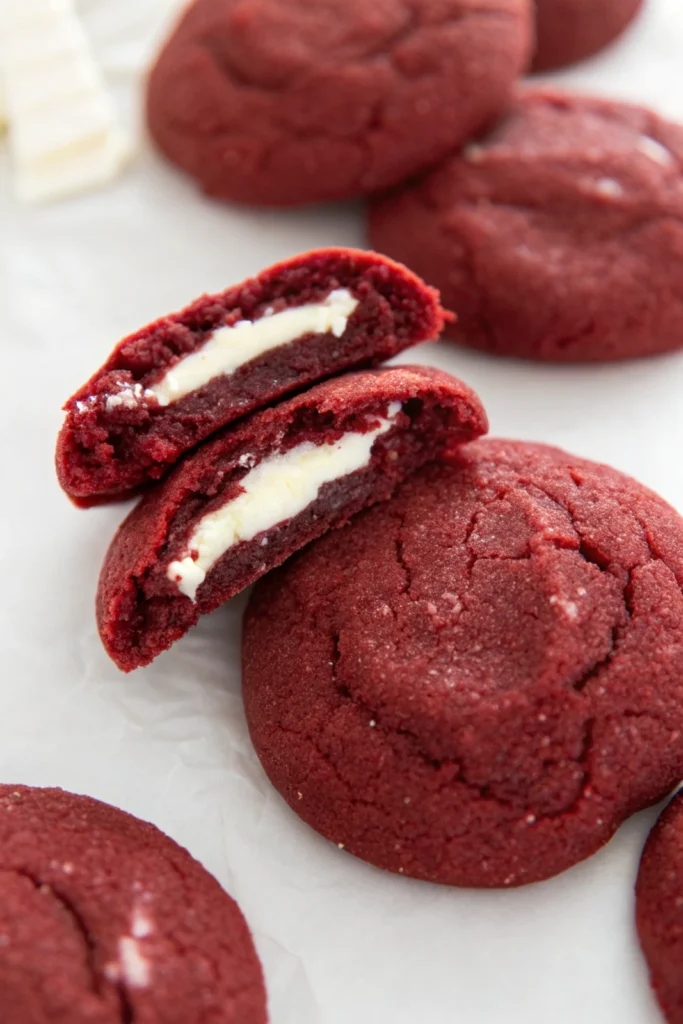
Mastering the Cheesecake Swirl: Sophie’s Secret to Success
The cheesecake swirl is undoubtedly the star of this cookie show, and getting it right is key. My little secret, which I discovered through my testing, is using a bit of flour in the cheesecake filling. This helps to stabilize the cream cheese, preventing it from completely melting and oozing out during baking.
When forming the cookies, ensure you fully encase the cheesecake filling within the cookie dough. Pinch those seams tightly! If the filling peeks out a little, don’t worry too much – it just adds to the rustic charm. However, a good seal ensures the majority of that creamy goodness stays put, creating that beautiful, luscious swirl in every bite. Chilling the cheesecake filling and the filled cookie dough balls also contributes significantly to a successful, well-defined swirl.
Perfect for Any Occasion: From Cozy Nights to Grand Celebrations
These Red Velvet Cheesecake Cookies truly shine in any setting. Their vibrant color makes them a natural fit for holiday gatherings, whether it’s Christmas, Valentine’s Day, or a festive celebration. Imagine a platter of these next to our decadent Stuffed Red Velvet Cookies! They instantly elevate any dessert table.
But they’re not just for special occasions. These cookies are the epitome of comfort food, making them ideal for a cozy night in with family. The balance of flavors is sophisticated enough for adult palates, yet approachable and delicious for kids. They’re also perfect for bake sales, potlucks, or as a thoughtful homemade gift. They transport well and are always a crowd-pleaser.
What to Serve with Your Red Velvet Cheesecake Cookies
While these cookies are utterly delightful on their own, pairing them can elevate the experience even further:
- A Glass of Milk: The classic pairing for any cookie, the cold milk perfectly complements the rich flavors.
- Hot Coffee or Tea: The slight bitterness of coffee or a robust black tea cuts through the sweetness beautifully.
- Vanilla Bean Ice Cream: Serve a warm cookie with a scoop of premium vanilla ice cream for a truly indulgent dessert.
- Champagne or Sparkling Wine: For a truly decadent holiday pairing, the bubbles and crispness of sparkling wine are surprisingly complementary.
Frequently Asked Questions About Red Velvet Cheesecake Cookies
What makes these Red Velvet Cheesecake Cookies special?
Sophie’s recipe features a perfectly balanced soft red velvet cookie base with a rich, tangy cheesecake swirl, ensuring a delightful blend of flavors and textures in every bite. It’s been expertly tested more than 9 times to guarantee a consistently delicious and easy-to-follow recipe for home bakers, making it truly unique and reliable.
Can I make Red Velvet Cheesecake Cookies ahead of time?
Absolutely! Both the cheesecake filling and the cookie dough can be prepared in advance. The cheesecake filling can be made 1-2 days ahead and stored in the refrigerator. The formed, unbaked cookie dough balls can be refrigerated for up to 3 days or frozen for up to 3 months. If baking from frozen, simply add a couple of extra minutes to the baking time, no need to thaw.
What’s the best way to store leftover Red Velvet Cheesecake Cookies?
Due to the cream cheese filling, these cookies must be stored in an airtight container in the refrigerator. They will stay fresh and delicious for 3-4 days. For longer storage, you can freeze the baked cookies for up to 2 months; simply thaw them in the refrigerator or at room temperature before enjoying.
Why did my cookies spread too much?
Common reasons for cookies spreading include the dough being too warm (ensure proper chilling time!), overmixing the dough (which can develop too much gluten), or inaccurate flour measurement. Always use room temperature ingredients as specified, and don’t skip the chilling step – it’s a game-changer! Using gel food coloring instead of liquid also helps maintain dough consistency.
Can I use regular cocoa powder instead of Dutch processed?
You can, but it might slightly alter the color and flavor profile. Dutch processed cocoa is less acidic, which can enhance the red color when paired with baking soda, and gives a smoother, less bitter chocolate taste. If you use natural cocoa, the red hue might not be as deep, and the chocolate flavor might be a bit sharper.
More Cookie Inspiration from SweetCraft Recipes
If you’re as passionate about creating irresistible cookies as I am, you’re in the right place! After mastering these Red Velvet Cheesecake Cookies, you might love exploring other incredible creations from my kitchen. Don’t miss our viral Pistachio NYC Cookies for a truly unique treat, or indulge in the rich, comforting flavors of my Peanut Butter Nutella Cookie Recipe. For those who adore a surprise in every bite, our White Chocolate Stuffed Cookies are an absolute must-try! Each recipe is crafted with the same dedication to flavor and quality you found here.
Your New Favorite Cookie Awaits!
These Red Velvet Cheesecake Cookies are more than just a dessert; they’re an experience. They represent the perfect fusion of classic indulgence and thoughtful craftsmanship, all brought to life through my dedicated testing process. I truly believe you’ll fall in love with their soft texture, decadent cheesecake swirl, and beautiful crimson hue.
So, gather your ingredients, preheat your oven, and prepare to fill your home with the sweet aroma of baking bliss. I can’t wait for you to try Sophie’s Irresistible Red Velvet Cheesecake Cookies. Bake them for your loved ones, share them with friends, or simply treat yourself to a moment of pure, unadulterated cookie joy.
If you make these cookies, I’d absolutely love to hear about it! Share your photos and thoughts in the comments below. Happy baking, sweet friends!
PrintRed Velvet Cheesecake Cookies
Soft, chewy, and decadently creamy, Sophie’s Red Velvet Cheesecake Cookies combine the rich cocoa flavor of classic red velvet with a luscious cheesecake swirl. Tested and perfected over nine rounds, this SweetCraft Recipes favorite delivers bakery-style results at home — ideal for holidays, parties, and cozy nights in.
- Prep Time: 25 mins (plus chilling)
- Cook Time: 12 mins
- Total Time: 1 hr
- Yield: 18 cookies
- Category: Cookies
- Cuisine: American
Ingredients
For the Cheesecake Filling:
6 oz (170 g) cream cheese, room temperature
1/2 cup (60 g) powdered sugar
2 tablespoons all-purpose flour
1/2 teaspoon vanilla extract
For the Red Velvet Cookie Dough:
1/2 cup (115 g) unsalted butter, room temperature
1/2 cup (100 g) light brown sugar
1/2 cup (100 g) granulated sugar
1 large egg + 1 egg yolk, room temperature
2 teaspoons pure vanilla extract
1 teaspoon red gel food coloring
1/3 cup (35 g) Dutch processed cocoa powder
1 3/4 cups (220 g) all-purpose flour
1 teaspoon baking powder
1/4 teaspoon baking soda
1/2 teaspoon salt
1/2 cup (100 g) granulated sugar, for rolling (optional)
Instructions
Prepare the Cheesecake Filling:
Beat cream cheese, powdered sugar, flour, and vanilla until smooth and lump-free. Chill for at least 30 minutes to firm.
Make the Cookie Dough:
Cream butter, brown sugar, and granulated sugar together for 2–3 minutes until light and fluffy.
Add egg, yolk, vanilla, and red gel food coloring. Beat until well blended and evenly red.
Mix the Dry Ingredients:
Whisk cocoa powder, flour, baking powder, baking soda, and salt in a separate bowl.
Combine Wet & Dry:
Gradually add dry ingredients to the butter mixture on low speed. Mix only until just combined.
Assemble Cookies:
Scoop 2 tablespoons of dough and flatten slightly. Place 1 teaspoon chilled cheesecake filling in the center, then wrap dough around it and seal. Roll into a smooth ball. If desired, roll in granulated sugar.
Chill:
Refrigerate cookie dough balls for at least 30 minutes (or up to 2 hours) to prevent spreading.
Bake:
Preheat oven to 350°F (175°C). Line baking sheets with parchment paper. Arrange cookies 2 inches apart. Bake 10–12 minutes, until edges are set but centers look slightly soft.
Cool:
Let cookies rest on the baking sheet for 5 minutes, then transfer to a wire rack. Enjoy warm or fully cooled.
Notes
💡 **Sophie’s Expert Tips**
• Always use room-temperature butter, cream cheese, and eggs for smooth, even texture.
• Use red gel food coloring — it gives vibrant color without thinning the dough.
• Don’t skip chilling! Cold dough spreads less and keeps cookies thick and chewy.
• For accuracy, measure flour by weight or spoon and level carefully.
• Store cookies in an airtight container in the fridge up to 4 days, or freeze up to 2 months.
• Unbaked filled dough balls can also be frozen for quick, fresh cookies anytime.
• Serving suggestion: Pair with coffee, tea, or vanilla ice cream for a perfect dessert.


