
Table of Contents
What Makes This Red White & Blue Mixed Berry Dessert Worth Making
Honestly, who doesn’t love a dessert that looks impressive but is secretly super easy? This Red White & Blue Mixed Berry dessert is exactly that. First off, it’s completely no-bake. That means no oven, no fuss, and no worrying about scorching anything. You just mix, layer, and chill, making it ideal for hot summer days or when your oven is busy with other dishes. Beyond its simplicity, the flavor and texture combination is a winner. You get the satisfying crunch of the graham cracker crust, the smooth and tangy sweetness of the cream cheese and whipped cream layers, and the burst of fruity goodness from both the strawberry and blueberry pie fillings. It’s a symphony of tastes that keeps you coming back for another bite. The colors are also incredibly vibrant, making it a beautiful centerpiece for any gathering, especially those with a patriotic theme. Plus, it’s a crowd-pleaser! Everyone, from kids to adults, adores this type of creamy, fruity, and cool dessert. It’s truly a Mixed Berry masterpiece that delivers on both looks and taste.Ingredients You Will Need
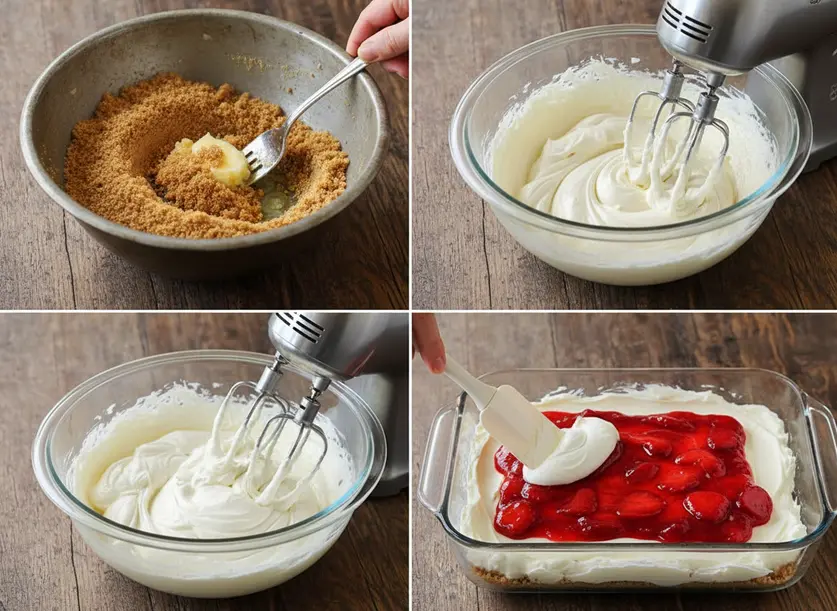
Gathering your ingredients for this Red White & Blue Mixed Berry delight is straightforward. For the golden crust, you’ll need a good amount of graham cracker crumbs, which you can buy pre-crushed or crush yourself from whole graham crackers. You’ll also need unsalted butter, melted to help bind those crumbs together perfectly. Moving on to the creamy heart of the dessert, make sure you have two packages of cream cheese, softened to room temperature for easy blending. Confectioners’ sugar, also known as powdered sugar, adds a delicate sweetness without any grittiness. You’ll also need a generous amount of whipping cream, chilled, to create that light and airy texture. Don’t forget the vanilla extract; we’ll divide it, using some for the cream cheese mixture and the rest for the whipped cream, adding a lovely aromatic note. Finally, some granulated sugar will be whipped into the cream to stabilize it. For the vibrant fruit layers, pick up one can of strawberry pie filling and one can of blueberry pie filling. These provide convenient, ready-to-use fruit layers that make assembly a breeze. This delicious Mixed Berry treat is truly a snap to put together with these simple ingredients. Let’s get layering and create this amazing Red White & Blue Mixed Berry dessert. Follow these steps carefully for the best results.- Prepare the Crust: In a medium bowl, combine your graham cracker crumbs and the melted unsalted butter. Use a fork to blend these two ingredients until all the crumbs are evenly moistened and resemble wet sand.
- Reserve Crumbs: Set aside about 3 tablespoons of these moistened graham cracker crumbs. You’ll use these later to sprinkle on top of the finished dessert for an extra crunch and pretty garnish.
- Press the Crust: Firmly press the remaining crumb mixture into the bottom of a 9×13-inch pan. Make sure the pan has been lightly sprayed with non-stick cooking spray to prevent sticking. Press it down well to form a compact layer.
- Make Cream Cheese Base: In a large mixing bowl, use an electric mixer to cream together the softened cream cheese, confectioners’ sugar, and 1 teaspoon of vanilla extract until the mixture is completely smooth and free of lumps. Scrape down the sides of the bowl as needed.
- Whip the Cream: In a separate, chilled bowl, whip the cold whipping cream, granulated sugar, and the remaining 1 teaspoon of vanilla extract until stiff peaks form. Be careful not to over-whip, as it can turn grainy.
- Combine Mixtures: Gently fold the whipped cream into the cream cheese mixture by hand. Mix until they are just well combined and no streaks of cream cheese or whipped cream remain. Don’t overmix, or you might lose the airy texture of the whipped cream.
- First Cream Layer: Spread about one-third (roughly 3 cups) of the combined cream cheese/whipped cream mixture evenly over the pressed graham cracker crust in the pan.
- Add Strawberry Filling: Drop spoonfuls of the strawberry pie filling directly on top of the first cream cheese layer. Gently spread the strawberry filling evenly, connecting the dollops, making sure to cover the cream layer completely.
- Second Cream Layer: Carefully spread another one-third of the cream cheese/whipped cream mixture over the strawberry layer. Be gentle to avoid mixing the colors, aiming for a clean, even layer that covers the red completely.
- Add Blueberry Filling: Drop large spoonfuls of the blueberry pie filling onto this second cream cheese layer. Gently spread the blueberry filling evenly across the pan, connecting the dollops, to form your blue layer.
- Final Cream Layer: Top the blueberry layer with the remaining one-third of the cream cheese/whipped cream mixture. Gently spread it out to cover the blueberry layer completely and create your white top layer.
- Garnish and Chill: Sprinkle the reserved 3 tablespoons of graham cracker crumbs evenly over the top of the dessert. Cover the pan tightly with plastic wrap and refrigerate the dessert overnight. This chilling time is crucial for the layers to set properly and for the flavors to meld, ensuring a perfect slice of this Mixed Berry delight.
Tips for the Best Results
Making this Red White & Blue Mixed Berry dessert truly shine comes down to a few key tips. First, ensure your cream cheese is properly softened to room temperature. This makes creaming it with the confectioners’ sugar much easier and prevents lumps in your smooth, creamy layer. Trying to cream cold cream cheese will result in a lumpy mixture, no matter how long you beat it. When whipping the cream, start with a cold bowl and cold beaters if possible; this helps the cream whip faster and achieve those stiff peaks. Watch it carefully and stop just as stiff peaks form; over-whipping can turn it grainy or even buttery. Gently folding the whipped cream into the cream cheese mixture by hand helps maintain its airy texture. Don’t use your electric mixer for this step! Also, be delicate when spreading the fruit pie fillings. Don’t press too hard or try to swirl them into the cream layers. The goal is distinct, colorful layers. Just spread them gently until they cover the cream. Finally, the overnight refrigeration step is absolutely non-negotiable. This allows the layers to firm up beautifully, making for clean slices and letting the flavors fully develop. Store any leftovers covered tightly in the refrigerator for up to 3-4 days; the crust will soften slightly over time, but the flavors of this Mixed Berry treat will still be fantastic.Variations to Try
While this Red White & Blue Mixed Berry dessert is perfect as is, there are plenty of ways to customize it to your taste! For a different crust, consider using crushed vanilla wafers or even Oreo cookies for a chocolate twist; just follow the same butter-to-crumb ratio. If you want to use fresh berries instead of pie filling, you certainly can. You might want to toss them with a little sugar and cornstarch and lightly cook them to create a simple compote, or arrange them fresh over a thin layer of clear glaze or gelatin to help them set and keep their vibrant color. For an extra pop of flavor, you could add a hint of lemon zest to the cream cheese mixture. Another fun variation is to make individual servings! Layer the ingredients in clear parfait glasses or small jars for a stunning presentation at parties. This also makes serving a breeze. You could also experiment with other pie filling flavors if you’re not sticking to the patriotic theme, like cherry, peach, or even lemon. No matter how you switch it up, this Mixed Berry dessert base is incredibly versatile and always delicious.FAQ
Can I use fresh berries instead of pie filling for this Mixed Berry dessert?
You absolutely can use fresh berries, but be aware it will change the texture and stability slightly. If using fresh, consider making a quick compote by cooking them briefly with a little sugar and cornstarch to create some body. Alternatively, arrange them fresh and perhaps brush them with a thin layer of clear fruit glaze or gelatin to help them set and prevent them from leaking too much moisture into the cream layers. The pie filling provides a thick, stable layer, so fresh berries will be juicier and less uniform.How long does this Red White & Blue Mixed Berry dessert need to chill?
This dessert truly benefits from a long chill time. While a minimum of 4-6 hours might work in a pinch, it’s best to refrigerate it for at least 8 hours, and ideally overnight. This extended chilling period allows the cream cheese layers to firm up completely and the flavors to fully meld, resulting in clean, perfect slices and a richer overall taste experience for this Mixed Berry treat.Can I make this dessert ahead of time?
Yes, this Red White & Blue Mixed Berry dessert is an excellent make-ahead option! In fact, preparing it a day in advance is highly recommended. It needs the overnight chilling to set properly, so planning ahead is part of the recipe. You can prepare it up to two days in advance for the freshest taste and best texture, making it a perfect stress-free dessert for entertaining.Red White & Blue Mixed Berry Dessert
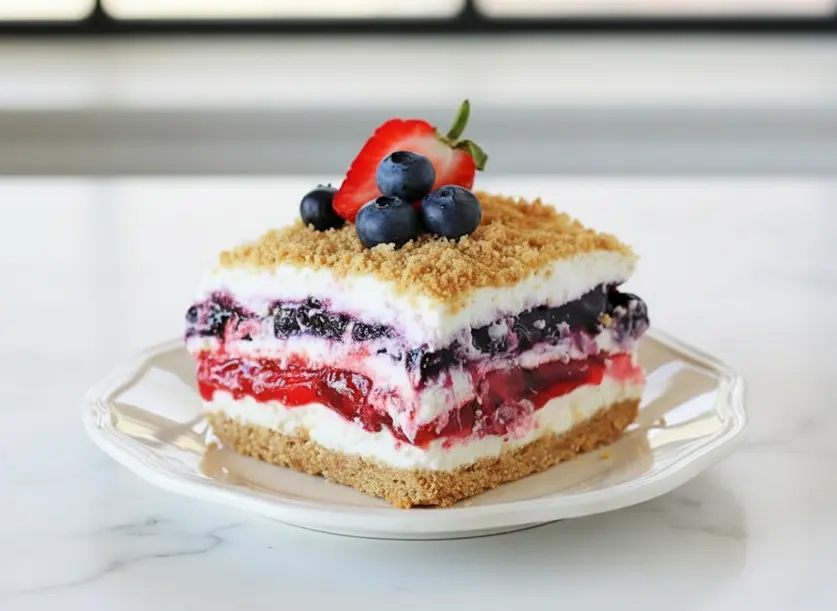
This no-bake Red White & Blue Mixed Berry dessert features layers of sweet graham cracker crust, fluffy cream cheese and whipped cream, and vibrant strawberry and blueberry pie fillings. It’s an easy, show-stopping treat perfect for any celebration, offering a delightful combination of creamy, fruity, and crunchy textures.
- Prep Time: 25 minutes
- Total Time: 25 minutes
- Yield: 12 servings
Ingredients
- 2 cups graham cracker crumbs
- 0.5 cup unsalted butter (melted)
- 16 oz cream cheese (softened to room temperature (two 8oz packages))
- 1 cup confectioners’ sugar
- 2 cups cold whipping cream (chilled)
- 2 tsp vanilla extract (divided (1 tsp for cream cheese mixture, 1 tsp for whipped cream))
- 0.25 cup granulated sugar
- 1 can strawberry pie filling ((approx. 21 oz))
- 1 can blueberry pie filling ((approx. 21 oz))
Instructions
- In a medium bowl, combine your graham cracker crumbs and the melted unsalted butter. Use a fork to blend these two ingredients until all the crumbs are evenly moistened and resemble wet sand.
- Set aside about 3 tablespoons of these moistened graham cracker crumbs. You’ll use these later to sprinkle on top of the finished dessert for an extra crunch and pretty garnish.
- Firmly press the remaining crumb mixture into the bottom of a 9×13-inch pan. Make sure the pan has been lightly sprayed with non-stick cooking spray to prevent sticking. Press it down well to form a compact layer.
- In a large mixing bowl, use an electric mixer to cream together the softened cream cheese, confectioners’ sugar, and 1 teaspoon of vanilla extract until the mixture is completely smooth and free of lumps. Scrape down the sides of the bowl as needed.
- In a separate, chilled bowl, whip the cold whipping cream, granulated sugar, and the remaining 1 teaspoon of vanilla extract until stiff peaks form. Be careful not to over-whip, as it can turn grainy.
- Gently fold the whipped cream into the cream cheese mixture by hand. Mix until they are just well combined and no streaks of cream cheese or whipped cream remain. Don’t overmix, or you might lose the airy texture of the whipped cream.
- Spread about one-third (roughly 3 cups) of the combined cream cheese/whipped cream mixture evenly over the pressed graham cracker crust in the pan.
- Drop spoonfuls of the strawberry pie filling directly on top of the first cream cheese layer. Gently spread the strawberry filling evenly, connecting the dollops, making sure to cover the cream layer completely.
- Carefully spread another one-third of the cream cheese/whipped cream mixture over the strawberry layer. Be gentle to avoid mixing the colors, aiming for a clean, even layer that covers the red completely.
- Drop large spoonfuls of the blueberry pie filling onto this second cream cheese layer. Gently spread the blueberry filling evenly across the pan, connecting the dollops, to form your blue layer.
- Top the blueberry layer with the remaining one-third of the cream cheese/whipped cream mixture. Gently spread it out to cover the blueberry layer completely and create your white top layer.
- Sprinkle the reserved 3 tablespoons of graham cracker crumbs evenly over the top of the dessert. Cover the pan tightly with plastic wrap and refrigerate the dessert overnight. This chilling time is crucial for the layers to set properly and for the flavors to meld, ensuring a perfect slice of this Mixed Berry delight.
Notes
For best results, ensure cream cheese is softened to room temperature before mixing to prevent lumps. When whipping cream, use a cold bowl and beaters, and avoid over-whipping to prevent graininess. Gently fold whipped cream into cream cheese mixture to maintain airy texture. Be delicate when spreading fruit fillings to maintain distinct layers. Refrigerate the dessert for at least 8 hours, ideally overnight, for layers to set and flavors to meld. Store leftovers covered in the refrigerator for up to 3-4 days.


