
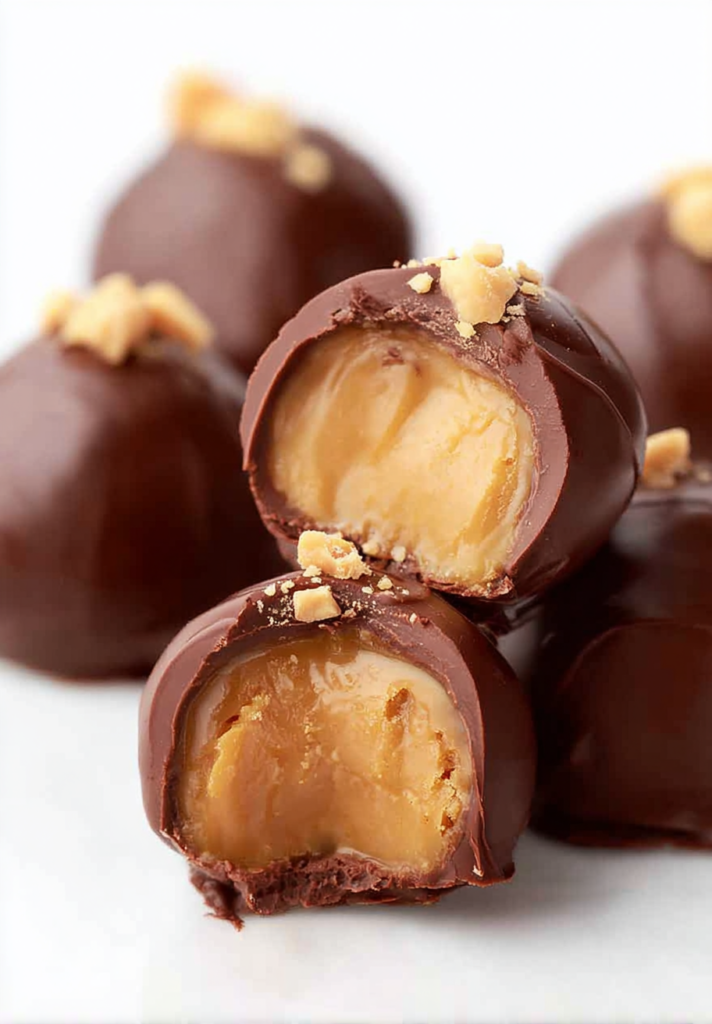
There is something inherently magical about the combination of deeply toasted caramel and velvety white chocolate. When you bite through a crisp, dark chocolate shell into a soft, salty-sweet center, it feels like a professional pâtisserie experience right in your own kitchen. These Salted Caramel White Chocolate Truffles are the epitome of indulgence, offering a sophisticated flavor profile that belies how simple they are to create. Whether you are looking for the perfect DIY holiday gift or a show-stopping dessert for your next dinner party, these truffles deliver on every front. By mastering a few simple techniques—like reaching the elusive “soft ball stage”—you can transform basic pantry staples like condensed milk and butter into a gourmet masterpiece that rivals any luxury chocolate brand.

Why You’ll Love This Recipe
You will fall in love with this recipe because it offers maximum reward for minimal effort. Unlike traditional truffles that require tempered ganache and precise cooling phases, this recipe uses a “fudge-base” method that is incredibly forgiving. You have the flexibility to choose between the speed of a microwave or the control of a stovetop. Furthermore, the balance of flavors is impeccable; the sea salt cuts through the richness of the white chocolate and sweetened condensed milk, preventing the treat from becoming cloyingly sweet. They are also highly customizable—you can swap the coating, add a nutty crunch, or even infuse the caramel with vanilla or espresso for a unique twist.
What Is a Salted Caramel White Chocolate Truffle?
At its core, this truffle is a hybrid between a traditional French ganache truffle and an American-style fudge. While most truffles use heavy cream, this version utilizes sweetened condensed milk and butter to create a “chewy-soft” texture that holds its shape at room temperature but melts instantly on the tongue. The “Salted Caramel” element comes from cooking the sugar and milk together until the proteins brown (the Maillard reaction), creating a natural caramel flavor without needing to burn dry sugar. By folding in white chocolate at the end, we add body and a creamy, buttery finish that elevates the caramel to a more sophisticated level of confectionery.
Ingredients Overview
To achieve the best results, quality is paramount. Here is what you will need:
- Sweetened Condensed Milk (240ml): This acts as the base of our caramel. It provides the sugar and milk solids necessary for that characteristic “fudgey” bite.
- Unsalted Butter (60g): Use high-quality grass-fed butter if possible. It adds a richness and silkiness to the caramel that cannot be replicated.
- Brown Sugar (90g): The molasses in the brown sugar deepens the color and provides a hint of toffee flavor that white sugar lacks.
- White Chocolate (150g): Look for white chocolate that contains real cocoa butter rather than vegetable fats. This ensures it melts smoothly into the hot caramel.
- Sea Salt (1/2 tsp): Fine sea salt or fleur de sel is best. It disperses evenly and provides that essential savory contrast.
- Dark or Milk Chocolate (300g): This is for the outer shell. A dark chocolate (60% cocoa) provides a beautiful bitter contrast to the sweet interior.
- Optional Toppings: Crushed hazelnuts or peanuts add a necessary textural element (crunch) to the otherwise soft truffle.
Ingredient Substitutions & Tips
If you find yourself missing an ingredient, don’t panic. You can substitute the brown sugar with muscovado for an even deeper, earthier caramel flavor. For those with dairy sensitivities, while this specific recipe relies heavily on condensed milk, there are coconut-based condensed milks available that can work, though the setting temperature may vary slightly. If you prefer a less sweet treat, increase the sea salt to 3/4 teaspoon and use an extra-dark 70% cocoa coating. For a nut-free version that still has crunch, try topping the wet chocolate shells with crushed pretzels or a light dusting of cocoa powder.
Step-by-Step Instructions
1. Preparing the Caramel Base
Regardless of your chosen method, your goal is to combine the butter, condensed milk, and brown sugar into a homogenous, thickened state.
Microwave Method: Use a large, high-sided glass bowl. The mixture will bubble up significantly, and a small bowl will lead to a mess. Heat for 3 minutes total, stirring every 60 seconds. Then, heat for another 2 minutes, stirring every 30 seconds. This frequent stirring prevents the edges from scorching.
Stovetop Method: Use a heavy-bottomed saucepan over low-medium heat. Stir constantly with a silicone spatula, ensuring you scrape the bottom and corners. Once the mixture simmers and thickens (about 5-6 minutes), it is ready.
2. The Critical Temperature
The caramel is ready when it reaches the “soft ball stage” (112°C / 234°F). If you don’t have a thermometer, the mixture should be a deep golden hue and thick enough to coat the back of a spoon heavily.
3. Incorporating the White Chocolate
Remove the heat and immediately add the broken white chocolate and sea salt. Stir vigorously. The residual heat from the caramel will melt the chocolate, creating a glossy, smooth “caramel-fudge” consistency.
4. Chilling and Setting
Transfer the mixture to a bowl, cover with plastic wrap (touching the surface to prevent a skin from forming), and refrigerate for 4 hours. It must be firm enough to roll without sticking excessively to your palms.
5. Shaping and Coating
Scoop tablespoon-sized portions. If the mixture is too cold, let it sit for 10 minutes. Roll into balls. Melt your dark chocolate in 30-second bursts in the microwave. Use a fork to dip each ball, tap off the excess, and slide onto parchment paper. Top with nuts immediately before the chocolate sets.
Expert Baking/Cooking Tips
To ensure your truffles look professional, keep your hands cool while rolling. If the fudge starts to melt, pop it back in the fridge for 15 minutes. When dipping, use a dedicated chocolate dipping fork or a regular dinner fork. Do not use a spoon, as it traps too much excess chocolate, leading to a “foot” at the bottom of your truffle. Finally, if your melted chocolate for the coating is too thick, add one teaspoon of coconut oil or cocoa butter to thin it out; this creates a thinner, snappier shell that is easier to bite through.
The Science of the Soft Ball Stage
In confectionery, the “Soft Ball Stage” is a specific concentration of sugar in a solution. At 112°C (234°F), the water content has evaporated enough that the remaining syrup will form a soft, flexible ball when dropped into cold water. This is the “sweet spot” for truffles. If you stop before this temperature, your truffles will be too gooey and won’t hold their shape. If you exceed 115°C, the caramel enters the “firm ball” or “hard ball” stage, resulting in a truffle that is too chewy or even hard like a candy. Precision here is what separates a good cook from a great one.
Serving Suggestions
These truffles are incredibly rich, so they are best served as a “mignardise”—a small sweet bite at the end of a meal. They pair beautifully with a strong espresso or a glass of dry tawny port. For a festive look, place each finished truffle in a gold or silver mini-cupcake liner. If you are serving them at a party, arrange them on a marble slab or a dark wooden board to make the chocolate colors pop. A light final dusting of flaky Maldon sea salt right before serving adds a beautiful visual and a burst of flavor.
Storage & Make-Ahead Tips
These are the perfect make-ahead treats. They can be stored in an airtight container in the refrigerator for up to 2 weeks. Because of the dairy content, I do not recommend storing them at room temperature for more than a few hours. For longer storage, you can freeze the uncoated fudge balls for up to 3 months. When you are ready to serve, thaw them in the fridge overnight and then dip them in fresh melted chocolate. This ensures the coating remains shiny and crisp.

FAQs
1. Why is my caramel grainy?
Graininess usually occurs if the sugar crystals didn’t dissolve completely before the mixture started boiling. Ensure the butter and sugar are fully melted on low heat before increasing the temperature.
2. Can I use white chocolate chips instead of a bar?
Yes, but be aware that chips often contain stabilizers that prevent them from melting as smoothly as high-quality bar chocolate. A chopped bar is always preferred for the smoothest texture.
3. My truffles are too soft to roll! What did I do wrong?
You likely didn’t cook the mixture long enough to reach the 112°C soft ball stage. You can try returning the mixture to a pan and heating it slightly more, or simply serve the mixture as a “spoonable” fudge or cake filling.
4. How do I get a smooth chocolate finish?
Make sure your truffles are cold when dipping, and your coating chocolate is warm but not hot. If the chocolate is too hot, it will melt the truffle; if it’s too cold, it will go on too thick.
5. Can I use milk chocolate for the center?
While you can, the flavor will be very different. The white chocolate is used here more for its texture and ability to let the caramel flavor shine through. Milk chocolate will dominate the flavor profile.
Making your own Salted Caramel White Chocolate Truffles is a rewarding journey into the world of candy making. While it requires a bit of patience during the chilling phase, the result is a professional-grade confection that is sure to impress. Don’t be afraid of the caramel process—treat it with respect, watch your temperatures, and you will be rewarded with the most decadent, silky-smooth truffles you’ve ever tasted. Happy rolling!
Salted Caramel White Chocolate Truffles
Decadent, melt-in-your-mouth truffles with a rich salted caramel and white chocolate fudge center, encased in a snap-perfect chocolate shell.
- Prep Time: 20 minutes
- Cook Time: 10 minutes
- Total Time: 4 hours 30 minutes
- Yield: 24 truffles
- Category: Dessert
- Cuisine: Modern
Ingredients
Unsalted butter – 60 grams
Sweetened condensed milk – 240 ml
Brown sugar – 90 grams
White chocolate, broken – 150 grams
Sea salt – 1/2 teaspoon
Dark or milk chocolate for coating – 300 grams
Crushed peanuts or hazelnuts (optional) – for garnish
Instructions
Combine butter, condensed milk, and brown sugar in a medium bowl or saucepan.
Cook using the microwave (5-6 mins total) or stovetop until the mixture reaches 112°C (234°F).
Stir in white chocolate pieces and sea salt until completely smooth.
Cover and refrigerate for 3-4 hours until the fudge is firm.
Scoop tablespoon-sized portions and roll into smooth balls.
Melt the coating chocolate and dip each ball using a fork.
Place on parchment paper, top with nuts if desired, and chill for 30 minutes to set.
Notes
• Use a candy thermometer to ensure the caramel reaches exactly 112°C for the perfect texture.
• If the caramel is too hard to roll, let it sit at room temperature for 10 minutes.
• High-quality chocolate with at least 60% cocoa solids works best for the coating.


