
There is something inherently nostalgic about a thick, soft sugar cookie piled high with swirls of creamy buttercream. It’s the kind of treat that transports you back to childhood bake sales, holiday parties, and rainy afternoons in the kitchen. If you’ve been searching for the ultimate Soft and Chewy Sugar Cookies recipe that actually stays soft for days, you have officially found it.
Forget those dry, crunchy discs that crumble into dust. These cookies are pillowy, tender, and perfectly balanced with a rich vanilla flavor. Whether you’re looking for the perfect holiday cookie or just a weekend project with the kids, this recipe is a total game-changer.
Why You’ll Love This Recipe
- Perfect Texture: These cookies have a soft-baked center and slightly chewy edges—the holy grail of cookie textures.
- Minimal Chilling: We only require 30 minutes of chill time, just enough to make the dough easy to handle without making you wait all day.
- Versatile Frosting: The American buttercream is stable enough for piping beautiful rosettes but soft enough to melt in your mouth.
- Pantry Staples: You likely have every single ingredient in your kitchen right now.
- Crowd-Pleaser: These are always the first to disappear at parties and are perfect for Pinterest-worthy decorating.
Ingredient Notes
To get that bakery-quality result at home, the quality and temperature of your ingredients matter more than you think.
- Unsalted Butter: Use high-quality butter and ensure it is truly at room temperature. It should be soft enough to leave an indent when pressed, but not greasy or melting.
- Granulated Sugar: This provides the sweetness and helps create those slightly crisp edges.
- Large Eggs: Always use room temperature eggs. They emulsify much better into the butter and sugar, creating a smoother dough.
- Vanilla Extract: With so few ingredients, vanilla is the star. Use pure vanilla extract rather than imitation for the best flavor.
- All-Purpose Flour: Crucial Tip: Measure your flour properly! Use a spoon to fluff the flour, fill the measuring cup, and then level it off with a knife. Packing flour into the cup is the #1 reason for dry, tough cookies.
- Heavy Cream: For the frosting, heavy cream creates a much fluffier, silkier texture than milk.
Step-by-Step Instructions
1. Cream the Butter and Sugar
In a large mixing bowl or the bowl of your stand mixer, combine your room-temperature butter and granulated sugar. Beat them together on medium-high speed for at least 60 seconds. You’re looking for a “light and fluffy” texture—this incorporates air which helps with the lift and softness of the cookie.
2. Emulsify the Wet Ingredients
Add your eggs and vanilla extract to the creamed butter. Continue to beat for another minute. Don’t worry if it looks a bit separated at first; keep mixing until it’s a pale, cohesive, and fluffy mixture.
3. Mix the Dry Ingredients
In a separate bowl, sift your flour, baking powder, and salt. Sifting is an extra step, but it ensures no clumps of baking powder ruin your bite. Gradually add this to the wet ingredients, mixing on low speed until just combined. Overmixing at this stage develops gluten, which leads to tough cookies.
4. The Short Chill
Cover the bowl and pop it into the fridge for 30 minutes. This allows the flour to fully hydrate and the butter to firm up, preventing the cookies from spreading too thin in the oven.
5. Scoop and Bake
Preheat your oven to 350°F (175°C). Scoop the dough into 1.5-inch balls (about 2 tablespoons each). If you want that classic “Lofthouse” look, flatten them slightly with the bottom of a glass. Bake for 10-12 minutes. The secret is to pull them out when the edges are just barely golden and the centers still look slightly “under-baked.” They will finish setting on the hot pan.
6. Whip the Buttercream
While the cookies cool completely, whip your butter, powdered sugar, cream, vanilla, and salt until it reaches a cloud-like consistency. If you want to get creative, this is the time to add gel food coloring!
Expert Tips for Best Results
- Don’t Skip the Salt: Salt is the flavor enhancer for the sugar and vanilla. A pinch in the frosting is essential to cut through the sweetness.
- Cool Completely: Never frost a warm cookie! Even a slightly warm cookie will cause your beautiful buttercream to melt and slide off. Wait at least 30-45 minutes.
- Use a Cookie Scoop: For even baking, all your cookies need to be the same size. A medium cookie scoop is your best friend for consistency.
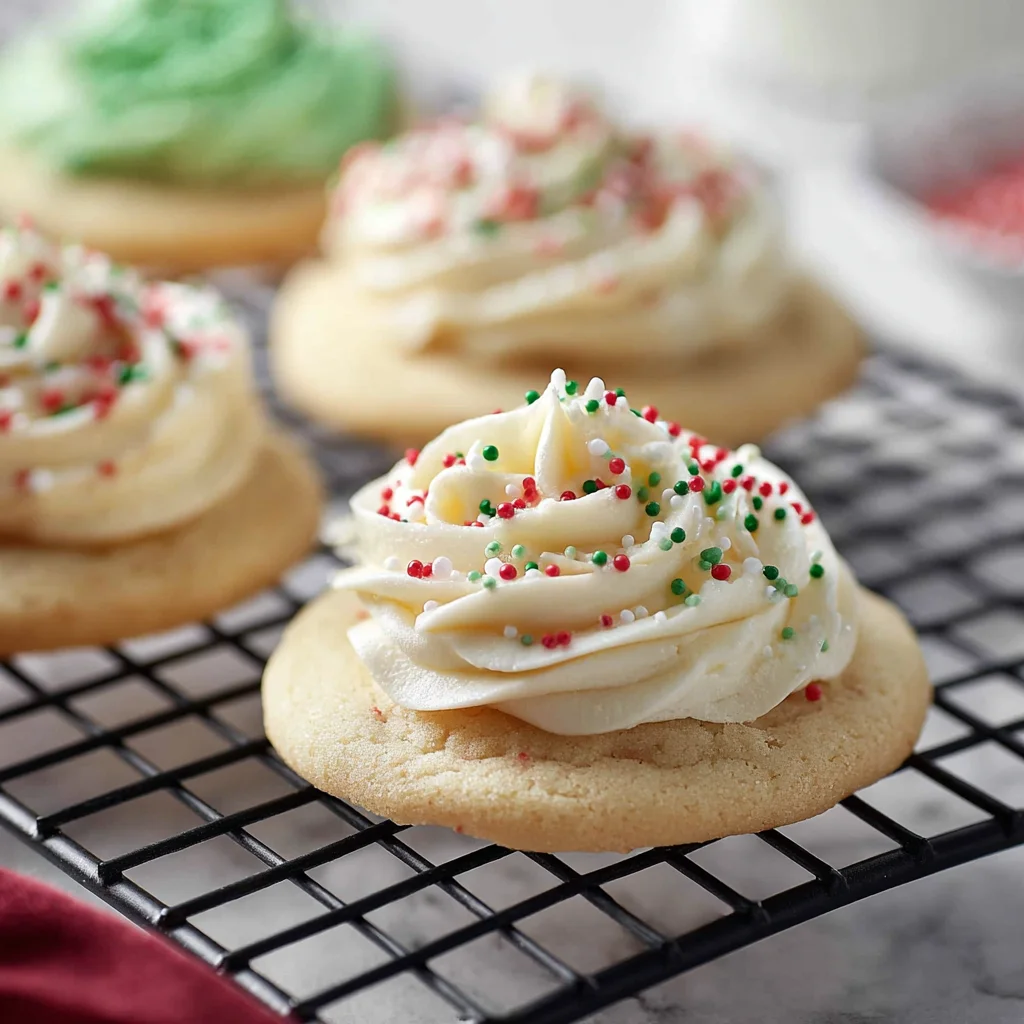
- Piping Tips: For the rosettes shown in the photos, use a Wilton 2D or 1M tip. Start in the center of the cookie and spiral outward.
Variations and Substitutions
- Almond Twist: Replace 1 teaspoon of vanilla extract with ½ teaspoon of almond extract in either the dough or the frosting for a professional bakery flavor profile.
- Lemon Sugar Cookies: Add the zest of one lemon to the sugar/butter mixture and use lemon juice instead of heavy cream in the frosting.
- Chocolate Chip: Fold in ½ cup of mini chocolate chips to the dough for an extra layer of texture.
- Holiday Themes: Use different extracts (peppermint for Christmas, orange for Fall) and matching food colors/sprinkles.
Storage and Freezing
To Store: Keep frosted cookies in a single layer in an airtight container. They will stay fresh at room temperature for up to 3 days or in the refrigerator for up to 5 days.
To Freeze (Unbaked): Scoop the dough into balls and freeze on a tray. Once solid, transfer to a freezer bag. Bake from frozen, adding 1-2 minutes to the cook time.
To Freeze (Baked): It is best to freeze these cookies unfrosted. Wrap them tightly in plastic wrap and place in a freezer container for up to 3 months. Thaw at room temperature before frosting.
FAQ
Why did my sugar cookies spread so much?
This usually happens if the butter was too soft/melted before mixing, or if the dough wasn’t chilled long enough. Also, ensure your baking sheets aren’t hot when you place new dough on them!
Can I make these cookies gluten-free?
Yes! You can substitute the all-purpose flour with a high-quality 1:1 gluten-free baking flour (ensure it contains xanthan gum).
Can I use this recipe for cutout cookies?
This specific recipe is designed to be a “drop” cookie (rolled into balls). While it holds its shape well, for intricate cookie cutter shapes, you might need to add an extra ¼ cup of flour to ensure the edges stay sharp.
The Final Bite
Baking these Soft and Chewy Sugar Cookies is more than just making a snack—it’s about creating a moment. There’s nothing quite like the first bite into that soft base and sweet frosting. Whether you’re making these for a birthday, a holiday, or “just because,” they are sure to become a staple in your recipe box.
If you make these, don’t forget to tag me on Instagram or pin this recipe to your “Baking Goals” board on Pinterest! Happy baking!
PrintSoft and Chewy Sugar Cookies with Buttercream Frosting
Thick, soft-baked sugar cookies topped with a cloud-like vanilla buttercream frosting. These are the ultimate bakery-style treats for any season.
Ingredients
1 cup (226 g) unsalted butter, room temperature
1 cup (198 g) granulated sugar
2 large eggs, room temperature
2 teaspoons vanilla extract
3 cups (360 g) all-purpose flour, measured properly
1 teaspoon baking powder
¾ teaspoon salt
¾ cup (170 g) unsalted butter, room temperature (frosting)
2 ½ cups (284 g) confectioner’s sugar (frosting)
2 tablespoons heavy cream (frosting)
2 teaspoons vanilla extract (frosting)
1 pinch salt (frosting)
Food coloring & sprinkles, optional
Instructions
1. In a large bowl, beat room temperature butter and sugar until light and fluffy (about 1 minute).
2. Add eggs and vanilla extract; beat until fully incorporated and fluffy.
3. In a separate bowl, sift together flour, baking powder, and salt. Gradually stir dry ingredients into the butter mixture until just combined.
4. Cover and chill dough in the refrigerator for 30 minutes.
5. Preheat oven to 350°F and line a baking sheet with parchment paper.
6. Scoop dough into 1.5 inch balls and place 2 inches apart on the sheet. (Optional: flatten slightly for a flatter top).
7. Bake for 10-12 minutes until tops look set. Cool for 5 minutes on the pan, then move to a wire rack.
8. For frosting: Whip butter, confectioner’s sugar, heavy cream, vanilla, and salt until smooth. Add more cream if needed.
9. Frost completely cooled cookies using a knife or piping bag.
Notes
Measure flour using the spoon-and-level method to avoid dry cookies.
Ensure butter is truly room temperature (soft, not melted) for the best texture.
Do not overbake! The cookies should look slightly underdone in the center when removed.


