
Easter is the season of renewal, vibrant pastels, and, most importantly, indulgent chocolate. If you are looking for a show-stopping dessert that captures the whimsical beauty of springtime, these Speckled Egg Easter Cupcakes are the answer. Combining a moist, fudgy chocolate base with a silky teal vanilla buttercream, these treats are designed to mimic the iconic look of a Robin’s egg. The secret lies in a simple but effective cocoa-splattering technique that adds an artisanal touch without requiring professional decorating skills. Whether you’re hosting a family brunch or participating in a community bake sale, these cupcakes offer a sophisticated yet playful aesthetic that appeals to both children and adults. Get ready to elevate your holiday baking game with a recipe that tastes even better than it looks.
Why You’ll Love This Recipe
There are countless Easter recipes out there, but this one stands out for its perfect balance of flavor and presentation. First, the cupcake base isn’t just a standard sponge; the addition of melted dark chocolate creates a rich, brownie-like texture that is far superior to box mixes. Second, the “speckling” technique is incredibly therapeutic and gives each cupcake a unique, handmade character. It’s a great way to get kids involved in the kitchen—though things might get a little messy! Finally, the recipe is highly adaptable. While we use teal and chocolate, the base provides a sturdy canvas for any spring-themed decorations you might have on hand.
What Is a Speckled Egg Cupcake?
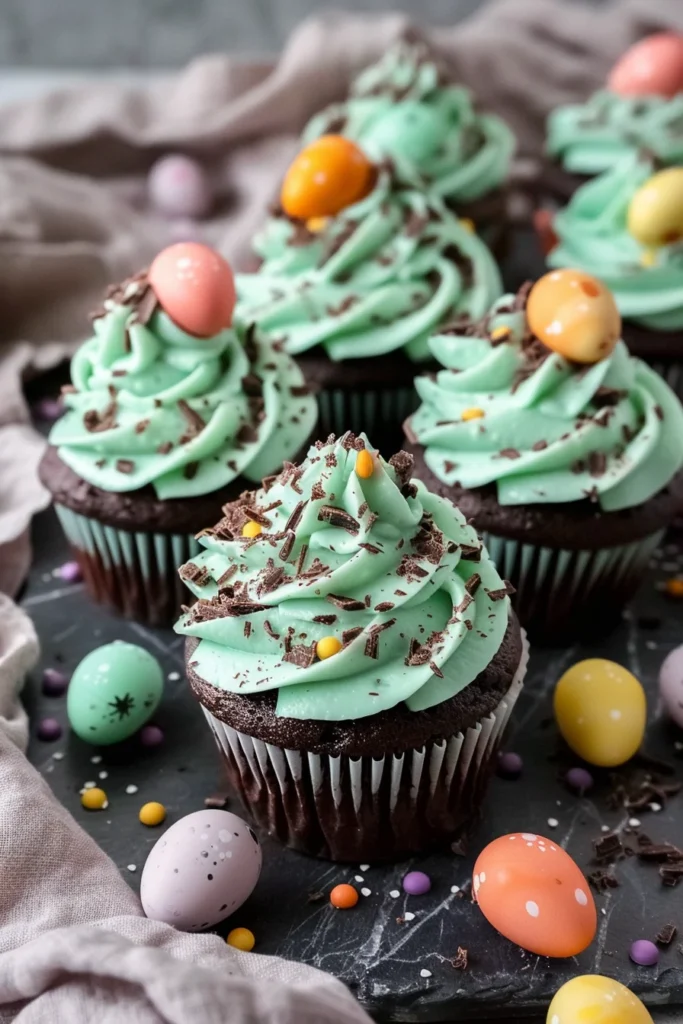
A Speckled Egg Cupcake is a thematic dessert inspired by the natural beauty of wild bird eggs, specifically those of the American Robin or thrush. These eggs are famous for their stunning blue hue and delicate brown spotting. To translate this into edible art, we use a specifically tinted teal buttercream and a “splatter” made from a mixture of cocoa powder and water. This creates a textured, matte finish that looks remarkably realistic. Unlike traditional cupcakes that rely on sprinkles, the speckled egg look offers a vintage, rustic charm that feels elevated and modern. It’s the perfect blend of natural inspiration and sugary indulgence.
Ingredients you will need
To achieve the best results, quality ingredients are paramount. Here is a breakdown of what makes this recipe work:
- Unsalted Butter & Light Brown Sugar: Using light brown sugar instead of white granulated sugar adds a hint of caramel and keeps the cake moist for days.
- Self-Raising Flour: This provides the necessary lift. Ensure your flour is fresh for the best rise.
- Cocoa Powder & Melted Dark Chocolate: We use a double-hit of chocolate. The cocoa provides the deep color, while 100g of melted dark chocolate (at least 50% cocoa solids) ensures a decadent, fudgy crumb.
- Medium Eggs: Ensure these are at room temperature to prevent the batter from curdling when mixed with the creamed butter.
- Icing Sugar (Confectioners’ Sugar): Sift this to ensure your buttercream is perfectly smooth and free of lumps.
- Blue Food Colouring: Use a high-quality gel or paste color. Liquid colors can thin out the buttercream and make it difficult to pipe.
- The Splatter Mixture: A simple 1:1 ratio of cocoa powder and water. This mimics the organic look of egg speckles perfectly.
Ingredient Substitutions & Tips
If you find yourself missing an ingredient, don’t worry. You can substitute the light brown sugar with dark brown sugar for an even richer, more molasses-forward flavor. For a gluten-free version, swap the self-raising flour for a 1-to-1 gluten-free baking blend and add 1/2 teaspoon of xanthan gum if the blend doesn’t include it. If you prefer a lighter frosting, you can use a Swiss Meringue Buttercream, though the teal tinting process remains the same. For the speckles, if you don’t want to use cocoa, a tiny drop of brown food coloring diluted with clear vanilla extract also works beautifully.
Step-by-Step Instructions
- Preparation: Preheat your oven to 180ºC (160ºC for fan-assisted ovens). Line a 12-hole muffin tray with high-quality paper cases.
- Creaming: In a large mixing bowl, beat 150g of softened butter and 150g of light brown sugar. You want the mixture to look pale and fluffy; this should take about 3-5 minutes with an electric mixer.
- Mixing the Batter: Fold in the eggs one at a time, followed by the flour, cocoa powder, and the melted (but slightly cooled) dark chocolate. Mix until just combined. Overmixing at this stage will lead to tough cupcakes.
- Baking: Distribute the batter evenly. Each case should be about two-thirds full. Bake for 18-22 minutes. Test with a skewer; if it comes out clean, they are done. Cool them completely on a wire rack.
- The Frosting: Beat 200g of unsalted butter for at least 5 minutes until it turns almost white. Gradually add 400g of icing sugar and the vanilla.
- Coloring: Add your blue food coloring a tiny drop at a time. Aim for a muted teal or “duck egg” blue.
- Piping: Use a piping bag fitted with a 2D closed star tip. Start in the center, spiral outwards, and then back up into a peak.
- The Speckle: Mix your cocoa and water. Dip a clean pastry brush into the paste. Hold it about 6 inches from the cupcakes and flick the bristles with your finger to create a fine mist of “eggshell” spots.
- Finishing: Place 2-3 mini chocolate eggs on top of each cupcake before the frosting sets.
Expert Baking Tips
- Temperature Matters: Always use room temperature butter for both the cake and the frosting. Cold butter will result in a lumpy batter and a grainy buttercream.
- Melted Chocolate Tip: When melting your dark chocolate, let it sit for 5-10 minutes before adding it to the batter. If it’s too hot, it can cook the eggs prematurely.
- The Splatter Shield: The cocoa splatter can travel! I recommend placing your cupcakes inside a large cardboard box or laying down plenty of parchment paper on your counter before you start flicking the cocoa mixture.
- Consistency is Key: If your buttercream feels too stiff, add a teaspoon of milk. If it’s too soft, add more icing sugar. It needs to hold its shape for the “star” ridges to stay defined.
Master the Cocoa Splatter Technique
The “speckling” is what gives these cupcakes their “wow” factor. To master this, the consistency of your cocoa paste is vital. It should be thin enough to flick but thick enough that it doesn’t run down the sides of the frosting in streaks. Test your flicking technique on a piece of paper first. If the drops are too large, you have too much liquid on the brush. If nothing happens, the paste is too thick. A stiff-bristled pastry brush or even a clean, new toothbrush works best for achieving those tiny, realistic micro-dots that define a true Robin’s egg.

Serving Suggestions
These cupcakes are a decorative powerhouse, so they don’t need much accompaniment. Serve them on a rustic wooden platter or a white ceramic cake stand to make the teal color pop. They are the perfect conclusion to an Easter Sunday roast or a charming addition to a spring tea party. For an extra touch of “nesting,” you can place the cupcakes on a bed of edible shredded paper or toasted coconut “grass” to complete the woodland theme.
Storage & Make-Ahead Tips
You can bake the cupcake bases up to two days in advance; just keep them in an airtight container at room temperature. Once frosted, these cupcakes will stay fresh for about 3 days. While they can be refrigerated, the cold air can sometimes dry out the sponge, so room temperature is preferred. If you need to freeze them, freeze the uniced bases for up to 3 months. Thaw at room temperature before frosting and decorating as fresh buttercream always looks best.
FAQs
1. Can I use milk chocolate instead of dark chocolate in the batter?
While you can, dark chocolate provides a better structural balance and a deeper color that contrasts beautifully with the teal frosting. If using milk chocolate, reduce the sugar by 20g to avoid an overly sweet cake.
2. What type of food coloring is best?
I highly recommend gel-based food coloring (like Wilton or Americolor). Liquid grocery store colors contain too much water, which can break your buttercream and make it “weep.”
3. Why did my cocoa speckles smear?
This usually happens if the buttercream hasn’t “crusted” slightly or if the cocoa mixture is too watery. Let the cupcakes sit for 10 minutes after piping before splattering, and ensure your cocoa paste is a “drippable” but not “runny” consistency.
4. Can I make these as mini cupcakes?
Yes! This recipe will make approximately 24-30 mini cupcakes. Reduce the baking time to 10-12 minutes.
5. How do I get the teal color right?
Start with a tiny amount of blue. If it looks too “sky blue,” add a microscopic amount of yellow or green to pull it toward teal.
These Speckled Egg Easter Cupcakes are more than just a dessert; they are a celebration of spring craftsmanship. By combining a decadent chocolate sponge with a creative decorating technique, you create a treat that is as memorable as it is delicious. Don’t be afraid of the cocoa splatter—it’s the imperfections that make these cupcakes look truly organic and professional. Happy baking, and may your holiday table be filled with these beautiful, speckled delights!
PrintSpeckled Egg Easter Cupcakes

Indulgent chocolate cupcakes topped with teal vanilla buttercream and a realistic ‘speckled’ cocoa effect. These are the perfect centerpiece for any Easter celebration or spring gathering.
- Prep Time: 20 minutes
- Cook Time: 20 minutes
- Total Time: 40 minutes
- Yield: 12 Cupcakes
- Cuisine: British
Ingredients
Unsalted butter/baking spread – 150 g
Light brown soft sugar – 150 g
Medium eggs – 3
Self raising flour – 125 g
Cocoa powder – 25 g
Dark chocolate (melted) – 100 g
Unsalted butter (frosting) – 200 g
Icing sugar – 400 g
Vanilla extract – 1 tsp
Blue food colouring – a few drops
Cocoa powder (for speckle) – 1 tbsp
Water – 1 tbsp
Easter chocolate eggs – 12-24 pieces
Instructions
Preheat the oven to 180ºc/160ºc fan and prep 12 cases in a muffin tray.
In a large bowl, beat the 150g butter and light brown sugar together until pale and creamy.
Add the flour, eggs, 25g cocoa, and melted dark chocolate. Mix until just combined and smooth.
Split the mixture evenly between the 12 cupcake cases.
Bake for 18-22 minutes. Remove and allow to cool fully on a wire rack.
For the buttercream, beat the 200g butter on its own for several minutes until very smooth and pale.
Add the icing sugar and vanilla extract and mix again until fluffy.
Add a small drop of blue food colouring to achieve a teal/Robin’s egg blue shade.
Transfer buttercream to a piping bag fitted with a 2D closed star tip and pipe onto the cooled cupcakes.
In a small bowl, mix the extra 1 tbsp cocoa powder and 1 tbsp water to form a drippable paste.
Use a pastry brush to flick the cocoa mixture over the cupcakes to create the speckled look.
Top with mini Easter chocolate eggs and enjoy!
Notes
• You can swap up the flavours of the bake by adding orange, lemon, or almond extract to the base.
• These cupcakes will last for 3+ days once made at room temperature in an airtight container.
• You can freeze the uniced cupcakes for up to 3 months.
• I recommend using a high-quality gel food colouring for the most vibrant teal.
• Use a 2D closed star piping tip for that classic bakery-style swirl.
• Ensure the cupcakes are completely cold before frosting to prevent melting.


