
When March rolls around, the hunt for the perfect “pot of gold” at the end of the rainbow begins. Whether you are prepping for a school bake sale, a neighborhood party, or simply looking to add a bit of Irish luck to your kitchen, these Lucky Charms Cereal Bars are the answer. This isn’t just your standard Rice Krispies treat; it’s a vibrant, marshmallow-loaded upgrade that captures the playful spirit of St. Patrick’s Day. By blending the iconic crunch of toasted rice with the whimsical, colorful charms of Lucky Charms cereal, we create a texture profile that is both nostalgic and exciting. Drenched in a festive green hue and kept incredibly gooey with a high marshmallow-to-cereal ratio, these bars are guaranteed to be the star of any dessert table. Best of all, they require zero oven time, making them a stress-free win for busy families.
Why You’ll Love This Recipe
There are a dozen reasons to keep this recipe in your holiday rotation, but the primary draw is the perfect texture balance. Unlike store-bought treats that can be dry or overly compressed, these homemade bars are light, airy, and pull apart with that iconic marshmallow stretch.
- No-Bake Ease: You only need a microwave and about 15 minutes of active time.
- Kid-Friendly: Children love helping with the “marshmallow melt” and adding the final decorative charms on top.
- Visually Stunning: The contrast between the emerald green base and the pastel Lucky Charms marshmallows makes these bars incredibly “Instagrammable” and Discover-friendly.
- Customizable: You can easily adjust the “greenness” or swap in different cereals for other holidays.
What Is a Lucky Charms Cereal Bar?
Essentially, a Lucky Charms Cereal Bar is an elevated version of the classic marshmallow treat. While traditional treats use only puffed rice cereal, this recipe utilizes a hybrid cereal base. By using 4 cups of Rice Krispies and 5 cups of Lucky Charms, you get the structural integrity and crunch of the rice cereal combined with the distinct oat flavor and dehydrated marshmallow bits of the Lucky Charms.
The addition of green gel food coloring transforms the marshmallow binder into a festive “meadow” that holds everything together. It’s a “magically delicious” snack that bridges the gap between a morning breakfast staple and a decadent afternoon dessert. Because we use salted butter, there is a subtle savory note that cuts through the sugar, preventing the bars from being cloyingly sweet.
Ingredients Overview: Choosing the Best Components
To achieve that professional, food-blog-quality result, the quality of your ingredients matters more than you might think.
- Lucky Charms Cereal (5 Cups): The star of the show. Ensure your cereal is fresh; stale cereal will lead to a chewy, unpleasant bar.
- Rice Krispies Cereal (4 Cups): This provides the “filler” and the essential crunch. It helps keep the bars from feeling too heavy.
- Mini Marshmallows (10.5 oz Bag): Always use a fresh, unopened bag. Older marshmallows develop a crystalline exterior that won’t melt into a smooth, gooey syrup.
- Salted Butter (5 Teaspoons): Salted butter is crucial here. The salt enhances the vanilla notes in the marshmallows and balances the sweetness of the cereal.
- Green Gel Food Coloring: Gel is superior to liquid coloring because it provides a more vibrant pigment without thinning out the marshmallow mixture.
Ingredient Substitutions & Tips
If you find yourself missing an ingredient or have dietary restrictions, here is how to pivot:
- Dairy-Free/Vegan: You can substitute the salted butter with a high-quality vegan butter stick (like Miyoko’s). For the marshmallows, look for “Dandies” vegan marshmallows, though they may require a slightly longer melting time.
- Cereal Ratios: If you prefer a more “sturdy” bar, you can do a 50/50 split of the cereals. If you want maximum “Lucky Charm” flavor, you can use 100% Lucky Charms, though the bars will be much sweeter.
- Butter Tip: If you only have unsalted butter, simply add a pinch of fine sea salt to the melted mixture to achieve that flavor balance.
Step-by-Step Instructions
- Preparation: Start by generously buttering a 9×13” glass or ceramic baking dish. Don’t skip this step—marshmallows are incredibly sticky! Set this aside so you’re ready to pour once the mixture is hot.
- Melt the Marshmallows: Place your mini marshmallows in a large, microwave-safe glass bowl. Microwave on high for 20 seconds. Take it out, give it a quick stir with a buttered spatula, and repeat for another 20 seconds. They should be puffed and starting to lose their shape.
- The Butter Integration: In a smaller bowl, melt your 5 teaspoons of salted butter. Once liquid, pour it over the puffed marshmallows.
- The Final Melt: Microwave the marshmallow and butter mixture together for one final 20-second burst. Stir vigorously until you have a smooth, glossy white cream.
- Coloring: Add a few drops of green gel food coloring now. It is much easier to distribute the color evenly in the liquid marshmallow than after the cereal is added.
- The Mix-In: Pour in the Rice Krispies first and stir. Then, gently fold in the Lucky Charms. Folding them in last helps prevent the delicate charms from crushing or melting too much.
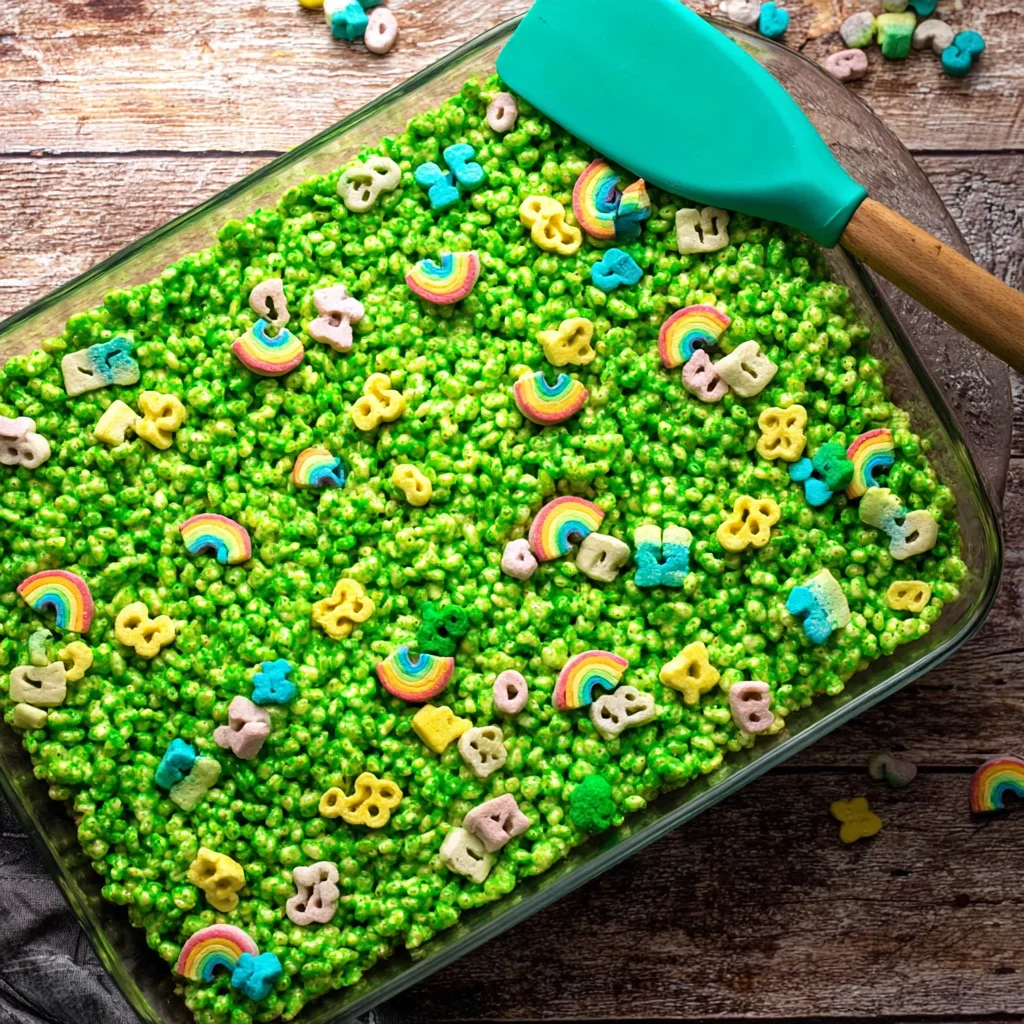
- Setting the Bars: Transfer the mixture to your prepared dish. Use a buttered spatula (or buttered fingers) to spread it evenly. Pro Tip: Do not press down hard! Lightly pat it into place to keep the bars soft.
- The Finishing Touch: Scatter extra Lucky Charms marshmallows over the top and press them in slightly so they stick.
- The Chill: Place in the refrigerator for 30 minutes. This helps the butter firm up, making the bars much easier to slice into clean 12 squares.
Expert Baking Tips for the Perfect Gooey Texture
The biggest mistake people make with cereal bars is ending up with a “brick” that’s hard to bite. To avoid this, follow these expert rules:
- The “Low Pressure” Rule: When you put the mixture into the pan, imagine you are tucking a child into bed. Be gentle! If you compress the cereal too much, you squeeze out all the air pockets that make the bar light and chewy.
- The Freshness Factor: Marshmallows lose their moisture quickly once the bag is opened. For this recipe, buy a brand-new bag the day you plan to make them.
- Gel vs. Liquid: Use gel food coloring. Liquid food coloring can change the sugar chemistry and make the marshmallow “weep” or become sticky rather than set.
The Secret to Professional Cereal Bars: Temperature Control
Temperature is everything when working with sugar and gelatin (the components of marshmallows). If you overheat the marshmallows, the sugar begins to reach the “hard ball” stage, which results in a rock-hard cereal bar once cooled.
This is why we use 20-second increments. It allows the residual heat to do the work rather than the direct microwave radiation. By stirring between intervals, you ensure the heat is distributed evenly. If you see the marshmallows starting to brown or “toast,” you’ve gone too far. Aim for a “melted ice cream” consistency for the ultimate gooey stretch.
Serving Suggestions
These bars are a complete showstopper on their own, but if you want to elevate the presentation for a party:
- Pot of Gold: Serve them on a gold platter surrounded by gold chocolate coins.
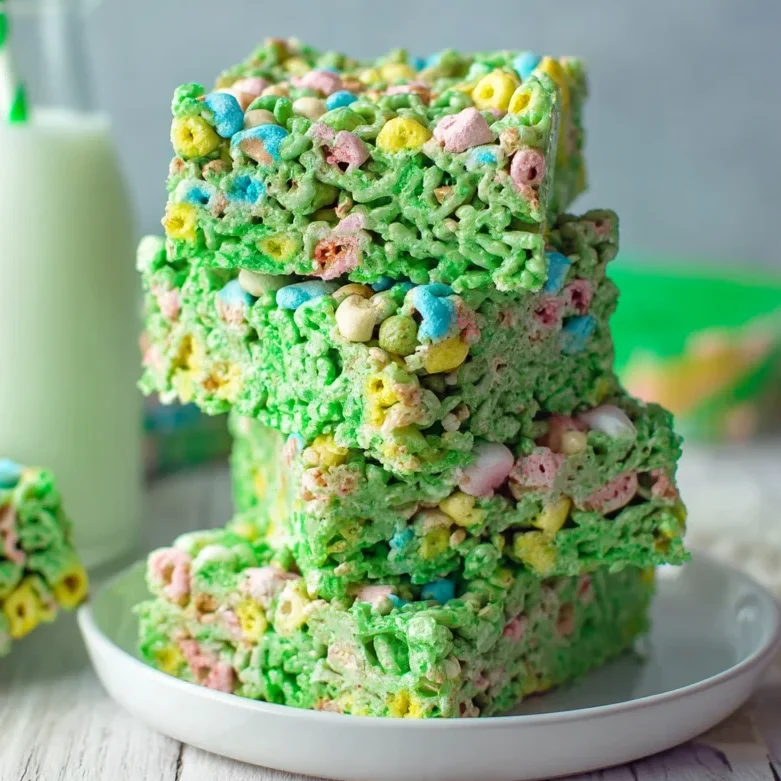
- Milk Pairing: Serve alongside a cold glass of milk (perhaps dyed a very pale green with a drop of coloring!).
- Gift Idea: Wrap individual squares in cellophane with a green ribbon for a perfect St. Patrick’s Day school treat.
Storage & Make-Ahead Tips
- Room Temperature: Store in an airtight container at room temperature for up to 3 days. To keep them extra soft, place a piece of white bread in the container; the marshmallows will absorb the moisture from the bread.
- Freezing: You can freeze these! Wrap them individually in plastic wrap and store them in a freezer bag for up to 6 weeks. Thaw at room temperature for 15 minutes before eating.
FAQs
Q: Can I make these on the stovetop instead of the microwave?
A: Absolutely! Use a large pot over low heat. Melt the butter first, then add the marshmallows, stirring constantly until 90% melted. Remove from heat and let the residual heat finish the job to avoid overcooking.
Q: Why are my cereal bars hard?
A: This usually happens for two reasons: you either overheated the marshmallows or you pressed the mixture too firmly into the baking dish.
Q: Can I use large marshmallows instead of mini?
A: Yes, but you should cut them into smaller pieces first so they melt evenly and quickly without the exterior burning before the interior is soft.
Q: How do I get clean edges when cutting?
A: Use a sharp chef’s knife and wipe it with a light coating of butter or non-stick spray between every cut.
Q: Are Lucky Charms gluten-free?
A: General Mills states that Lucky Charms are gluten-free, but Rice Krispies (Kellogg’s) often contain malt flavoring (barley). If you need a 100% gluten-free treat, ensure you buy a certified gluten-free puffed rice cereal.
Making St. Patrick’s Day Lucky Charms Cereal Bars is a joyful way to celebrate the holiday with a minimum of fuss and a maximum of flavor. They are the perfect blend of crunchy, gooey, and sweet, with a festive flair that delights both children and adults. By following the “gentle press” method and using fresh ingredients, you’ll create a snack that is truly magically delicious. Enjoy your bit of edible Irish luck!
PrintSt. Patrick’s Day Lucky Charms Cereal Bars
These vibrant Green Lucky Charms Cereal Bars are the ultimate St. Patrick’s Day dessert. By combining the classic crunch of Rice Krispies with the magical marshmallow charm of Lucky Charms, we’ve created a treat that is both nostalgic and festive. They are extra gooey, perfectly sweet, and take less than 15 minutes of active prep time.
- Prep Time: 10 minutes
- Cook Time: 5 minutes
- Total Time: 45 minutes
- Yield: 12 bars
- Cuisine: American
Ingredients
Lucky Charms Cereal – 5 cups
Rice Krispies Cereal – 4 cups
Mini marshmallows – 10.5 oz bag
Salted butter – 5 teaspoons
Green gel food coloring – as needed
Instructions
Butter a 9×13” baking dish and set aside to ensure easy removal.
In a large microwave-safe bowl, melt marshmallows in 20-second increments, stirring between each, until they are puffed and mostly melted.
In a separate small microwave-safe bowl, melt the salted butter in 20-second increments until liquid.
Pour the melted butter into the marshmallows and microwave for another 20 seconds; stir until smooth.
Stir in the green gel food coloring until you reach your desired shade of festive green.
Add the Rice Krispies cereal and stir until the cereal is fully incorporated into the marshmallow base.
Gently fold in the Lucky Charms cereal until evenly coated, being careful not to crush the charms.
Using a buttered rubber spatula, evenly spread the mixture into the prepared baking dish without pressing too firmly.
Press additional Lucky Charms marshmallows onto the top for a decorative look.
Refrigerate the bars for 30 minutes to set.
Slice into 12 even squares and serve at room temperature.
Notes
• It’s ok if butter isn’t fully melted; it will finish melting when added to the hot marshmallows.
• For the best color, add food coloring to the marshmallow mixture before adding the cereal.
• Do not pack the mixture too tightly into the pan, or the bars will become hard.
• Use fresh marshmallows for the best “pull” and gooey texture.


