
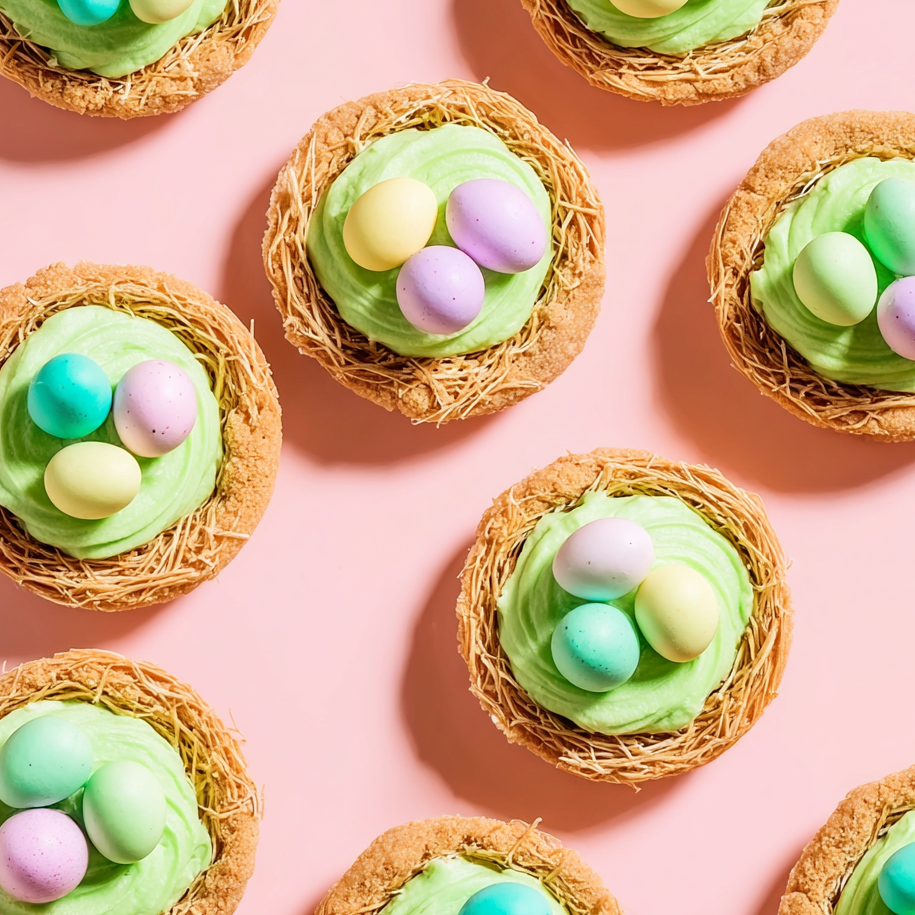
When the flowers start blooming and the pastel colors emerge in every shop window, you know Easter is just around the corner. While we all love a traditional roast, it’s the dessert table that truly captures the magic of the season. These Sugar Cookie Easter Egg Nests are a whimsical, delightful addition to any spring celebration. Imagine a soft, buttery sugar cookie “cup” filled with a cloud of silky buttercream frosting and topped with colorful candy eggs. Not only do they look like they came from a high-end bakery, but they are also incredibly easy to assemble. Whether you’re hosting a brunch or looking for a fun kitchen project with the kids, these nests are guaranteed to be the star of the show, combining a nostalgic flavor with a stunning visual appeal that screams “Spring has arrived!”
Why You’ll Love This Recipe
There are so many reasons to fall in love with these cookie nests. First, they are semi-homemade, utilizing the convenience of pre-made dough which saves you precious time during the busy holiday season. Second, the texture is perfection—crisp on the edges but soft and chewy in the center. The buttercream is customizable, allowing you to play with colors and flavors to suit your specific theme. Finally, they are perfectly portioned. Unlike a large cake that needs slicing, these are individual servings that are easy to grab, making them ideal for school parties or large family gatherings. Plus, the “nesting” process is surprisingly satisfying and requires zero advanced baking skills!
What Is a Sugar Cookie Nest?
Essentially, a sugar cookie nest is a creative evolution of the classic cookie. Instead of baking flat discs, we bake the dough in a muffin tin to create a “cup” or “well.” While the cookie is still warm and soft from the oven, we press down the center to create a hollow space. This space serves as the “nest” which we then fill with a rich frosting. The addition of candy eggs—usually chocolate-covered malt balls or jelly beans—completes the illusion of a bird’s nest. It’s a structural dessert that provides a better frosting-to-cookie ratio than a standard cookie, resulting in a decadent, multi-textured treat.
Ingredients
The beauty of this recipe lies in its simplicity. You only need six main components to create magic.
- Pillsbury Sugar Cookie Dough: This provides a consistent, delicious base that holds its shape well when molded into cups.
- Salted Butter: Using salted butter in the frosting helps balance the intense sweetness of the powdered sugar, providing a more complex flavor profile.
- Powdered Sugar: Also known as confectioners’ sugar, this creates the structure for your buttercream.
- Heavy Whipping Cream: This is the secret to a professional-grade frosting. It adds a luxurious richness and a fluffier texture compared to regular milk.
- Vanilla Extract: A high-quality vanilla extract acts as the bridge between the cookie and the cream, rounding out the sweetness.
- Hershey’s Egg Candies: These provide the iconic Easter look. You can use various brands, but ensure they are the small, egg-shaped variety to fit comfortably inside the nest.
Ingredient Substitutions & Tips
If you prefer a completely scratch-made experience, you can substitute the store-bought dough with your favorite homemade sugar cookie recipe—just ensure it’s a “drop” cookie style rather than a thin “cut-out” style. For the frosting, if you find yourself out of heavy cream, whole milk will work, though you should start with half the amount as it is much thinner. To make these dairy-free, use a plant-based butter stick and a splash of oat milk. If you can’t find Hershey’s eggs, Cadbury Mini Eggs or even jelly beans make fantastic alternatives. For a “grass” effect, you can toss shredded coconut in green food coloring and sprinkle it over the frosting before adding the eggs.
Step-by-Step Instructions
- Prep the Foundation: Preheat your oven to 350°F. The most important step for success is liberally spraying your 12-cup muffin tin. Use a baking spray that contains flour for the easiest release.
- Form the Cups: Take your pre-portioned cookie dough and place one section into each muffin well. You don’t need to flatten them; the heat will do that for you.
- The Golden Bake: Bake for 10-14 minutes. Watch closely—you want the edges to be a very pale golden brown. Over-baking will make the cookies too crunchy to mold.
- Create the Nest: This is the “magic” step. As soon as the pan comes out of the oven, take a shot glass or the bottom of a spice jar. Slowly and gently press into the center of each cookie. This creates the indentation for your frosting.
- Cooling Phase: Let them sit in the pan for exactly 10 minutes. This allows them to firm up enough to move. Use a butter knife to gently lift them out onto a wire rack to cool completely.
- Whip the Buttercream: In a large bowl, beat your softened butter for 2 full minutes. Gradually add the powdered sugar one cup at a time.
- Emulsify: Add your vanilla and heavy cream. Beat on high for another minute until the frosting is light, airy, and holds its shape.
- Decorate: Fit a piping bag with a star tip (like a 1A or 2A). Pipe a generous swirl into each cookie cup.
- The Finishing Touch: Place three candy eggs into the center of the frosting. Press down slightly so they stay secure.
Expert Baking/Cooking Tips
The most common mistake is trying to remove the cookies while they are piping hot. They are very fragile at this stage! Give them that 10-minute rest in the pan; the residual heat continues to set the bottom without over-baking the top. Another tip is the “Butter Temperature Test.” Your butter for the frosting should be soft enough that your finger leaves an indentation, but it shouldn’t be greasy or melting. If it’s too cold, your frosting will be lumpy; if it’s too hot, the frosting will be soupy. Finally, if your cookies puff up too much during baking, don’t panic—the shot glass trick fixes everything!
Making This a Family Activity
Easter is all about making memories, and this recipe is the perfect way to involve the little ones. Children love the task of placing the “eggs” into the nests. To make it even more engaging, set up a decorating station. Give the kids different colors of frosting—pastel pinks, blues, and greens—and let them choose their egg colors. It’s a great way to practice fine motor skills and creativity. Just be prepared for a few “missing” candy eggs along the way! You can even talk about the science of baking, like why the cookie dough changes shape in the oven.
Serving Suggestions
Present these nests on a large white platter to make the pastel colors pop. They look beautiful surrounded by a few sprigs of fresh mint or even some edible flowers like pansies. If you’re serving these at a party, consider placing each nest into a decorative cupcake liner; it makes them easier for guests to pick up and adds an extra layer of color. They pair wonderfully with a cold glass of milk or a light spring tea. For a brunch setting, they serve as a perfect “sweet bite” to follow savory egg dishes.
Storage & Make-Ahead Tips
These cookie nests are excellent for making ahead of time. You can bake the cookie cups up to two days in advance; just store them in an airtight container at room temperature. The frosting can also be made ahead and kept in the fridge for up to a week. Once assembled, they are best enjoyed within 24–48 hours to ensure the cookie remains soft. If you need to store them after they are frosted, keep them in a single layer in a cool spot or the refrigerator. If refrigerating, let them come to room temperature for 15 minutes before serving for the best texture.
FAQs
Can I use a mini muffin tin instead?
Yes! If you use a mini muffin tin, use half the amount of dough per well and reduce the baking time to 7–9 minutes. Use a smaller object, like a thimble or a small measuring spoon, to create the indentation.
My cookies are sticking to the pan, what do I do?
If a cookie is stuck, gently run a thin butter knife around the edge. Next time, ensure you use a “baking spray” (the kind with flour) rather than just regular oil spray.
Can I freeze these?
The un-frosted cookie cups freeze beautifully for up to 3 months. However, the candy eggs can sometimes lose their color or crack in the freezer, so it’s best to frost and decorate them after thawing.
How do I get the frosting to look like grass?
Use a “grass tip” (Wilton 233) and green-tinted buttercream. This tip has multiple small holes that create thin strands of frosting as you pull away.
What if I don’t have a piping bag?
No problem! Simply snip the corner off a gallon-sized Ziploc bag. It won’t have the star ridges, but it will still create a nice, clean mound of frosting.
Baking for the holidays doesn’t have to be stressful. These Sugar Cookie Easter Egg Nests prove that with a few clever hacks and a little bit of creativity, you can create a dessert that is as impressive as it is delicious. They capture the essence of spring in every bite—sweet, creamy, and vibrantly colorful. We hope this recipe becomes a new tradition in your household, bringing joy to your kitchen and your Easter table for years to come. Happy baking!
PrintSugar Cookie Easter Egg Nests
These adorable Sugar Cookie Easter Egg Nests are the ultimate holiday hack. By using pre-made sugar cookie dough as a base, you can create professional-looking ‘nests’ that are perfect for spring parties, school treats, or your Easter Sunday dessert table.
- Prep Time: 15 minutes
- Cook Time: 12 minutes
- Total Time: 27 minutes
- Yield: 12 nests
- Cuisine: American
Ingredients
Pillsbury Sugar Cookie Dough – 16 oz
Salted butter – 1 cup
Powdered sugar – 3 cups
Heavy whipping cream – 2 tablespoons
Vanilla extract – 1 teaspoon
Hershey’s Egg Candies – 18 oz
Instructions
Preheat oven to 350° F. Liberally spray a 12-cup muffin tin with cooking spray.
Separate the premade cookie dough and put one section into each well in the muffin pan.
Cook for 10-14 minutes until very lightly browned. Do not over-cook.
Immediately after baking, use a shot glass to lightly and slowly press the center of the cookies down to form a ‘basket’.
Let the cookies cool in the pan for 10 minutes, then remove to a cooling rack.
Beat the softened butter for 2 minutes until fluffy.
Gradually add powdered sugar on low speed, then increase to medium until combined.
Mix in vanilla and heavy cream until desired consistency is reached.
Pipe the frosting into the cookie cup indentation and top with 3 candy eggs.
Notes
• Use a shot glass or the bottom of a spice jar to create the ‘nest’ indentation while the cookies are still hot.
• If you don’t have piping bags, use a Ziploc bag with the corner snipped off.
• Tint the frosting green to look like grass for an extra festive touch.


