
There is something undeniably nostalgic about a bright, ruby-red Fresh Strawberry Pie sitting on a picnic table. It’s the ultimate sign that summer has officially arrived. If you’ve ever walked into a classic diner or a family reunion and seen that glistening, fruit-piled masterpiece, you know exactly the kind of magic I’m talking about.
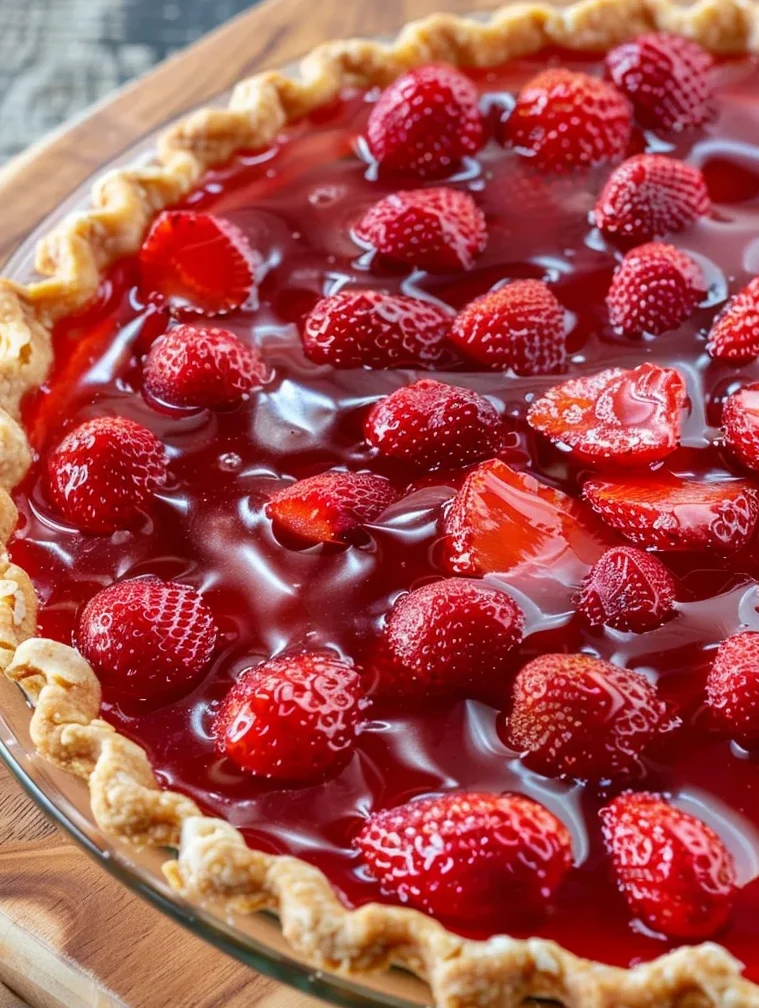
This recipe is a tribute to those sun-drenched afternoons. Unlike some complicated fruit pies that require hours of peeling and lattice-weaving, this version is incredibly approachable. By using a clever combination of fresh berries and strawberry gelatin, we achieve that iconic “high-gloss” look and a flavor that bursts with seasonal sweetness.
Whether you’re looking for the perfect 4th of July dessert or just want to use up a gallon of berries from the local U-pick farm, this pie is your new secret weapon. It’s light, refreshing, and—most importantly—takes very little active kitchen time.
Why You’ll Love This Recipe
- Vibrant Presentation: The strawberry jello creates a stunning, clear glaze that makes the berries look like jewels.
- Beginner-Friendly: No fancy pastry skills required. If you can boil water and slice a berry, you can make this pie.
- Make-Ahead Magic: It actually needs to sit in the fridge, making it the perfect stress-free dessert for hosting.
- Perfect Texture: The cornstarch and gelatin work together to create a sliceable filling that doesn’t run all over the plate.
- Kid-Approved: The sweet, familiar flavor of strawberry jello combined with fresh fruit is always a hit with the little ones.
Ingredient Notes
To make the perfect Fresh Strawberry Pie, quality matters. Here is what you’ll need and some tips on how to choose the best components:
- Fresh Strawberries: This is the star of the show! Look for berries that are deep red all the way to the top. Smaller berries often have more concentrated flavor than the giant, hollow ones.
- Strawberry Gelatin (Jello): This provides both the color and the “set.” You can use name-brand or store-brand; both work perfectly.
- Cornstarch: This is our thickening agent. It ensures the water and sugar turn into a syrupy glaze rather than a liquid mess.
- Granulated Sugar: Just enough to balance the tartness of the berries.
- Pie Crust: I used a 9″ frozen crust for convenience, but if you have a favorite homemade buttery pie crust recipe, feel free to use it! Just make sure it is fully baked and cooled before you even think about the filling.
Step-by-Step Instructions
1. Prep the Crust
First, bake your 9-inch frozen pie crust according to the package directions (usually called “blind baking”). Once it’s golden brown, remove it from the oven and set it aside. Crucial Tip: Let the crust cool completely. If you add warm filling to a warm crust, you’ll end up with a soggy bottom.
2. Create the Glaze Base
In a large saucepan, combine the sugar and water. Turn the heat to medium. Slowly whisk in the cornstarch. I like to add it gradually to prevent those pesky white clumps.
3. Thicken the Mixture
Stir the mixture continuously for about 4-5 minutes. You’ll notice it go from cloudy to slightly translucent and thick. It should look like a heavy syrup. Once it reaches this stage, remove it from the heat immediately.
4. The “Jello” Factor
Whisk in the strawberry gelatin powder while the mixture is still hot. Stir until every little grain is dissolved. Now, patience is key: Let this mixture cool to room temperature.
5. Coat the Berries
While your glaze is cooling, wash, hull, and slice your strawberries. Once the glaze is no longer hot, gently fold the strawberries into the saucepan until every slice is beautifully coated in red.
6. Fill and Chill
Pour the strawberry mixture into your cooled pie crust. Smooth out the top so the berries are evenly distributed. Place the pie in the refrigerator for at least 2-3 hours. This allows the gelatin to set firmly.
Expert Tips for Best Results
- Dry Your Berries: After washing your strawberries, pat them dry with a paper towel. Excess water on the berries can thin out the glaze and prevent it from sticking properly.
- The “Clear” Test: When cooking your sugar and cornstarch, wait until it looks “clearish.” If it’s still milky white, the cornstarch hasn’t fully cooked, and your pie might taste starchy.
- Prevent a Soggy Crust: Some bakers like to brush the inside of the baked crust with a thin layer of melted chocolate or a beaten egg white (and then bake for 2 more minutes) to create a moisture barrier. This is optional but helpful if you plan on keeping the pie for more than 24 hours.
- Whipped Cream Timing: Only add your whipped cream (homemade is best!) right before serving. This keeps the cream fluffy and prevents it from melting into the glaze.
Variations and Substitutions
- The “Mixed Berry” Twist: Feel free to swap half of the strawberries for raspberries or blueberries. Just use the corresponding Jello flavor (or stick with strawberry for a “Red, White, and Blue” look).
- Sugar-Free Option: You can use a sugar substitute (like monk fruit) and sugar-free strawberry gelatin if you are watching your sugar intake.
- Graham Cracker Crust: For a different texture, try a graham cracker crust instead of a traditional pastry crust. It adds a lovely honey-sweet crunch that pairs perfectly with berries.
- Whole Berries: If your strawberries are small and uniform, you can leave them whole for a very dramatic, professional bakery look. Simply stand them up in the crust and pour the glaze over them.
Storage and Freezing
To Store: Keep your Fresh Strawberry Pie in the refrigerator, loosely covered with plastic wrap or a pie dome. It is best eaten within 2 days. After that, the strawberries may begin to release their juices, making the crust a bit soft.
To Freeze: I generally do not recommend freezing this pie. Fresh strawberries have a high water content, and the gelatin texture changes significantly when frozen and thawed, often becoming watery and grainy.
FAQ
Can I use frozen strawberries?
I highly recommend sticking with fresh berries for this recipe. Frozen strawberries release too much moisture as they thaw, which will prevent the glaze from setting properly and result in a “soupy” pie.
Why didn’t my glaze thicken?
This usually happens if the cornstarch wasn’t cooked long enough or if the measurements were slightly off. Make sure the mixture comes to a gentle boil while stirring to activate the thickening power of the cornstarch.
How do I get clean slices?
The secret is a cold pie and a sharp knife. Dip your knife in warm water and wipe it clean between each cut to get those picture-perfect diner-style slices.
Serving Suggestions
This pie is a showstopper on its own, but a dollop of homemade whipped cream or a scoop of premium vanilla bean ice cream takes it over the top. For a fancy touch, garnish with a sprig of fresh mint or some lemon zest to brighten up the sweetness.
If you’re bringing this to a potluck, keep it in a cooler until you’re ready to serve. The glaze stays beautiful at room temperature for an hour or so, but it’s most refreshing when chilled!
Enjoy your slice of summer! If you make this recipe, don’t forget to tag us on Pinterest or Instagram—we love seeing your berry beautiful creations.
PrintFresh Strawberry Pie

A nostalgic, vibrant summer classic! This Fresh Strawberry Pie uses a simple homemade glaze made with strawberry gelatin to lock in that peak-season fruit flavor. It’s the ultimate crowd-pleaser for 4th of July, Memorial Day, or any warm Sunday afternoon.
Ingredients
1 9-inch frozen pie crust, baked and cooled
1 cup granulated sugar
1 1/2 cups water
1/4 cup cornstarch
1 lb fresh strawberries, hulled and sliced
1 3 oz package strawberry gelatin (Jello)
Instructions
1. Bake pie crust according to package directions, remove from oven and let cool completely.
2. Meanwhile, in a large saucepan, add sugar and water and heat over medium heat. Slowly whisk in your cornstarch to incorporate well to make sure you don’t have any lumps.
3. Stir continuously for about 4-5 minutes until the mixture thickens and turns a little clear. Remove from heat and whisk in your strawberry jello until completely dissolved.
4. Let the mixture cool to room temperature (this is key to prevent a soggy crust).
5. Once cooled, add in your sliced strawberries and toss to coat evenly, then pour into the prepared pie crust.
6. Place in the refrigerator to set for about 2-3 hours. Dollop with whipped cream if desired.
Notes
Ensure the glaze is room temperature before adding the berries.
Use the brightest, ripest berries for the best flavor.
Don’t skip the refrigeration time; the pie needs to set to slice cleanly.


