
There is something incredibly nostalgic about a cut-out cookie. Whether it’s stars for a birthday, hearts for Valentine’s Day, or classic trees for the holidays, the process of rolling out dough and stamping out shapes is a core baking memory for many of us.
But let’s be honest: most traditional sugar cookies can be a bit… boring. They look beautiful, but they often lack that “wow” factor in the flavor department.
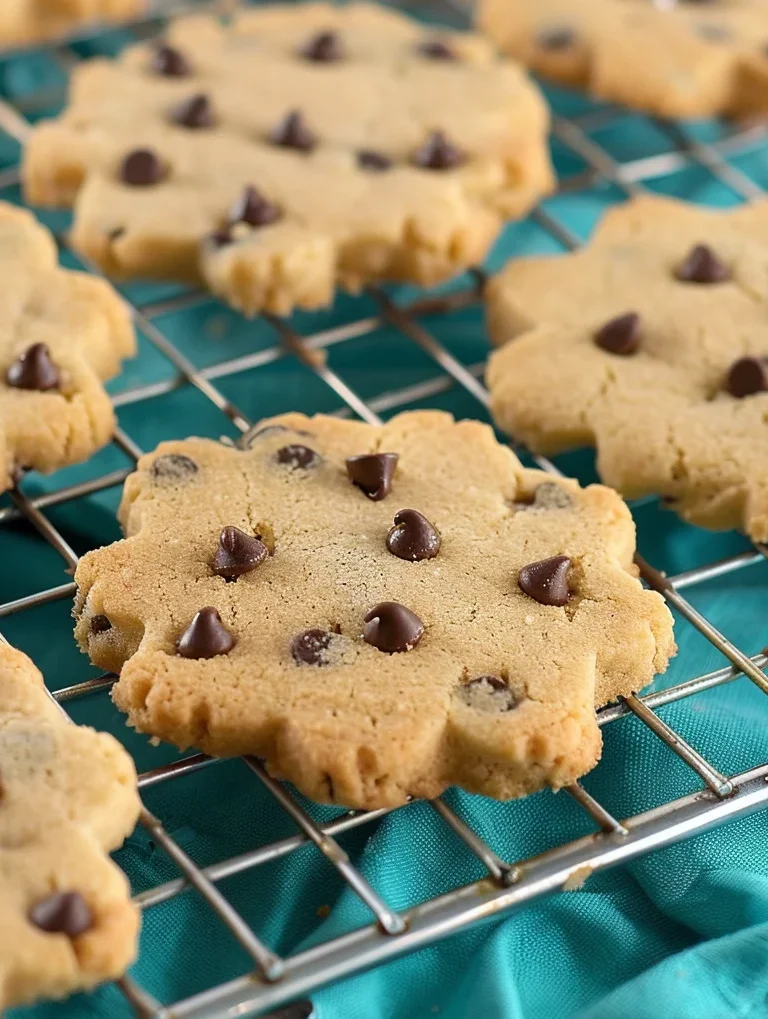
That’s where these Soft Cut-Out Chocolate Chip Cookies come in. Imagine the buttery, soft-bite texture of a high-end sugar cookie paired with the brown-sugar-depth and chocolatey goodness of a classic chocolate chip cookie. Best of all? They hold their shape perfectly. No “blob” cookies here!
Why You’ll Love This Recipe
- No-Spread Magic: Thanks to the specific ratio of flour and the chilling process, these cookies keep their sharp edges in the oven.
- Soft & Chewy: Unlike crispy shortbread, these have a tender, melt-in-your-mouth crumb.
- Perfect for Kids: Rolling and cutting dough is the ultimate rainy-day activity.
- Versatile: Use any shapes you like! The mini chips ensure the cookie cutter glides right through the dough.
- Freezer Friendly: You can make the dough ahead of time or freeze the baked cookies for later.
Ingredient Notes
To get that professional food-blogger result at home, the quality and temperature of your ingredients matter. Here is what you need to know:
- Unsalted Butter: Make sure it is truly softened to room temperature. You should be able to press it with your finger and leave an indent, but it shouldn’t be greasy or melting.
- Brown Sugar: You can use light or dark. Dark brown sugar will give a slightly deeper molasses flavor and a darker hue to the cookie.
- Mini Semi-Sweet Chocolate Chips: This is the “secret sauce” of the recipe. Do not use regular-sized chocolate chips. Regular chips are too bulky and will catch on your cookie cutters, resulting in jagged edges and broken shapes. Mini chips distribute perfectly and allow for clean cuts.
- All-Purpose Flour: I recommend the “spoon and level” method. If you scoop directly with the measuring cup, you’ll pack too much flour and end up with dry cookies.
Step-by-Step Instructions
1. Cream the Butter and Sugars
In your stand mixer (or using a hand mixer), cream together the softened butter, brown sugar, and granulated sugar. You want to beat this for about 2–3 minutes until it looks pale and fluffy. This aeration is what gives the cookies their soft texture.
2. Incorporate Wet Ingredients
Add your eggs, salt, vanilla extract, and baking powder. Beat these until well incorporated. Don’t be afraid to scrape down the sides of the bowl to ensure everything is evenly mixed.
3. The Flour Reveal
Add the flour one cup at a time. This is where the magic happens. After the 3.5 cups are mixed in, touch the dough. It should be non-greasy. If it still feels sticky or clings to your finger, add an extra 1/4 cup of flour. The dough should feel like soft playdough.
4. Fold in the Chips
Use a hand spatula to fold in the mini chocolate chips. Mixing them by hand prevents the mixer from breaking the chips or overworking the gluten in the flour.
5. Roll and Chill (The Secret Step!)
Place your dough between two sheets of parchment paper. Roll it out to 1/4 inch thickness.
Pro Tip: I highly recommend the Joseph Joseph Adjustable Rolling Pin. It has removable rings on the ends that act as guides, ensuring your dough is perfectly level from edge to edge.
Once rolled, slide the whole sheet (parchment and all) into the fridge for at least 30 minutes.
6. Cut and Bake
Once the dough is hard to the touch, cut your shapes. Place them on a light-colored baking sheet. Crucial Tip: Put the tray of cutouts back in the fridge for 10 minutes while the oven finishes preheating. This “double-chill” method is why these cookies don’t spread!
Bake at 375°F for 7-9 minutes. You want to pull them out before the edges turn brown for that ultra-soft finish.
Expert Tips for Best Results
- Use Light-Colored Pans: Dark baking sheets absorb more heat and can cause the bottoms of your cookies to burn before the centers are set.
- Room Temp Eggs: To ensure a smooth emulsion, soak your cold eggs in a bowl of warm water for 5 minutes before cracking them.
- The “Non-Greasy” Test: If the dough leaves a film of butter on your hands, add more flour. This is the best indicator that the cookies will hold their shape.
- Don’t Overwork the Dough: When you re-roll the scraps, do it gently. The more you handle the dough, the tougher the cookies become.
Variations and Substitutions
- Holiday Spice: Add 1 tsp of cinnamon and 1/4 tsp of nutmeg for a “snickerdoodle-chip” vibe.
- Almond Twist: Swap half of the vanilla extract for almond extract for a professional bakery flavor profile.
- Gluten-Free: You can use a high-quality 1:1 gluten-free baking flour (like King Arthur or Bob’s Red Mill). The texture will be slightly different, but still delicious.
- Dairy-Free: Use a high-quality vegan butter stick (like Miyoko’s) and dairy-free mini chips.
Storage and Freezing
To Store: Keep baked cookies in an airtight container at room temperature for up to 5 days.
To Freeze (Dough): You can freeze the rolled-out sheets of dough for up to 3 months. Just wrap them tightly in plastic wrap. You can cut and bake directly from frozen (just add 1-2 minutes to the bake time).
To Freeze (Baked): Once completely cool, layer the cookies in a freezer-safe container with parchment paper between layers. They stay fresh for up to 2 months.
FAQ
Can I use regular chocolate chips?
I don’t recommend it for cut-outs. The large chips will get caught under the cookie cutter, causing the dough to tear or the shapes to become distorted.
Why did my cookies spread?
Usually, this happens if the butter was too warm or the dough wasn’t chilled long enough. Make sure the cut shapes are cold when they go into the oven!
Do I need to frost these?
They are delicious plain because of the chocolate chips, but a light drizzle of royal icing or a dip in melted chocolate makes them extra special.
Happy Baking!
These Soft Cut-Out Chocolate Chip Cookies are truly the best of both worlds. They offer the creative fun of a sugar cookie with the undeniable satisfaction of a chocolate chip cookie. Whether you’re baking for a school party or just a cozy Sunday at home, this recipe is sure to become a staple in your kitchen.
If you make these, tag me on Instagram or pin this recipe to your “Baking Inspiration” board on Pinterest!
PrintThe Best Soft Cut-Out Chocolate Chip Cookies
The ultimate soft cut-out chocolate chip cookies! This recipe combines the buttery texture of a sugar cookie with the classic flavor of chocolate chips, all while holding its shape perfectly for any cookie cutter.
Ingredients
1 cup (two sticks) unsalted butter, softened
1 cup packed brown sugar (light or dark)
½ cup granulated sugar
2 eggs
1 tbsp vanilla extract
1 tsp salt
1 tsp baking powder
3 ½ cups all-purpose flour
1 cup mini semi-sweet chocolate chips
Instructions
1. Preheat oven to 375 degrees F.
2. In a mixer, cream together butter and the two sugars. Mix until fluffy and well incorporated.
3. Add eggs, salt, vanilla extract, and baking powder and beat until well mixed.
4. Add flour a cupful at a time. If the dough is still sticky, add an extra 1/4 cup of flour until non-greasy to the touch.
5. With a hand spatula, fold in the mini chocolate chips.
6. Roll to 1/4 inch thickness between two sheets of parchment paper. Chill the dough for at least 30 minutes.
7. Cut out shapes and place them on a parchment paper-lined baking sheet. Chill the cutout shapes again before baking.
8. Bake at 375 degrees for 7-9 minutes. Remove before the edges turn brown.
9. Cool on the baking sheet for 10 minutes, then move to a cooling rack.
Notes
Use a Joseph Joseph rolling pin for perfectly even 1/4 inch thickness.
Mini chips are essential; regular chips will make cutting shapes difficult.
Do not overbake! They should look soft when pulled out.


