Peppermint Swirl Sugar Cookies
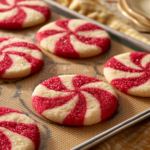
These delightful peppermint swirl sugar cookies are soft, chewy, and surprisingly easy to make, even for beginners!
- Prep Time: 30
- Cook Time: 13
- Total Time: 73
- Yield: 24 cookies 1x
- Category: Dessert
- Method: Baking
- Cuisine: American
Ingredients
Scale
- 1 cup unsalted butter, room temperature 226g
- 1 3/4 cups granulated sugar 350g
- 1 large egg + 1 large egg yolk 80g
- 1 1/2 tsp peppermint or almond extract – optional 8g
- 1 tsp vanilla extract or vanilla bean paste 5g
- 2 1/2 cups all purpose flour 325g
- 1 Tbsp cornstarch 8g
- 1 tsp fine salt 6g
- 1/2 tsp baking soda 3g
- Red gel food coloring
- 1 cup granulated sugar or white sanding sugar (for coating)
Instructions
- Preheat your oven to 350°F (175°C).
- Line two large baking sheets with parchment paper or silicone baking mats.
- Set the prepared baking sheets aside.
- In a large bowl, combine the room temperature butter and 1 3/4 cups granulated sugar.
- Using a hand mixer or stand mixer with a paddle attachment, beat the butter and sugar at medium-high speed for a couple of minutes until light and fluffy.
- Add the large egg, large egg yolk, 1 1/2 tsp peppermint or almond extract (if using), and 1 tsp vanilla extract.
- Beat at medium-high speed until all ingredients are just combined.
- Scrape down the sides and bottom of the bowl with a rubber spatula as needed.
- Add the 2 1/2 cups flour, 1 Tbsp cornstarch, 1 tsp fine salt, and 1/2 tsp baking soda to the bowl.
- Mix on low speed until the ingredients are mostly combined and the dough looks shaggy.
- Scrape down the sides and bottom of the bowl with a rubber spatula.
- Increase the speed to medium and beat for a few more seconds until all ingredients are fully combined into a soft dough.
- Split the dough into 2 equal portions (about 490g per bowl).
- Move one portion of dough to a separate large bowl.
- Add red gel food coloring to the other portion of dough.
- Begin mixing the red dough with a spatula.
- Knead the red dough with your hands until the color is evenly distributed.
- Use a teaspoon to scoop out teaspoon-sized portions of the white dough and roll them into small balls.
- Set the white dough balls aside.
- Use a teaspoon to scoop out teaspoon-sized portions of the red dough and roll them into small balls.
- Set the red dough balls aside.
- Take three red dough balls and three white dough balls (six balls total).
- Arrange the six dough balls in a small circle, alternating colors (red, white, red, white, etc.).
- Use your fingers to gently press the different colors together to close any gaps in the middle.
- Cup your hand around the pressed dough to round out the edges of the cookie.
- Gently use your forefinger to push the stripes of color in the same direction to create a swirled look.
- Repeat this process with the remaining dough until you have about 24 cookies.
- If desired, pour 1 cup of granulated sugar or sanding sugar into a small bowl.
- Toss each cookie dough ball in the sugar until it is fully coated.
- Chill the prepared cookies in the fridge for 30 minutes, or in the freezer for 15 minutes.
- Place the chilled cookies a few inches apart on the prepared baking sheets (about 6 cookies per tray).
- Bake one tray at a time on the middle rack of your oven for 11-13 minutes.
- Bake until the edges look set but have not started browning yet.
- Remove the tray from the oven.
- Let the cookies cool on the baking tray for 15 minutes.
- Move the cooled cookies to a wire rack to finish cooling completely.
- Store the cooled cookies in an airtight container at room temperature for up to 5 days.
Notes
Always use room temperature butter for the best texture.
Do not overmix the dough once the flour is added.
Chilling the dough is essential to prevent spreading.
Bake one tray at a time for even cooking results.
Nutrition
- Serving Size: 1 cookie
- Calories: 200
- Sugar: 15
- Sodium: 80
- Fat: 11
- Saturated Fat: 7
- Carbohydrates: 23
- Fiber: 0
- Protein: 2
- Cholesterol: 35
Find it online: https://pinchofwarmthbakes.com/peppermint-swirl-sugar-cookies/