There is a universal truth in the world of baking: the dough is almost always better than the finished cookie. We’ve all been there—standing in the kitchen with a wooden spoon, “testing” the batter just one more time before it hits the oven. But as we know, raw flour and eggs aren’t exactly on the “safe to eat” list.
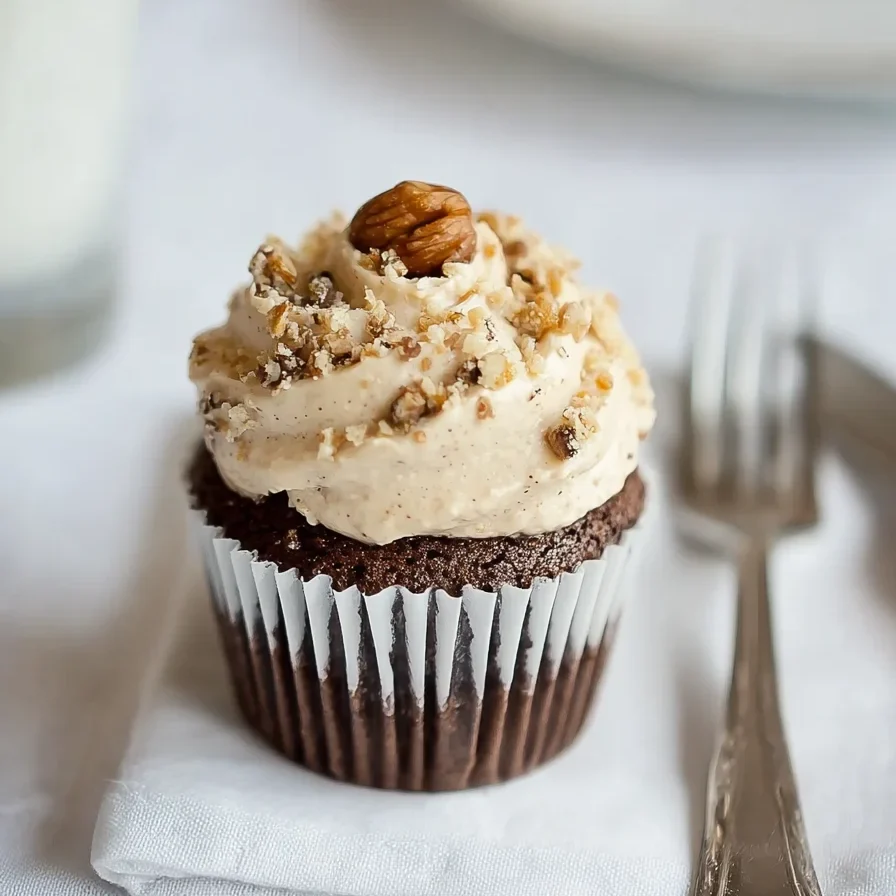
This recipe is a total game-changer. It captures that nostalgic, buttery, brown-sugar-packed flavor of raw cookie dough but transforms it into a light, fluffy frosting that is 100% safe to eat. Whether you’re piping this onto dark chocolate cupcakes, spreading it between layers of a vanilla cake, or just eating it with a spoon (no judgment here!), this is about to become your new favorite recipe.
Why You’ll Love This Recipe
- Safety First: We use heat-treated flour and zero eggs, so you can indulge without worry.
- Texture Heaven: It’s creamy enough to pipe but still has that slight “grainy” cookie dough feel we all crave.
- Quick & Easy: You can whip this up in about 15 minutes.
- Versatile: It pairs perfectly with chocolate, vanilla, or even pumpkin spice flavors.
- Crowd-Pleaser: Perfect for birthday parties, bake sales, or a cozy weekend treat.
Ingredient Notes: What Makes It Taste Like Real Dough?
To get that authentic cookie dough flavor in a frosting format, the ingredients matter. Here is what you’ll need:
- Salted Butter: I prefer salted butter for this recipe because it balances the sweetness of the sugars perfectly. Make sure it is softened to room temperature for the best emulsion.
- Brown Sugar: This is the secret ingredient! Most frostings use only powdered sugar, but the molasses in brown sugar provides that unmistakable “cookie” depth.
- Heat-Treated Flour: Raw flour can carry bacteria, so we microwave it to 160°F to make it safe. It also adds the structure needed for that doughy texture.
- Heavy Cream: This thins the frosting out into a spreadable consistency while adding a luxurious richness.
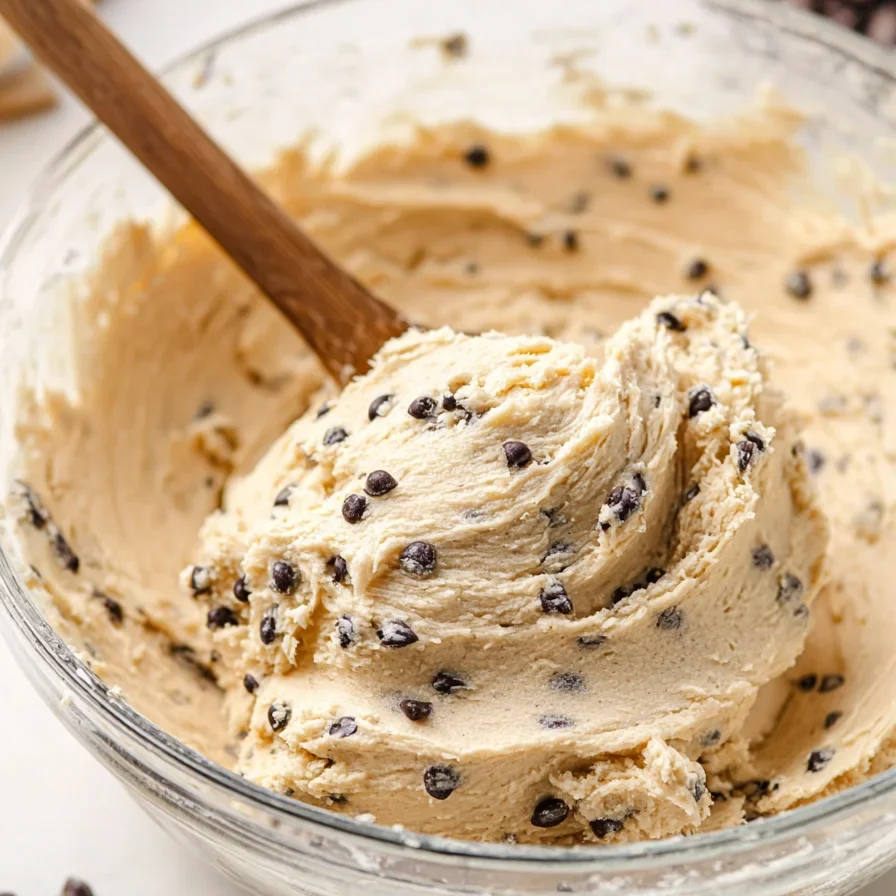
- Mini Chocolate Chips: Regular chips are a bit too chunky for frosting. Mini chips distribute better and won’t clog your piping tips if you decide to pipe swirls!
Step-by-Step Instructions
1. Heat Treat the Flour
Before you do anything else, you must make the flour safe. Place your all-purpose flour in a microwave-safe bowl. Heat it for about 45 seconds. The most important part? Use an instant-read thermometer to ensure it reaches 160°F (71°C). This kills any potential pathogens. Let it cool completely before adding it to the butter, or you’ll melt your frosting!
2. The 5-Minute Creaming Secret
In your stand mixer fitted with the whisk attachment, combine the softened butter and brown sugar. Now, here is the pro tip: mix it for at least 5 minutes. This allows the brown sugar granules to partially dissolve into the butter, creating a fluffy, stable base.
3. Build the Flavor
Scrape down the sides of the bowl to ensure everything is incorporated. Add your vanilla extract and mix again. The vanilla acts as the bridge between the sugar and the cream.
4. Incorporate the Dry Ingredients
Turn the mixer to low and add in your cooled, heat-treated flour and salt. Mix until the flour is fully incorporated. At this stage, it will look quite thick—almost like actual cookie dough!
5. Cream and Sugar
Add about half of your heavy cream and mix. Then, add the powdered sugar. As the powdered sugar begins to blend in, pour in the remaining heavy cream. Crank the speed up to medium-high and whip until the frosting is smooth and light.
6. The Finishing Touch
Finally, fold in your mini chocolate chips with a spatula. Avoid using the mixer for this part so you don’t break the chips or turn your frosting a muddy grey color.
Expert Tips for Best Results
- Don’t Rush the Butter: If your butter is too cold, you’ll get lumps. If it’s melted, the frosting won’t hold its shape. Room temperature is “the goldilocks zone.”
- Sift the Flour: After heat-treating, flour can sometimes clump. Sift it through a fine-mesh strainer before adding it to the mixer for a perfectly smooth result.
- Adjust Consistency: If you want a stiffer frosting for piping high swirls, use a little less heavy cream. If you want a soft spread for brownies, add an extra tablespoon of cream.
- Salt is Key: Don’t skip the salt! It cuts through the sugar and highlights the butter and vanilla notes.
Variations and Substitutions
- Gluten-Free: You can swap the all-purpose flour for a 1:1 gluten-free baking blend. You still need to heat-treat it!
- Vegan Version: Use a high-quality vegan butter stick and coconut cream or almond milk in place of the heavy cream.
- Peanut Butter Twist: Swap 1/4 cup of the butter for 1/4 cup of creamy peanut butter for a PB-cookie dough vibe.
- Double Chocolate: Add 2 tablespoons of cocoa powder along with the powdered sugar.
Storage and Freezing
In the Fridge: This frosting contains dairy, so it should be stored in an airtight container in the refrigerator. It will stay fresh for up to 5 days. Before using it, let it sit on the counter for 30 minutes and give it a quick whip with a hand mixer to restore the fluffiness.
In the Freezer: You can freeze this frosting for up to 3 months! Thaw it overnight in the fridge and then bring it to room temperature before using.
FAQ
Is it safe to eat raw flour?
Raw flour is considered a “raw food” that hasn’t been treated to kill germs like E. coli. By heat-treating it to 160°F, you make it perfectly safe for no-bake recipes like this one.
Can I use regular chocolate chips?
You can, but they are heavy and tend to sink or make the frosting look lumpy. Mini chips provide the best “mouthfeel” and look much more professional on a cupcake.
Does this frosting crust?
Because of the heavy cream and brown sugar content, this frosting stays relatively soft. It won’t “crust” as hard as a traditional American buttercream, so it’s not ideal for intricate floral piping, but it’s perfect for standard swirls.
Final Thoughts
This Chocolate Chip Cookie Dough Frosting is the ultimate nostalgia trip. It’s rich, buttery, and packed with enough chocolate to satisfy any sweet tooth. It transforms a standard box-mix cake into a gourmet dessert that will have everyone asking for the recipe.
If you make this, be sure to tag me on Instagram or save it to your “Dessert Goals” board on Pinterest! Happy baking (and dough-eating)!
PrintThe Ultimate Chocolate Chip Cookie Dough Frosting (Safe & Creamy!)
The ultimate Chocolate Chip Cookie Dough Frosting! This recipe is safe to eat, incredibly creamy, and tastes just like your favorite childhood treat.
- Prep Time: 10
- Cook Time: 5
- Total Time: 15
- Yield: 2 cups
- Category: Dessert
- Method: Mixing
- Cuisine: American
Ingredients
1/2 cup salted butter (softened)
1/2 cup brown sugar
1 tsp vanilla
1 cup all purpose flour (heat treated)
1/2 tsp salt
1/3 cup heavy cream
1 cup powdered sugar
1/2 cup mini chocolate chips
Instructions
1. Heat treat the flour in the microwave for 45 seconds until it reaches 160°F.
2. Cream the butter and brown sugar for a full 5 minutes until light and fluffy.
3. Mix in the vanilla extract.
4. Incorporate the heat-treated flour and salt.
5. Add half of the heavy cream and mix well.
6. Add powdered sugar and the remaining heavy cream, mixing until smooth.
7. Fold in mini chocolate chips by hand.
Notes
Ensure the flour is cooled before adding to the butter mixture.
Use mini chocolate chips so they can easily pass through a piping tip.
Store in an airtight container in the fridge for up to 5 days.